Reset Utility
The Reset Utility is the recommended tool designed to restore your Desktop Connector installation to its default state. This can help resolve syncing issues, crashes, or other unexpected behaviors. Resetting removes local cache and settings but does not delete cloud data. You can also use the Reset Utility to properly uninstall Desktop Connector if you're experiencing persistent issues.
What the Reset Utility does
- Clears local cache files and resets settings
- Removes locally stored project data
- Removes the Change Workspace location when set using the command in the home screen gear menu
- Does not remove Change Workspace location when set by the ADMIN in registry
- Does not delete any data stored in the cloud
- After resetting, you will need to reselect your projects
When to use the Reset Utility
The Reset Utility is designed for two main scenarios:
Primary use: Troubleshooting Desktop Connector or upgrading to a new version
For most users resolving sync issues or upgrading Desktop Connector, the Reset Utility alone is sufficient. This is the recommended approach because it:
- Automatically handles the technical cleanup required
- Reduces risk of user error
- Provides a cleaner, simpler experience
- Preserves cloud data while resetting local settings
When to use the Reset Utility for upgrades:
- Forma connector from 15.x → upgrading to 16.x or 17.x
- Fusion connector from 15.x or 16.x → upgrading to 17.x
Secondary use: Complete removal of Desktop Connector
If you're permanently removing Desktop Connector and won't be reinstalling it, follow the standard uninstall process: Run Reset Utility → Uninstall. Starting with version 17.1, the Reset Utility will automatically close Desktop Connector if it's running. The Reset Utility is the recommended approach for uninstalling Desktop Connector. For complete cleanup if the Reset Utility fails, refer to the IT Administrator Reset Tools section below.
Before using the Reset Utility
Try these troubleshooting steps first:
- Review the Troubleshooting Guide for known issues and solutions.
- Collect diagnostic logs using the Collecting Diagnostic Logs process.
- Back up any unsynced files outside your Desktop Connector workspace.
- Submit diagnostic logs to Autodesk for further assistance.
- Try removing then re-adding your projects from the Desktop Connector Home Screen. See Add or Remove Projects for details.
- Check your internet connection.
If these steps don't resolve your issue, proceed with the Reset Utility.
Reset Utility Video Tutorial
The following video ![]() provides a guide on how to reset the Desktop Connector, but please note that some information may be outdated. Always refer to the current written content on this page for the most up-to-date instructions and features. Keep in mind that there might be additional information in the subsequent text that is not covered in the video. We recommend going through the listed steps after watching the video for a complete understanding.
provides a guide on how to reset the Desktop Connector, but please note that some information may be outdated. Always refer to the current written content on this page for the most up-to-date instructions and features. Keep in mind that there might be additional information in the subsequent text that is not covered in the video. We recommend going through the listed steps after watching the video for a complete understanding.
Steps to Run the Reset Utility
Before Running the Utility
Confirm that there are no changes made locally that have not been synced to the cloud.- If you have any unsynced changes, you can identify them by running the Troubleshooter. See Troubleshooter guide for more information.
- You can also check for unsynced data by referring to Collecting and Viewing Sync Data in Desktop Connector.
Locate the Utility
The Reset Utility was updated on December 8, 2025 with new preflight checks and more thorough cleanup. This version is included automatically in Desktop Connector v17.0.2 and later.
Open File Explorer and navigate to the Reset Utility location:
Desktop Connector v17.0.2 or later: The Reset Utility is included with your installation at:
C:\Program Files\Autodesk\Desktop Connector\Reset\ResetDesktopConnector.exe
Desktop Connector pre-17.0.2 (v15.x, v16.x, v17.0, v17.0.1): Download the updated Reset Utility instead of using the version included with your installation: DC Reset Utility
Run the Utility
Double-click the utility and follow the on-screen instructions. You will see three options:Reset Desktop Connector: The main command that will reset the installation back to a clean state.
Open Online Help: Opens the help page for all content including an instructional video on how to use the tool.
Cancel: Exits the utility.

Follow Prompts
- Confirm you've backed up unsynced files.
Get verification
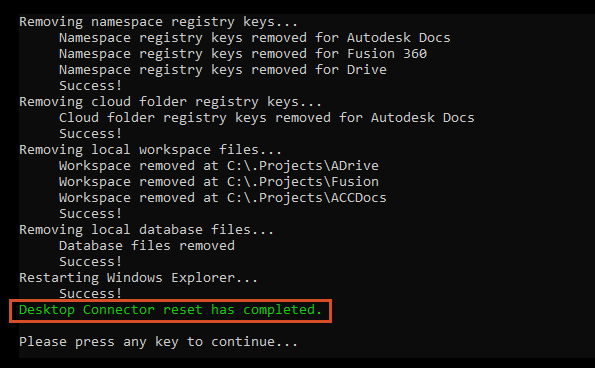
Once the utility has completed the process, you will get verification that your workspace has been reset to default settings. Important: Verify that you see the green success message.
Restart Desktop Connector
After the reset is complete, restart Desktop Connector and reselect your projects.
If the Reset Utility Doesn't Resolve Your Issue
The Reset Utility is sufficient for most scenarios. However, if you continue to experience issues after running the Reset Utility, or if you're permanently removing Desktop Connector from your system, you may need additional cleanup steps.
In rare cases where the Reset Utility doesn't fully resolve your issue, refer to the manual cleanup steps in the IT Administrator Reset Tools section below. These manual steps should only be used when the automated Reset Utility has not worked.
Understanding Deletions: Recycle Bin and Cloud Workflows
When you remove files or folders in Desktop Connector, the way deletions are handled depends on whether the files are synced, cloud-only, or local-only. For a full explanation of deletion workflows and recovery options, see Recover Deletions.
Command Line Parameters
| Command | Command Switch | Description |
| Help | -h | Displays help page to the user |
| Promptless | -p | Skips displaying user prompts and moves straight to reset logic |
IT Administrator Reset Tools (manual fallback)
While the Reset Utility for Desktop Connector is the recommended approach and resolves most issues, these manual steps are provided as a fallback option if the Reset Utility doesn't work or for advanced troubleshooting scenarios.
Expand this Section for more Details
- Review the Troubleshooting Guide for known problems and solutions.
- Collect Diagnostic Logs through the Collecting Diagnostics Logs process.
- Back up any unsynced files outside your Desktop Connector Workspace.
- Submit the diagnostic logs to Autodesk.
- Add and Remove your projects from the Desktop Connector Home Screen.
The following steps will only remove files from the local machine and will not delete data in the cloud. Confirm that there are no changes made locally that haven't been synced to the cloud before following these steps.
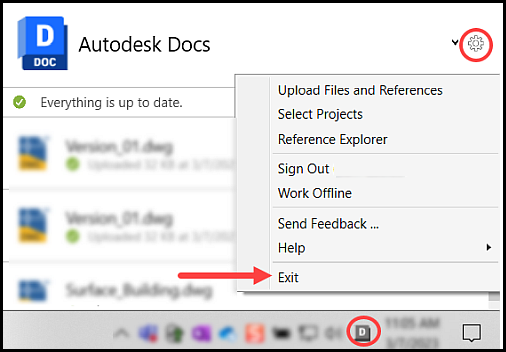
Exit Desktop Connector:
- Right-click the Desktop Connector icon in the status tray.
- Select the gear icon
 in the upper right corner.
 - Select Exit to close the program.
- Right-click the Desktop Connector icon
In File Explorer, navigate to the cleanup utility tool by going to this location.
C:\Program Files\Autodesk\Desktop Connector\ShellCleanup.exe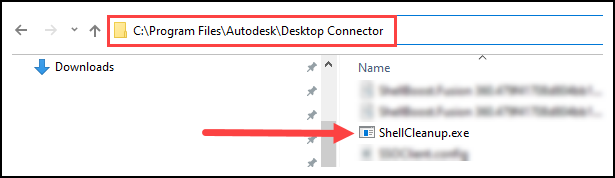
Double-click to run the ShellCleanup.exe script to unregister the Desktop Connector drive.
- Running the shell cleanup script will remove the Forma, Fusion, and Drive connectors from File Explorer.
- The connectors will appear again the next time the Desktop Connector is started.
Important: Running the ShellCleanup tool will only work if logged in as a Windows user (it does not support SYSTEM account).In File Explorer, navigate to the following folder as shown and delete any of the following Desktop Connector workspace cache locations if they exist:
Important: Confirm that there are no changes made locally which haven't been synced to the cloud before deleting the workspace. If you suspect that new data or edits to data on the local machine have not been uploaded you should move/copy the data before deleting the workspace.- %userprofile%\DC\ACCDocs. - %userprofile%\DC\Fusion. - %userprofile%\DC\ADrive. - %userprofile%\ACCDocs. - %userprofile%\Fusion - %userprofile%\ADrive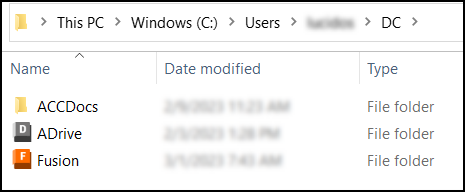
Manually delete existing Desktop Connector databases found at the path shown. Delete the entire "Data" folder to remove local databases.
C:\Users\<username>\AppData\Local\Autodesk\Desktop Connector\DataDelete the folders or folders that start with "DesktopConnector.Applicat_Url_" found at this path.
C:\Users\<username>\AppData\Local\Autodesk\DesktopConnector.Applicat_Url_xxxxxx)Use the Microsoft® Registry Editor at your own risk. Remember to back up the registry, system.dat, and user.dat files as guided in the Microsoft Knowledge Base.
Restart Desktop Connector
A. Type Desktop in Windows Search bar.
B. Select Autodesk Desktop Connector.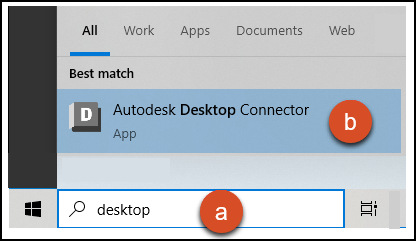
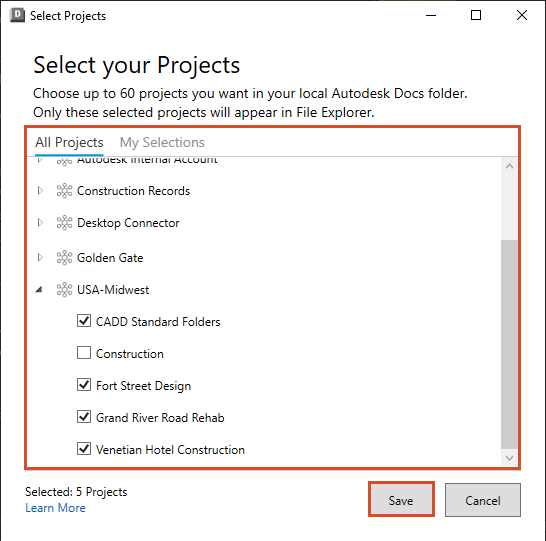
Go to Select Projects to reselect your projects.
Select your projects and Save the dialog box.
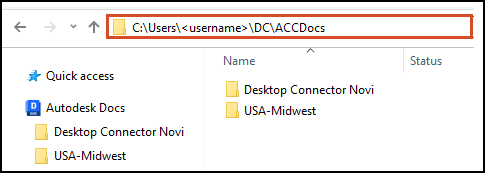
Open File Explorer and navigate to %userprofile%. You should now see the projects that you selected in the following location: %userprofile%\DC\ACCDocs.
Related Concepts: