Activity 3: Rough out the three pockets
In this activity, you rough out the three pockets with an Adaptive Clearing Strategy. This strategy is commonly used for pocketing out large areas. Because of the way Adaptive Clearing calculates toolpaths, it's very efficient for odd shaped pockets with sharp corners. Adaptive Clearing is the right toolpath to use for removing large amounts of material quickly.

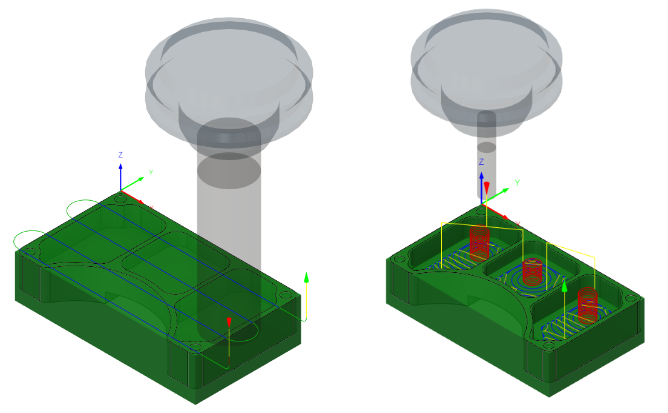
Before, showing the Face toolpath applied along the top of the part (left). After, showing the 2D Adaptive Clearing toolpath applied in the three pockets (right).
Prerequisites
- Activity 2 is complete.
Steps
Select the 1 – Ø1/4" (Flat end mill) tool from the Tool library for this roughing operation.
On the Manufacture toolbar, Milling tab, select 2D > 2D Adaptive Clearing
 .
.On the Tool tab, click Select to access the tool library
 .
.From the All > Documents > 2D Adaptive Milling Tutorial v1 document, select 1 – Ø1/4" (Flat end mill).
Click OK to select the tool and close the dialog.
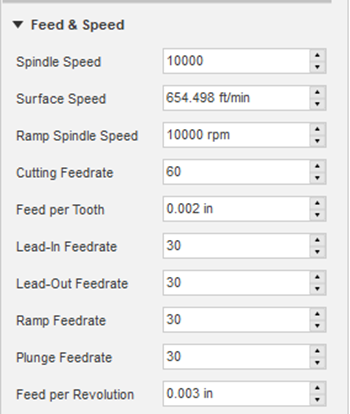
Increase both the tool Spindle Speed and the Ramp Spindle Speed to 10000 rpm.
In the 2D Adaptive dialog, set the Spindle Speed to 10000 rpm.
Set the Ramp Spindle Speed to 10000 rpm.
Increase the Cutting Feedrate to 60 in/min, the Lead-in Feedrate, Lead-out Feedrate, Ramp Feedrate, and Plunge Feedrate to 30 in/min, and set the Cutting Feed Per Revolution to 0.003 in.
In the same 2D Adaptive dialog, set the Cutting Feedrate to 60 in/min.
Set the Lead-In Feedrate to 30 in/min.
Set the Lead-Out Feedrate to 30 in/min.
Set the Ramp Feedrate to 30 in/min.
Set the Plunge Feedrate to 30 in/min.
Note: The Cutting Feed Per Revolution changes to 0.003 in, automatically.
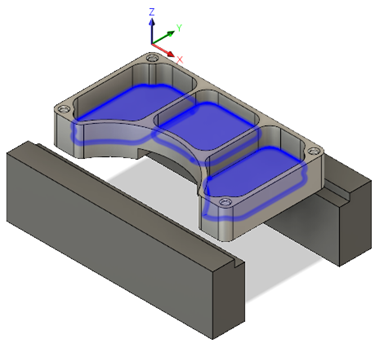
Select the three faces at the bottom of the pockets to which to apply the 2D Adaptive Clearing toolpath. These represent the boundary limit for machining, and also the final depth of the cut.
Click the Geometry tab
 .
.Ensure Pocket Selections is active so that you can select the three faces at the bottom of the pockets.

Do not close the 2D Adaptive command palette. Instead, proceed to the next step.
Set the No-Engagement Feedrate to 60 in/min and create the toolpath. The No-engagement Feedrate is the feed rate used when the tool is not in engagement on the material but has not been retracted.
Click the Linking tab
 .
.Set the No-Engagement Feedrate to 60 in/min.
Click OK to create the toolpath.
Activity 3 summary
In this activity, you selected a tool and applied a 2D Adaptive Clearing toolpath in the three pockets of the part.

Before, showing the Face toolpath applied along the top of the part (left). After, showing the 2D Adaptive Clearing toolpath applied in the three pockets (right).