Generate a Drill toolpath
On the Manufacture workspace toolbar, click Milling > Drilling > Drill.
The Drill dialog opens.
On the Tool tab, click Select to pick a tool. In the left panel of the dialog, from the Fusion Library, pick a tool from the Sample Tools library.
Tip: Drills, Center Drills and Spot Drills are most commonly used for hole making operations.Note: For multi-axis drilling, it is recommended to select Use Flute in Flute, Shaft & Holder group.(Optional) On the Multi-Axis tab, in the Machining Type group, select a machining type. You can choose 4-axis or 5-axis machining.
- 4-axis: Define a rotary axis. Holes are generally perpendicular to this axis.
- 5-axis: Enables full 5-axis drilling. You can define axis limits and apply minimum and maximum tilt angles relative to the tool axis.
On the Geometry tab, you can select the hole locations by picking cylindrical hole faces from the model, hole edges, sketch geometry, and points.
For 4-axis machining, you can select holes that are not aligned with the Z-axis, such as angled holes or holes on a sloped surface:
- Specify whether hole axes must intersect the rotary axis, in cases like holes on a cylinder.
- Allow hole axes to shift in the perpendicular plane, in cases like holes on a cuboid.
- Set a tilt angle to tilt holes away from the perpendicular plane.
For 5-axis machining, you can select complex hole geometries that require the tool to tilt to access certain areas.
Note: Point selection depends on the hole's axis being defined by the toolpath settings. Because of this, point selection isn't available for 4-axis and 5-axis toolpaths.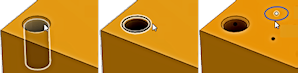
Optional steps:
To select holes of the same size, enable the Select Same Diameter parameter.
To select drill holes of the same depth first, enable the Order by Depth parameter.
For 4-axis and 5-axis machining, fix through-hole direction by clicking the white arrow on through hole on the canvas. Tool machines the hole from that side and shows a green arrow when the direction is fixed. Use Reset Directions to restore all holes to default directions.
On the Heights tab, set the Bottom Height if the geometry selection is based on hole edges or sketch geometry. If Faces were selected, Fusion recognizes the Hole Bottom automatically from the model data.
On the Passes tab, adjust any cycle specific parameters as needed for your operation.
On the Cycle tab, select the Cycle Type based on the type of hole being created.
Note: When using 4-axis or 5-axis machining, toolpaths are generated as detailed movements (expanded paths) instead of simplified canned cycles. Because of this, operations like threading, tapping, and back boring aren't yet supported in multi-axis mode.Click OK.
The toolpath is generated based on the selected machining type and geometry.
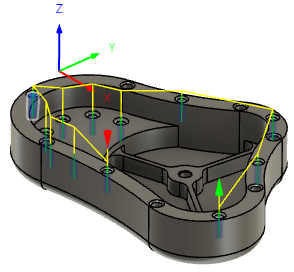
3-axis Drilling toolpath.
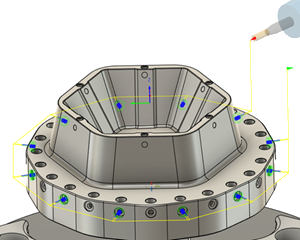
Multi-axis Drilling toolpath.