Fill a build volume with components
Ensure that you have an additive setup with an additive machine selected.
On the Manufacture workspace toolbar, click Additive > Modify > Fill Build Volume
 .
.The Fill Build Volume dialog opens.
By default, all the components in the setup are automatically selected. If you want to change the selection, on the canvas, click the components to select or deselect them.
Choose a Filling Type to determine the way Fusion uses the available space within the build volume:
- 2D Fill (Bounding Box) arranges copies in a single layer on the surface of the build platform. The component's bounding box is taken as a measure of space required for each copy.
- 3D Fill (Bounding Box) arranges copies within the entire volume of the build. The component's bounding box is taken as a measure of space required for each copy. Use this option to reach a quick and rough 3D arrangement.
- 3D Fill (True Shape) arranges copies anywhere within the build volume. The actual shape of the component is used to measure its space requirements. Use this option to optimize the use of space to fit more copies of the component in a single build.
Enter a Platform Clearance to set the distance between the copies of the component and the build platform.
Enter a Frame Width to set the distance between the copies of the component and the edge of the build volume.
Enter a Ceiling Clearance to set the distance between the tops of the copies of the component and the top of the build volume.
Enter an Object Spacing to set the minimum distance between the copies of the component and between the copies and any existing components.
If you selected the Filling Type of 3D Fill (Bounding Box) or 3D Fill (True Shape), enter a Voxel Size to set the smallest unit (voxel) used in spacing calculations. Smaller voxel sizes result in more precise spacing.
(Optional) To restrict the number of copies of the selected component, select the Limit Number of Copies checkbox, then enter a multiplier for the Copies.
(Optional) If you selected the Filling Type of 3D Fill (True Shape), select the Rotation checkbox and adjust the settings to control how the copies can rotate within the build arrangement.
Click OK.
Copies of the component fill the build volume. The copies of the component are added to the manufacturing model.
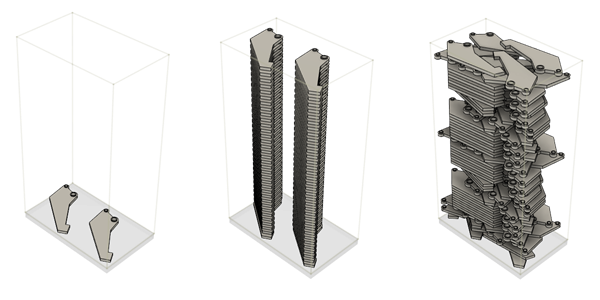
Example of components filling a build volume in in 2D (left), 3D (Bounding Box) (center), and 3D (True Shape) with Rotations checkbox selected and X, Y and Z rotations set to Custom: 20 degrees (right).