Activity 1: Restore synchronization between two designs
In this activity, you restore synchronization between Schematic and PCB in the Tubescreamer Electronics Design.
Prerequisites
- Data file location: Electronics Samples > Synchronizer Tutorial.
Steps
Click Show Data Panel
 , if necessary, and navigate to Samples > Electronics Samples > Synchronizer Tutorial, right-click Tubescreamer C Electronics Design, then click Open.
 See that the companion documents for Tubescreamer C schematic and board also open. Click Tubescream C Board tab and see on the top of the canvas message about Schematic and PCB sync deactivated.
Go back to Tubescreamer C Electronics Design and click File
 > Save As, then click the Location arrow and select New Folder.
Provide a descriptive name for the folder, then click Save. This action saves one of the three Tubescreamer designs.
Two other Tubescreamer designs should be saved automatically in created folder with both names as Tubescreamer C Electronics Design. Rename them.
- Right-click schematic and click Rename from context menu.
- Enter Tubescreamer C Schematic.
- Right-click 2D PCB and click Rename from context menu.
- Enter Tuberscreamer C Board.
Click the Tubescream C Schematic tab.
Click Validate > Validate > Synchronize
 .
.Tubescreamer C Schematic shows as the Source in the left column, and Tubescreamer C Board as the Target in the right column of the Synchronizer dialog.
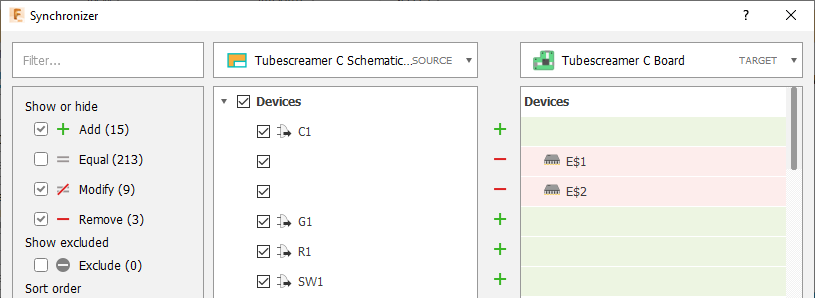 Note: Between the two columns you can see:
- Green plus signs indicate components and nets missing from the target that will be added during synchronization.
- Red minus signs indicate that components added to the board that will be removed by synchronization.
- Not-equal signs show components and nets modified in the target that will be restored to their original state if synchronized.
Once you have verified the proposed synchronization changes, click Run in the Synchronizer to apply them to the board.
Note: You might need to run the synchronization multiple times to apply all the changes. Eventually, running the Synchronizer from the schematic design should show no further changes needed, or only minor manual corrections.
Activity 1 summary
In this activity, you restored synchronization between the Tubescreamer C Schematic and Tubescreamer C Board designs.