Activity 3: Apply structural constraints
In this activity you fully constrain the rigid body Base plate. You then constrain the top face of the Top plate that pushes down on the billet, so it does not move in the X- and Z- directions. Since it is a quarter symmetry model, you also apply constraints to the two 'inside' vertical faces of the billet and Top plate, one in the X-direction and one in the Z-direction.
Apply a fixed constraint to the rigid body Base plate in all 6 degrees of freedom.
Apply fixed constraints to the vertical faces of the Billet and Top Plate in the X-direction, as they would otherwise be on the inside of a full model.
Apply fixed constraints to the vertical faces of the Billet and Top Plate in the Z-direction, as these faces represent a plane of symmetry across which the material doesn't move.
Apply fixed constraints to the top face of the Top Plate, to allow movement in only the Y-direction.
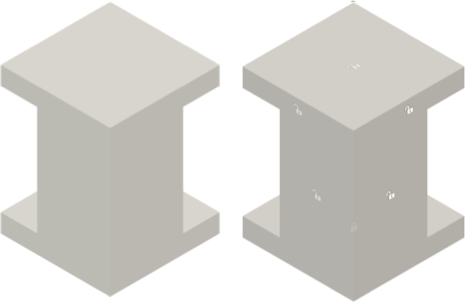
Model before applying constraints (left) and with applied constraints (right).
Prerequisites
- Activity 2 is complete.
Steps
Fully fix the rigid body in all six translational and rotational degrees of freedom.
Click
 (Simulation workspace > Setup tab > Constraints panel > Structural Constraints), to open the Structural Constraints dialog.
Confirm the constraint Type is set to Fixed.
Click the Rigid base plate to select it as the Target.
Note: Since it is a rigid body, the entire body is selected when you click any edge or face.Notice that three rotational degrees of freedom (DOF) appear in the Structural Constraints dialog in addition to the usual translational DOF. Elements belonging to rigid bodies support six DOF.
Confirm that the Ux, Uy, Uz, Rx, Ry, and Rz Axis options are all activated, as indicated by blue highlighting.
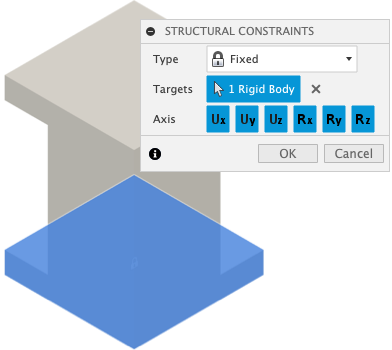
Click OK to set the constraints and close the dialog.
Optionally, click on the new constraint in the Browser to highlight it in blue, then click again to rename it, to distingush it from additional constraints you set later.

Apply a Fixed Constraint to the top face of the Top Plate, in the X- and Z-directions.
Click
 (Simulation workspace > Setup tab > Constraints panel > Structural Constraints), to open the Structural Constraints dialog.
Confirm the constraint Type is set to Fixed.
Click the top face of the Top Plate to select it as the Target.
Click on Uy to deselect it, leaving both Ux and Uz selected.
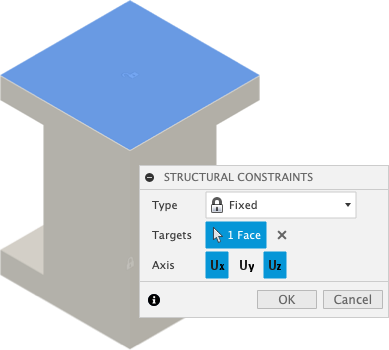
Click OK to set the constraints and close the dialog.
Optionally, click on the new constraint in the Browser to highlight it in blue, then click again to rename it, to distingush it from additional constraints you set later.

Apply a Fixed Constraints, in the X-direction, to the 'inside' vertical face on both the Top Plate and the Billet, that aligns with the Base Plate and is perpendicular to the X-axis.
Click
 (Simulation workspace > Setup tab > Constraints panel > Structural Constraints), to open the Structural Constraints dialog.
Confirm the constraint Type is set to Fixed.
Click the 'inside' vertical face of both the Top Plate and Billet that is perpendicular to the X-axis to select them as the Target.
Click on Uy and Uz to deselect them, so that only Ux is selected.
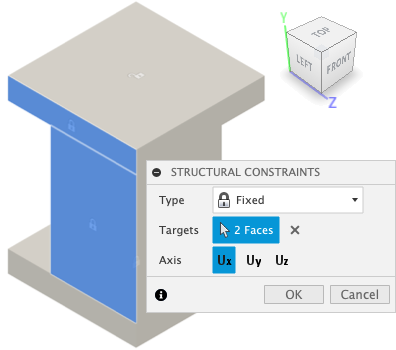
Click OK to set the constraints and close the dialog.
Optionally, click on the new constraint in the Browser to highlight it in blue, then click again to rename it, to distingush it from additional constraints you set later.

Apply a Fixed Constraints, in the Z-direction, to the 'inside' vertical face on both the Top Plate and the Billet, that aligns with the Base Plate and is perpendicular to the Z-axis.
Click
 (Simulation workspace > Setup tab > Constraints panel > Structural Constraints), to open the Structural Constraints dialog.
Confirm the constraint Type is set to Fixed.
Click the 'inside' vertical face of both the Top Plate and Billet that is perpendicular to the Z-axis to select them as the Target.
Click on Ux and Uy to deselect them, so that only Uz is selected.
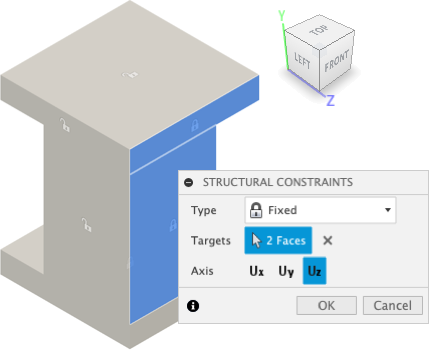
Click OK to set the constraints and close the dialog.
Optionally, click on the new constraint in the Browser to highlight it in blue, then click again to rename it, to distingush it from additional constraints you set later.
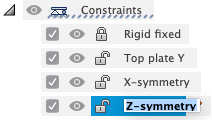
Activity 3 summary
In this activity, you
- Applied a fixed constraint to the rigid body Base Plate in all 6 degrees of freedom.
- Applied fixed constraints to the vertical faces of the Billet and Top Plate in the X-direction.
- Applied fixed constraints to the vertical faces of the Billet and Top Plate in the Z-direction.
- Applied fixed constraints to the top face of the Top Plate, in all but the Uy-direction.