Activity 3: Add dimensions
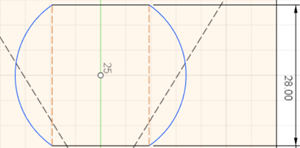
In this activity, you dimension the circle that is at the center of the sketch and you dimension the overall height and width of the wall outlet. Finally, you add 3 dimensions to the cutout that is at the top of the outlet. After all the dimensions are applied, the sketch turns from blue to black and is fully defined.
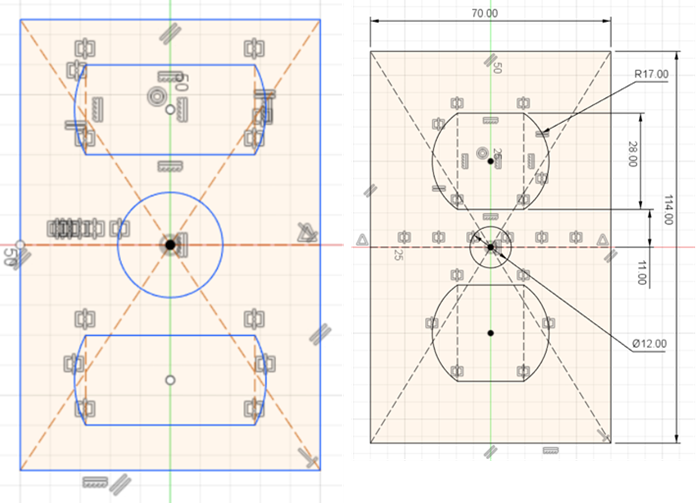
Sketch with all constraints applied to it (left). Fully defined sketch after applying dimensions to it (right).
Prerequisites
- Activity 1 is complete.
- Activity 2 is complete.
Steps
Add a concentric constraint to the two arcs on the top of the outlet cutout so they both share a center point.
If you prefer, you can hide the constraints from your view to clearly see your dimensions. Hide constraints on the canvas by deselecting Show Constraints form the Sketch Palette.
On the Sketch tab, click Create panel drop-down list > Sketch Dimension. The Sketch Dimension icon follows the cursor to show you it is active
 .Note: You can press D key on your keyboard as a shortcut to activate the Sketch Dimension tool.
Click the top edge of the outlet rectangle and specify a dimension of 70 mm.
 .
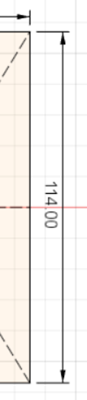
.Click the right edge of the outlet rectangle and specify a dimension of 114 mm.
 Note: Don't worry if your wall-outlet sketch changes size such that the cutouts appear larger than the outlet as you begin to add dimensions. As we add the final dimension, the sketch will look like a wall outlet.
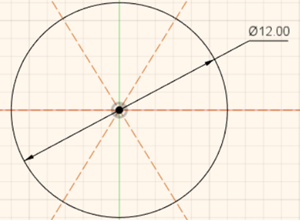
Add a diameter dimension of 12 mm to the screw hole (circle at the center of the outlet).
If necessary, on the Sketch tab, click Create panel drop-down list > Sketch Dimension. The Sketch Dimension icon follows the cursor to show you it is active
.Note: You can press D key on your keyboard as a shortcut to activate the Sketch Dimension tool.Click anywhere on the circumference of the circle and specify a diameter dimension of 12 mm.
 .
.
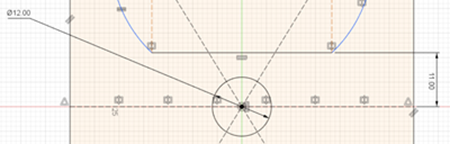
Dimension the wall cutout so that it is 11 mm away from the horizontal centerline, 28 mm in height and 17 mm in radius.
With the Sketch Dimension tool active, click the bottom edge of the top cutout then click the construction line and specify a dimension of 11 mm.
Click the top edge of the top cutout then click the bottom edge of the same cutout and specify a dimension of 28 mm.
Finally, specify a dimension of 17 mm for one of the arcs on the top cutout. You only have to dimension one of the arcs, the second arc follows the same value because of the equal constraint. In case you hadn't noticed, the bottom cutout also follows the same values because of the Mirror tool (used in Activity 1).
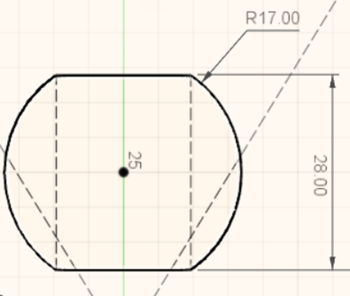
If you have followed the steps, the sketch should be fully defined (the color of all the entities turns black). If the sketch hasn't turned black, click and drag any underdefined sketch entities in the canvas to check if they are constrained.
 Note: Remember to show your constraints by selecting the Show Constraints checkbox from the Sketch Palette.
Click Finish Sketch on the Sketch Palette to complete your sketch for this tutorial.
Activity 3 summary
In this activity, you applied a dimension to the height and width of the wall outlet, then you dimensioned the circle that is at the center of the sketch. Finally, you added 3 dimensions to the cutouts. You have now fully defined the sketch after having added all the constraints and dimensions.
Sketch with all constraints applied to it (left). Fully defined sketch after applying dimensions to it (right).