Activity 2: Add constraints
In this activity, you add constraints cutout feature on the top of the wall outlet. You constrain the feature such that the arcs on either side always remain the same size as each other. The Mirror tool you used in Activity 1 creates associativity between the top half and the bottom half of the outlet, so that whatever you do to the top half is mirrored to the bottom half.
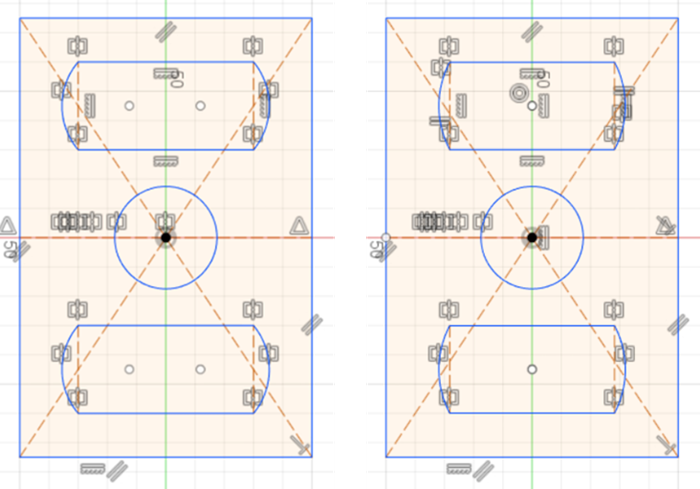
Sketch of the wall-outlet with its features (left). Sketch with all constraints applied to it (right).
Prerequisites
- Activity 1 is complete.
Steps
Add a concentric constraint to the two arcs on the top of the outlet cutout so they both share one center point.
On the Sketch tab, click Constraints panel drop-down list > Concentric. The Concentric icon follows the cursor to show it is active
 .
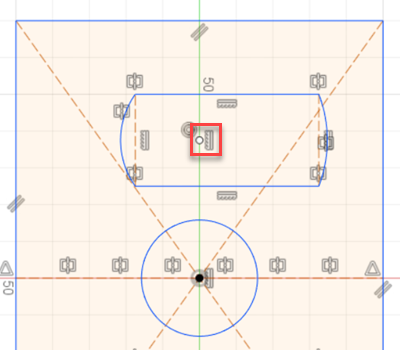
.With the concentric constraint active, click the left arc and then click the right arc.

The center point of the arc on the right moves to become concentric with the center point of the arc on the left, and the concentric constraint symbol appears
 .
.
Add a vertical constraint between the center point of the arcs and the center point of the circle so they align vertically.
On the Sketch tab, click Constraints panel drop-down list > Horizontal/Vertical. The horizontal/vertical icon follows the cursor to show it is active
 .
.With the horizontal/vertical constraint active, click the center of the circle then click the center of the arcs. The center point of the arcs moves vertically to align with the center of the circle. The vertical constraint symbol appears as highlighted in the image below.
 Note: If you click the center of the arcs first, when neither center point is constrained, and then the center of the circle, the opposite happens. The circle moves to align with the center of the arcs. The first selection is your reference, then your second selection aligns to match the reference.
Add an equal constraint between the two arcs of the cutout so they are both always the same size.
On the Sketch tab, click Constraints panel drop-down list > Equal. The Equal icon follows the cursor to let show it is active
 .
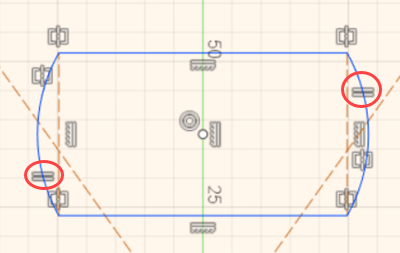
.Click the left arc and then the right arc. The arcs now become the same size. An equal constraint symbol appears on both the arcs as highlighted in the image below.
Activity 2 summary
In this activity, you added a concentric constraint to the arcs, so they share a center point. You then aligned that center point with the center point of the circle in the middle of the outlet using the horizontal/vertical constraint. You then added an equal constraint to the arcs to ensure both arcs always stay the same size.
Sketch of the wall-outlet with its features (left). Sketch with all constraints applied to it (right).