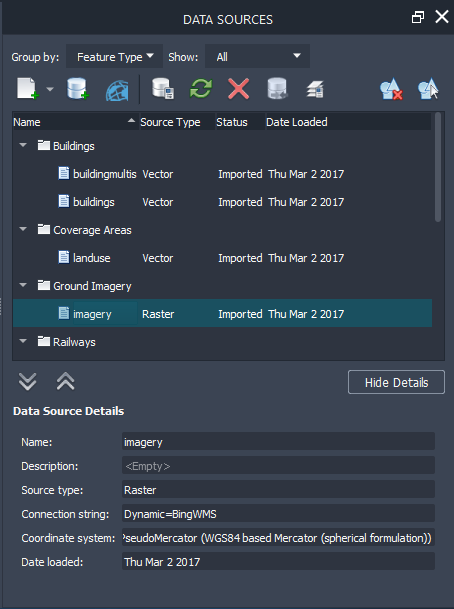
The Data Sources Panel
Use the Data Sources panel to import and configure data. You can also use the Save Back right-click command for ArcGIS data sources.
To access the Data Sources panel, click Manage ![]() Content
Content ![]()
![]() (Data Sources).
(Data Sources).

The elements in the Data Sources panel are:
Display Pulldowns

Group items by feature type or by source type. By default, all data stores are listed under their feature type, for example, all building sources appear under "Buildings." To group them by source type (vector, 3D models, and so on), switch to Source Type.

You can also filter the display of items according to whether they are configured or not. By default, all items are displayed. To filter the display, switch to the types of items you want to see.
Tool Strip
 Add File Data Source: Import datafrom file data sources.
 Add Database Data Source: Import data from database data sources.
 Add ArcGIS Data Source: Add ArcGIS data to an InfraWorks model from your ESRI ArcGIS Online or Enterprise account. See About Exchanging Data with ESRI ArcGIS.
 Configure Data Source: Configure data sources after you import them. You can also double-click the data source to configure.
 Refresh Data Source: Update the selected data source from its original data. The data for that data source in the model is replaced by the current contents of the connected data store. If you have made undesired changes, use Refresh to return to the original state of your data.
 Remove Data Source: Delete the selected data source from the model.
 Manage Paths of File Data Sources: Update the location of data sources in your model if they have moved or been renamed.
 Surface Layer Management: Features that conform directly to the terrain (terrain, coverage, water, railways, and roads) are considered "surface layers." To control the draw order of surface layers, use the arrows to move surface layers up or down in the display. You can also control the visibility of these layers.Note: This functionality is also available from the Model Explorer.
 Delete Data Source Features: Remove all features from the selected data store, while maintaining its address. To add the data back into your model, reimport from the address of the data store.
 Select Data Source Features: Select all the features in the selected data source. The model zooms to the extents of those features and highlights them.Note: If the data source is locked on the Model Explorer, you cannot use Select Data Source Features.
Data Source List — Click the headings in the list to sort in ascending or descending order. Use the
 (Expand All) and
  (Collapse All) arrows to display each data source or collapse the list to show only feature type titles. Once you collapse the list, you can expand individual feature types.
Right-click any data source to see relevant options. You can rename a data source using the right-click menu.
Details — Hide or show the details for the selected data source. The Details area includes the coordinate system and connection string for the data source. You cannot edit this information — use Configure Data Source to make changes.