Use multiple skin clusters to layer deformations, for example, creating a layer for squash and stretch, a layer for kinematic motions, and another for fine details.
When you add more than one skin cluster to geometry, the following settings appear to help you manage the clusters. This topic covers the Skin menu Hammer Skin Weights, Prune Small Weights, Go to Bind Pose, Reset Default Weights, Normalize Weights, Import Weights Maps, and Edit Influences options.
The Copy Skin Weights and Mirror Skin Weights tools have slightly different Skin Cluster settings, and include a Source and a Target cluster list. They are explained in the section that follows. The Paint Skin Weights tool multiple skin cluster section is contained within the Paint Skin Weights tool window.
- Skin Cluster
-
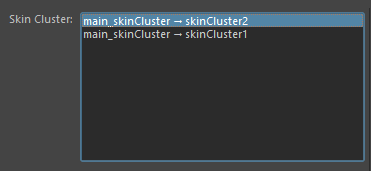
The Skin Cluster list contains all the skin clusters associated with the currently selected geometry
- The Skin Cluster area lets you select individual skin clusters on geometry that have more than one or more skin cluster applied.
-
- Skin Cluster list
- Skin clusters on the selected geometry appear here.
Note: If no skin cluster are found this list remains empty. Select geometry to update the list.
- The most recently added skin cluster appears at the top of the list.
Copy Skin weights and Mirror Skin weights Skin Cluster areas
The Copy Skin Weights and Mirror Skin Weights tools have slightly different Skin Cluster settings, with a Source and a Target cluster list to let you choose which clusters you want to copy or mirror. See Copy Smooth skin weights and Mirror Smooth skin weights.
- Skin Cluster list
-
The Skin Cluster area lets you control individual skin clusters on geometry that has more than one skin cluster applied.
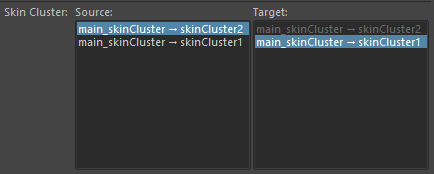
The Skin Cluster list contains a Source and Target column.
- Click geometry to update the list of skin clusters for the selected geometry, below.
- Skin Cluster list
- Skin clusters on the selected geometry appear here.
Note: If no skin cluster is selected this list remains empty. Select the geometry to update the list.
- The most recently added skin cluster appears at the top of the list.
-
- Source
- Select the skin cluster to be copied/mirrored.
- Target
- The skin cluster to which the copied/mirrored attributes apply.
Removing skin clusters from geometry

Delete clusters from geometry with multiple skin clusters
- Select the geometry.
- Open
>
 . The
Unbind Skin options appear.
. The
Unbind Skin options appear.
- Uncheck the Skin Clusters: Unbind All option. A list of the skin clusters associated with the selected geometry appears in the field below.
- Select one or
Shift-select more than one
skin clusters from the list and click
Apply.
The skin clusters are removed.