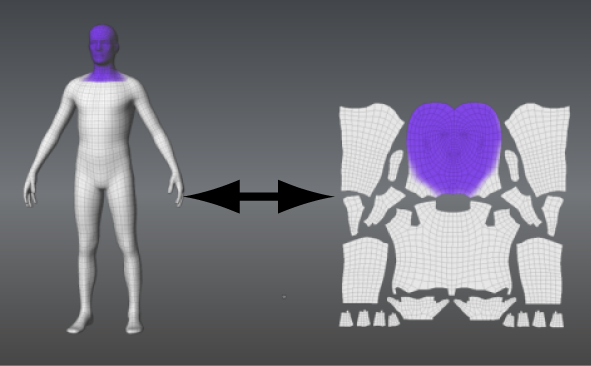
In some cases, it’s useful to paint on a flattened version of your model (as it appears in the UV View).
Flatten to UV Space (Hotkey: Alt + T) lets you paint on a flattened representation of the mesh, within the 3D View.

Flatten to UV Space creates a copy of the selected model with vertex positions that are identical to the UV texture coordinates of the original 3D model, so you can paint or edit your textures on the flattened version. The original model is temporarily invisible to let you paint on the 2D copy.
When the model is laid out flat, it’s easy to see how the painted textures correlate to the UV shells, without having to switch to the UV View.
Since all components of the model are visible in a flattened layout, you can:
- Use large brushes to quickly apply or edit paint on large regions of the model without paint bleeding onto another region, and without having to tumble around the object in the 3D View.
- Paint textures in the flattened view that would otherwise be difficult to paint in 3D. For example, painting a texture for a tread pattern on a tire, or a logo with lettering is easier to create in a flattened view.
- Use the Clone Tool to copy textured areas from one region to another that would otherwise not be possible in the 3D View because of the location on the model or the camera angle.
- Touch-up regions that were occluded from receiving paint from the Projection tool because of sculpted features on the model’s surface (such as folds and wrinkles).
You can also use Flatten to UV Space for minor repositioning of UV texture coordinates on the flattened 2D version. See Adjust UV positions in 2D.
To paint on a flattened model
- Select the model(s) that you want to paint as a flat object.
You can flatten multiple objects at once by selecting them with the Objects selection tool.
- Select UVs & Maps > Flatten to UV Space (Hotkey: Alt + T).
A flattened copy of the selected model is created with vertex positions that are identical to the UV texture coordinates on the original model. The model appears unfolded exactly like its associated UVs, generally in multiple flattened pieces.
The original 3D version of the model is temporarily invisible. By default, the flattened model appears in the same camera position as the 3D version.
 Note: If you want the flattened model to automatically appear in an orthographic view (planar to the view), turn on the Autofocus on Flatten preference located in the Focus preferences. Otherwise, the model appears flattened relative to the current camera position.
If you flatten multiple meshes at once, they may appear stacked in the 3D View. You can select and translate each mesh to separate them for painting.
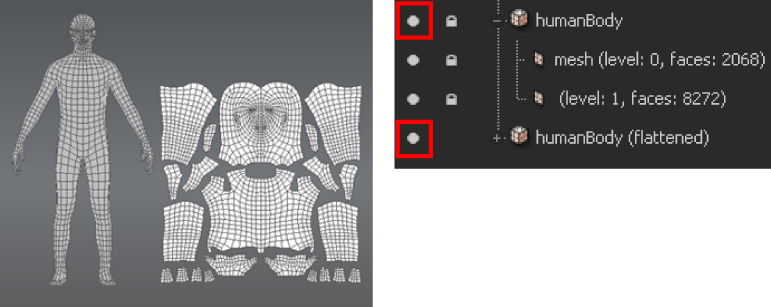
- Create a paint layer, select a Paint tool, and paint on the flattened model. Tip: Both versions of the model (3D and 2D) reference the same texture map and can be displayed and painted simultaneously in the 3D View. To display the 3D model along with the flattened version, enable the Visibility icon for the 3D version in the Object List.

Now you can paint on either version of the model and the associated texture maps update automatically.
- To display the original 3D version of the model, select UVs & Maps > Unflatten from UV Space or press Alt + T.