For task instructions, see Extract an ambient occlusion map.
Expand the following headings to find descriptions of each area in the Extract Texture Maps window.
Target Models
Displays the name of the model to receive the extracted map. The map produced will represent the difference between this model (low resolution) and the source model(s) (high resolution).
The target model is usually the lowest subdivision level of a model with multiple subdivision levels. You can click the displayed subdivision level (next to the target model name) to select a different subdivision level from a drop-down list.
Use the Add All, Add Selected, and Remove buttons to change the model listed as the target.
- Smooth Target Model
-
On by default. Uses a smoothed version of the target model (low resolution) for map extraction calculations. Turn off if you are extracting texture maps for games applications where a smoothed model is not used.
- Smooth Target UVs
-
Smooths the positions of interior UVs of the target model during the texture extraction. Smooth Target UVs only smooths when the Smooth Target Model option is on.
This can be useful if your image rendering software (for example, Arnold for Maya or Arnold for 3ds Max) can smooth the UV texture coordinates on a mesh during rendering to improve the results.
- Use Creases & Hard Edges
-
For target models with creasing or hard edge data (see Import and export objects with creasing and hard edges), lets you set how Mudbox handles the creasing information when extracting texture maps.
When on, Use Creases & Hard Edges affects the operation of other map extraction options. If you are smoothing your target mesh (Smooth Target Models is on), it ensures that the creases are maintained in the smoothed mesh. If you are using Ray Casting, it ensures that vertex normals are used to map the surface together (rather than face normals). If you are creating a normal map, it ensures that the local tangent space calculation takes the creases and edges into account, rather than interpolating smoothly over the model.
Source Models
Lists the model(s) to extract maps from. The source model (high resolution) typically contains the sculpted details to be extracted into the map(s). This model does not require UV texture coordinates.
You can click the displayed subdivision level (next to the source model name) to select a different subdivision level from a drop-down list. Use the Add All, Add Selected, and Remove buttons to change the model listed as the source
- Smooth Source Model
-
On by default. Subdivides the source model and uses the smoothed version for map extraction calculations. This option is useful for most texture extraction applications.
Output Map
- Quality
-
Determines the quality of the final ambient occlusion map based on multiple shadow maps used for the calculation. Preset values include: Fastest, Fast, Normal, Good, and Best. A higher quality setting increases the number of shadow maps, produces a higher quality map, and increases the time to generate the ambient occlusion map.
- Method
-
Determines how the source and target meshes are compared during texture extraction. Select from the following methods:
- Ray Casting
-
Extracts a texture map by recording the distance (as a pixel value) between the source and target models based on sample rays cast along the surface normals of the target surface. The number of sample rays cast depends on the texture map resolution.
Use this method when extracting maps between arbitrary meshes (meshes with differing topologies), and ensure that you manually align the models as accurately as possible before extracting. Artifacts in the resulting texture map can sometimes occur (particularly with overhanging features) that require editing afterwards.
- Subdivision
-
Extracts a texture map by recording the distance (as a pixel value) between one subdivision level and the corresponding point at a higher subdivision level on the same model. Use this method only when extracting texture maps between different subdivision levels on the same model.
The resulting texture map will contain fewer artifacts compared to the Ray Casting method, requires no setup or alignment between separate models, and performs the extraction more quickly. However, Subdivision does not capture the height differences as accurately as the Ray Casting method, particularly when vertices on the higher subdivision level have been translated off normal compared to the lower subdivision level, which can occur when using the Grab or Pinch tools.
- Choose Samples
-
(For map extraction, available only when Method is set to Ray Casting.) Controls how the extraction process matches points on the target model to points on the source model, and determines which value to record if an extraction sample intersects the high-resolution model more than once.
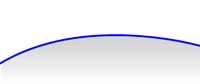
For example, given a target mesh with a relatively smooth surface (shown in cross-section in blue):
And using a source mesh with a detailed, wavy surface (shown in cross-section in black):
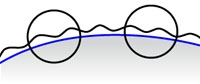
The following sections illustrate the Choose Samples options available.
- Search Distance
-
(For map extraction, available only when Method is set to Ray Casting.) Sets the maximum distance samples can travel from the target model surface in search of a corresponding point on the source model surface. Samples can travel on both sides of the target model based on the Choose Samples option.
The Search Distance is a physical measurement that determines how far Mudbox searches to find sculpted detail on the source model(s). It should be slightly larger than the distance between the maximum absolute displacement between the high resolution (source) mesh and the low resolution (target) mesh. Click Best Guess if you are unsure.
If set too small, some detail will be cut off or flattened in the resulting map. If set too large, the resulting map can have precision errors, leading to jagged edges in the map. You may need to experiment with the Search Distance value and generate several maps to find the best results. See also Troubleshoot texture extraction.
Tip: To determine the distance between the source and target meshes, you can estimate the distance using the vertical line on the Sculpt tool that indicates the brush strength as a starting point. This line represents the distance the center of the tool moves the vertices in the current Mudbox units (the default is centimeters). - Test Both Sides
-
(For map extraction, available only when Method is set to Ray Casting.) Off by default. so that intersections are ignored when the ray intersects a surface that is facing in the opposite direction. When on, Mudbox records ray intersections with source faces that are backfacing. This improves extraction results when a number of intersecting meshes are used as the source model.
Image properties
(Available only when you set Map Type to Texture.)
- Generate one map for all targets
-
Use this option when extracting to multiple targets if you want one map generated (for each extraction type selected) that can be shared by all target models. This is useful for conserving the number of texture maps when multiple objects share one UV tile.
Important: When generating one map for multiple targets that share the same UV tile, ensure the models do not have overlapping UVs. - Generate one map for each target
-
Use this option when extracting to multiple targets if you want one map extracted for each individual target model. This is useful when the target models use different materials or when the UV texture coordinates occupy the same UV tile location and producing one shared map would not be possible.
- Image Size
-
Specifies the height and width in pixels of the output map(s).
Note: A larger Image Size produces more detail in the map, but increases extraction time and file size. - Edge Bleed
-
Specifies the size of the border that is automatically extended outside the perimeter of a UV shell when painting on a model. Extending paint pixels beyond the perimeter edges reduces the appearance of seams on a painted model where separate UV shells meet.
There are two options Global (default) or Custom. The default Edge Bleed setting, Global uses the Edge Bleed value set in the Paint Preferences, while Custom lets you set an Edge Bleed value used only for Map Extraction. (See Texture extraction overview
Note: When Edge Bleed is set to Global (the default), modifying the Image Size value automatically updates the value in the Edge Bleed Pixel field, as it is determined by the Paint Preference and Image Size values. If you set the Edge Bleed value to Custom, changing the Image Size setting does not affect the Edge Bleed pixel input field; the Custom setting means this value is now absolute. - Antialiasing
-
When on, improves the quality of the final extracted image map by applying a filter comparison between pixels in the image. Higher values increase the amount of antialiasing that occurs and the time to extract the image map. For initial test extractions, use a small Image Size value and leave the Antialiasing property turned off until you produce a final image.
Advanced
- Shadow Map Resolution
-
Controls the size of the shadow maps for the occlusion map calculations. Values are preset at 256 x 256, 512 x 512, 1024 x 1024, 2048 x 2048, 4096 x 4096. The shadow maps are not accessible and are discarded after the generation of the occlusion map.
Increasing the Shadow Map Resolution produces a more detailed occlusion map and increases the time to generate it. In general, set the Shadow Map Resolution to the lowest value that produces an occlusion map of acceptable quality. Default is 1024 x 1024.
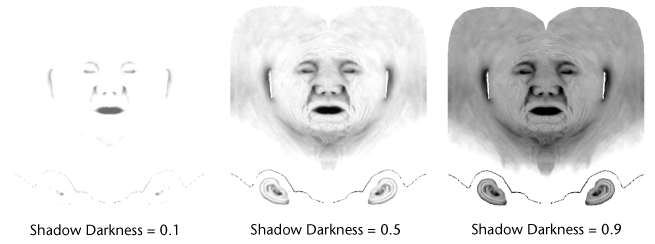
- Shadow Darkness
-
Controls the brightness of the ambient occlusion map. Decreasing the value brightens the resulting ambient occlusion map. Increasing the value darkens the resulting ambient occlusion map. The default setting is 0.5.
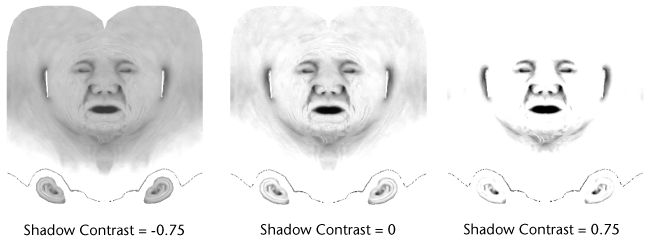
- Shadow Contrast
-
Controls the contrast between shaded and non-shaded areas in the ambient occlusion map. Decreasing the value reduces contrast, producing more mid-tone gray values in the map. Increasing the value increases contrast, producing tones that are more black and white. The default contrast setting is 0 (neutral contrast) with the lower and upper range of -1 and 1.
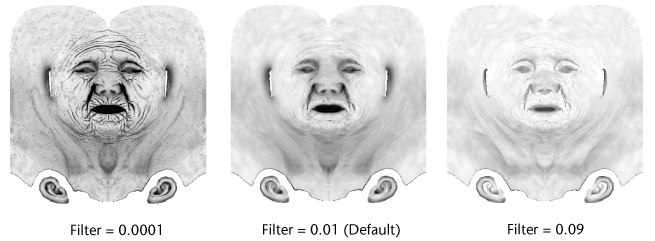
- Filter
-
Controls the filtering of multiple shadow map calculations when producing the final ambient occlusion map. To achieve sharp, finely detailed shadows, set a low value (0.0001). To produce a softer effect, reducing visible artifacts in the map, set a higher number.
Output options
- Map Type
-
Lets you specify whether to extract a Texture map or a Ptex file.
The other Output options available change depending on which type you select.
Available when Map Type is set to Texture:
- Base File Name
-
Enter a name for the extracted map(s). To have Mudbox automatically append the target mesh name to your filename, use the wildcard characters %s.
Important: If you are extracting a map for multiple target meshes and Generate a map for each target is on, ensure that you use %s as part of your Base File Name. (Otherwise the map generated for each target will have the same name and overwrite the map output for the previous target.)Click the browse icon
 to set save options (including file format) in the
Save As window.
Note:
to set save options (including file format) in the
Save As window.
Note:If the model contains UVs within multiple UV tile spaces, that is, outside the 0 to 1 range, Mudbox automatically creates separate maps that correlate to each UV tile and saves to the directory you specify. For example, <basefilename>_u1_v1.bmp, <basefilename>_u2_v2.bmp, and so on.
- Bits per Channel
-
Lets you specify the color depth of the output map.Note: To change the format of the output image file, click next to
Base File Name to open the
Save As options.
- Preview as
-
(Different Preview as options display depending on the type of map you're extracting. Refer to the options for each specific map type.)
Available when Map Type is set to Ptex:
- Include Mesh Data
-
When on (default), Mudbox also saves general data about the mesh (vertex positions, list of faces, and so on) in the output PTEX file. This can be useful if other tools in your pipeline can use this type of PTEX data, for example if you will use a PTEX viewer to inspect the output file. It is recommended that you keep this option on when extracting PTEX files.
- File Name
-
Enter a name for the extracted Ptex file.
Click the browse icon
to change the default save location in the
Save As window.
Note:If the model contains UVs within multiple UV tile spaces, that is, outside the 0 to 1 range, Mudbox automatically creates separate maps that correlate to each UV tile and saves to the directory you specify. For example, <basefilename>_u1_v1.bmp, <basefilename>_u2_v2.bmp, and so on.
- Data Format
-
Depending on the type of map (or maps) you're generating, lets you specify the bit depth for the extracted Ptex file. (Options include 8 bit integer, 16 bit integer, 16 bit float, or 32 bit float.) The larger the bit depth you select, the higher the precision in the extracted files, and the larger the file size.
- Preview as Diffuse
-
Automatically imports the generated ambient occlusion map as a new paint layer within the Diffuse channel of the assigned material. This lets you preview the ambient occlusion map on the selected model(s) and iterate the generated map with different settings if required.