Sculpt Layer menu
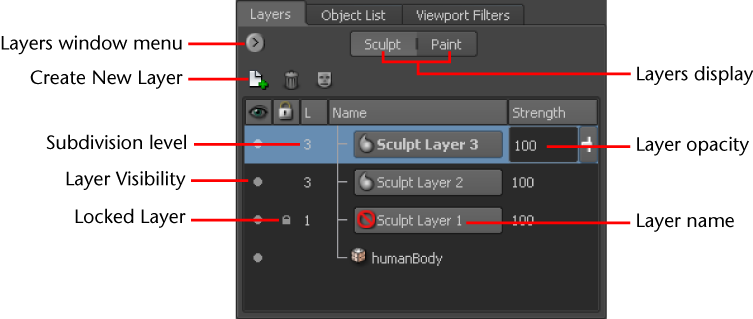
Items available from the Sculpt Layers (![]() ) menu:
) menu:
- New Layer
-
Creates a new layer directly above the selected layer.
- Delete Selected
-
Deletes the selected layer.
- Duplicate Selected
-
Makes a copy of the selected layer. The duplicate layer is inserted directly above the selected layer.
- Freeze from Selected
-
Opens the Freeze From Sculpt Layer window, letting you set the following values:
- Contrast
-
Controls the sharpness of the transition from frozen to unfrozen areas. Higher values make a sharper transition, lower values spread the freezing out. Ranges from 0 to 1, default is 0.5.
- Midpoint
-
Defines the center point of the transition (the point at which the gradient is at 50% freeze). Lower values spread the frozen areas wider, and higher values bring it tighter. Ranges from 0 to 1, default is 0.5.
See also Freeze mesh based on a sculpt layer.
- Merge Visible
-
Combines the sculpting information on all visible layers into a single layer and deletes all merged layers.
- Flatten
-
Moves the information on all layers (for a particular layer type) onto the base (bottom) layer and deletes all layers above the base layer.
- Import Layer
-
Lets you load a model from disk and apply it as a layer on the active object in the scene. See Import a model as a layer.
- Mirror Layer
-
Reflects the sculpt detail on a selected layer from one side of an object to its opposite side. Mirroring requires that the model be topologically symmetrical, even though its shape may be asymmetrical. See Set a topological axis.
- Flip Layer
-
Swaps the sculpt detail of a layer across the topological axis of the model. Flipping detail on a layer requires that the model be topologically symmetrical, even though its shape may be asymmetrical. See Set a topological axis.