Integration Phase 2: Generating your First NavData
Most of the principal uses of Autodesk Navigation in your game rely on NavData: optimized data structures that represent the navigable areas and topological connections in your game terrain. NavData is a crucial resource that you will have to produce for each terrain or level that you use in your game.
It is generally expected that you will use the API of the NavData generation system to integrate the production of your NavData directly into the same game editor tools that your artists use to create the game levels. This automates the production of your data and ensures that the NavData will always match the latest changes in the terrains themselves. However, this integration requires some time and effort to set up. Therefore, we will use the Navigation Lab to generate some initial NavData, and return to the integration of the data generation API later on in Integration Phase 6: Using the NavData Generation API.
Export your terrain to a .obj file. For details on this file format, see here.
The mesh in this file must contain all static, non-destructible objects in your scene that need to be taken into account by your characters in their pathfinding and path following. This includes the ground or heightmap, buildings, trees, lampposts, walls, benches, fences, and so on. Other destructible and/or dynamic obstacles such as, vehicles or crates must not be included in your .obj file; these types of dynamic objects will be added to the World at runtime.
Note that the use of an .obj file is a requirement of the standalone Navigation Lab tool, but not of the data generation system itself. When you integrate the NavData generation system into your own code, you will not have to use .obj files (though you still may if you wish).
For now, choose a small terrain that you will load in its entirety at runtime. The Navigation Lab, by default, will create a single output file that contains the NavData for the whole terrain. After you complete this initial integration tutorial, you can follow a variety of approaches for partitioning your terrain into multiple sectors to reflect the streaming logic used for other types of data in your game and to reduce the amount of data you have to load at runtime.
- Launch the Navigation Lab.
Drag and drop your .obj file onto the 3D view of the Navigation Lab.
A dialog box will be displayed for you to set up the coordinate system used in your game. Indicate which axes in your game's coordinate system are used for Up, Right, and Front coordinates. Also, use the OneMeter control to set the number of measurement units in your game that add up to one meter. This controls the scale at which your terrain is measured.
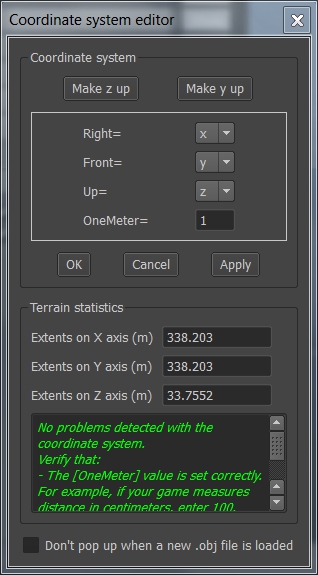
If the Navigation Lab detects any possible errors in your coordinate system setup, it lists them in the editor window.
Your terrain must appear with the correct orientation. If its orientation is not correct, adjust the coordinate system as necessary. Close the Coordinate System Editor when your terrain looks right.
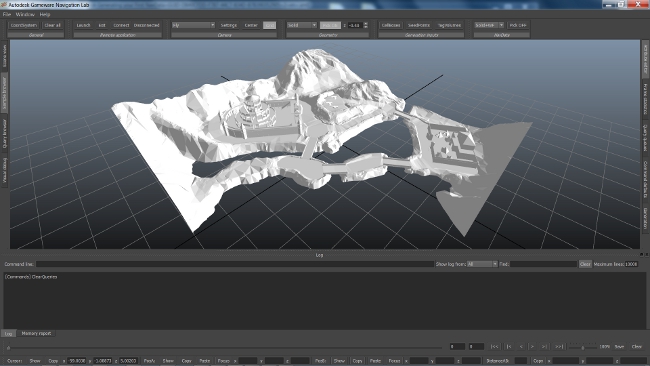
Open the Generation panel on the right side of the main Navigation Lab window.
In the Output section, set up the location in which you want to create your output files.
The NavGenProj File setting determines the location of the project file the Navigation Lab creates to record your generation. You can re-open this .NavGenProj file at any time to pick up where you left off.
Set the Base output Directory to an absolute path under which you intend to create all of your NavData output files. Keep this value the same each time you generate data for your game.
Set the Relative Directory to a path under the base output directory in which you want to create the NavData for this level. This relative directory is saved in your output NavData, and can be used when visual debugging to automatically retrieve the data for the levels currently loaded in your game.
Also, in the Parameters section, set the Entity height and Entity radius values to match the dimensions of the characters that will use this NavData in your game.
The other settings in this window are less important for now, but you can feel free to return to them later.
Click Generate. The Navigation Lab will generate the NavMesh for your terrain, and show it in the 3D view when the generation is complete.
Statistics about the generation process are shown in the Log panel.
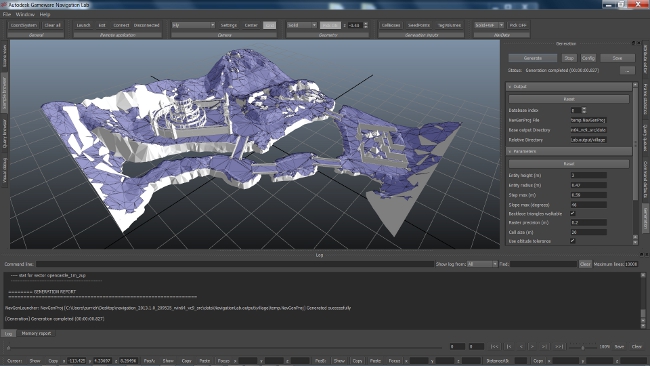
Depending on the terrain you have chosen, you may see NavMesh generated in places that you do not want your characters to go in the game: on rooftops, treetops, the tops of walls, and so on. This is not a problem for now, but eventually you will want to use one of several possible strategies for excluding unwanted areas. See Identifying the Navigable Areas.
NOTE: If the generation process fails, or if it takes a very long time, you likely mis-configured the scale of your terrain in the OneMeter control when you set up the coordinate system mapping for your terrain. Try again using a larger OneMeter value.
Now that you have a NavMesh, you can conduct queries against your terrain directly within the Navigation Lab. You can also launch the labgame send your terrain to the game in order to play with spawning bots, obstacles and smart objects in your own game level. For an introduction to using the labgame, launching samples, and running queries, see Getting Started with the Navigation Lab.
Within your output directory, you can see several new files with the following extensions:
- .ClientInput: Contains a record of the geometry that was passed to the generation system.
- .GenIO: Contains a record of the sector definitions and configuration parameter values used in the generation process. If you use the data generation API directly, you can use this file to re-create the settings from a previous data generation run.
- .DataIndex: Contains a browsable record of the data generated for this sector. You can create a new Kaim::DatabaseDescriptorIndex object from the contents of this file and use its API to browse and load the data objects generated for that sector.
- .NavData: The final NavMesh for your level, which you will load into your game for use at runtime.
The most important file is the .NavData file; you will need this file to complete the next phases of your integration.
You can save your generation project from the Navigation Lab. All of the information used to perform the generation are written to a file with the.NavGenProj extension, which contains an XML representation of the generation settings and input .obj files.
When you generate data in the Navigation Lab, the Navigation Lab transparently passes this file to the command-line navgenlauncher tool. You can also call the navgenlauncher tool yourself and pass it this file in order to re-run your generation outside of the Navigation Lab. See also navgenlauncher.