Learn how to add live, wind, and snow load cases.
- Continue working in your project, or open the project
Tutorial_Alpha_Model.rstructure.
Note: To open the project, click Explore Tutorials from the Welcome Screen or navigate to the Tutorials folder C:\Users\Public\Public Documents\Autodesk React Structures Tech Preview\Tutorials.
- Click
Loads
 Load Cases and Combinations
 Load Cases.
The Load Cases dialog opens.
Note: The Load Cases dialog contains a self-weight load case. It is added automatically when you create a project. - In the Load Cases dialog, click
 to add a load case.
The DL2 load is added to the list of defined cases.
- In the Case name column, delete the default name DL2 and enter Live Load.
- In the Nature column, select
live
to define the nature of the load.
The Live Load case is defined.

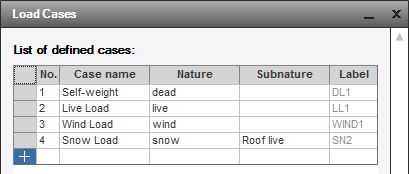
- Repeat this process for the following load cases:
- Case No. 3, Case name: Wind Load, Nature: wind,
- Case No. 4, Case name: Snow Load, Nature: snow.
- In the Subnature column, select
Roof live to define a subnature for the Snow Load.
The list of defined cases looks as follows.

- Save the project as Tutorial_Alpha_Load_Cases.rstructure.