Example workflow: Trigger a door opening
Triggers are simple game objects that let you trigger events when other objects come in contact with them. This workflow explains how to animate a door opening when the player gets close to it.
You can also find a video tutorial that demonstrates this workflow here.
Place the door unit in your level.
Create a story to animate the door object in the level.
Next, you'll create the trigger that will start this animation.
- Create a trigger volume in front of the door you want to animate.
In the Property Editor, verify that the trigger has the following properties set in the Physics section:
- Actor Template: Static
- Shape Template: Trigger
(See also Trigger properties.)

Switch to the Level Flow Editor.
Right-click in the graph view area to start adding nodes. Select the following from the pop-up menu to add Level Loaded, Trigger, and Story Event nodes:
On the Event > Trigger node, click
 next to Shape, then select your trigger.
On the Level > Level Story node, click
 next to Story, then select the story animation you created.
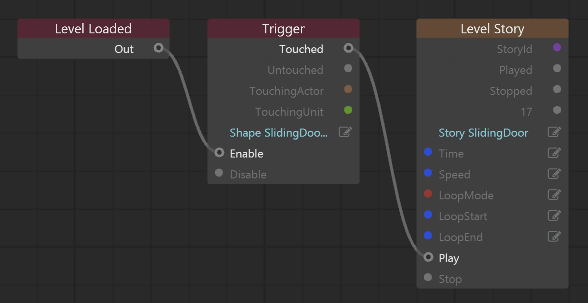
Connect Event > Level Loaded Out to Event > Trigger Enable, then connect Event > Trigger Touched to Level > Level Story Play.
Your flow graph should look similar to the following:

In the Asset Browser, double-click the door unit to open the Unit Editor, and confirm that the Actor Template property is set to keyframed.
Click Play in the Toolbar to play the level, and walk to the door. The door should animate when you reach the trigger area.
(See also Ways to run your project.)