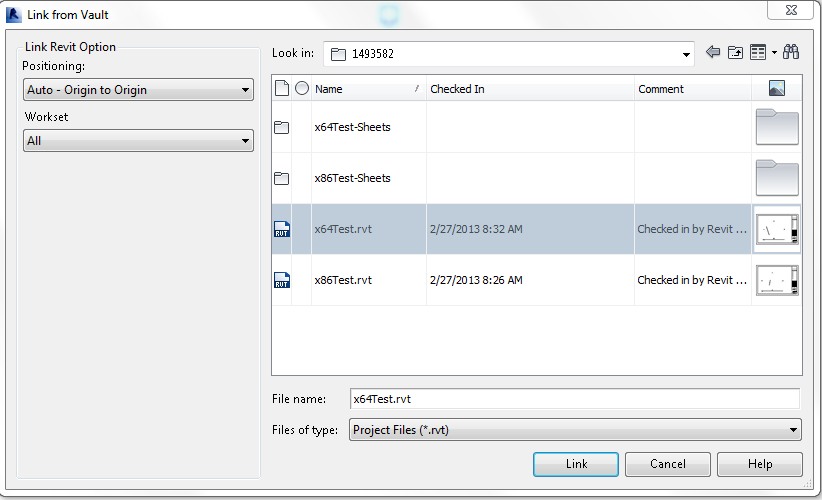
Link from Vault allows the user to select a file in Vault to be linked into the current Revit Project. The advantage of using the Link from Vault is that there is no need to know where the latest version of the file is. If the latest version is located on the Revit Server, then the Revit server version is linked too. If the file is a non-work shared file, it is downloaded from Vault and linked to the current project and will continue to be managed by Vault.
The Link from Vault feature differs based on your Vault Revit Add-in release.
Vault Revit Add-in for 2014
You can select a file in Vault to be linked to the current Revit project and specify position options for the linked file on the Link from Vault dialog.

Position Options
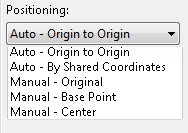
You can select a positioning preference when you link a file into the current Revit project.
The following table describes the positioning options available for selection. Refer to Import and Link Options for CAD Formats and Revit Models for more information.
|
Option |
Details |
|---|---|
|
Auto–Origin to Origin |
Revit places the import's world origin at the Revit project's internal origin. If the import object has been drawn at a large distance from its origin, it may display at a large distance from the model. To test this, set the zoom to Zoom View to Fit. |
|
Auto–By Shared Coordinates |
Note: This option is for Revit files only.
Revit places the imported geometry according to its position with respect to the shared coordinates between the two files. If there is no current shared coordinate system between the files, Revit notifies you, and uses Auto–Center to Center positioning. See Shared Positioning. Important: When a link is inserted using shared coordinates, the position is correct but the shared site must be manually configured. Refer to the section below on Manually Configuring a Site.
|
|
Manual–Origin |
The imported document's origin is centered on the cursor. |
|
Manual–Base Point |
The imported document's base point is centered on the cursor. Use this option only for AutoCAD files that have a defined base point. |
|
Manual–Center |
Sets the cursor at the center of the imported geometry. |
Worksets
If you are working with linked worksets, all worksets from the work-shared link are loaded and displayed.
Link a File from Vault
- Launch Link from Vault.
- Select the file to be linked from Vault.
- Select your positioning preference from the Positioning drop-down.

- Click the Link button.
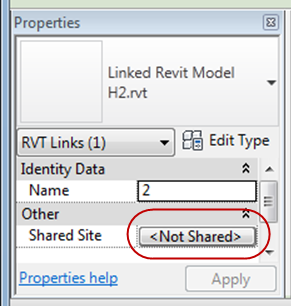
- Select the recently added link.
The properties for the link are displayed.
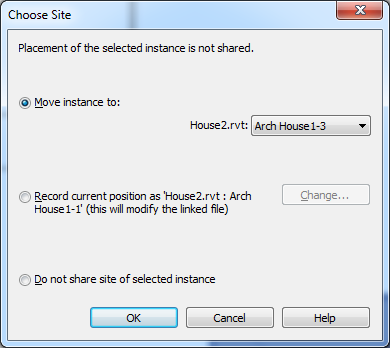
- Click "Not Shared" next to the Shared Site property to launch the Choose Site dialog.

- On the Choose Site dialog, select the Move Instance To radio button and select the position name that the link is currently at (e.g., Arch House 1-3).

- Click OK.
The file is imported based on your positioning selection.
Manually Configure a Shared Site
If you have inserted a link using the Auto–By Shared Coordinates positioning option, you must take additional steps to manually configure the shared site.
The position of the model on site is recorded. The site can be Saved so that the changes persist.
Insert a DWG from Vault
- Launch Link from Vault.
- Locate the DWG that you want to insert.

- Select your positioning preference from the Positioning drop-down.
- Select your Colors preference from the Colors drop-down.
- Select your Layers/Levels from the Layers/Levels drop-down.
- Select the position at which to place the DWG in the Place at drop-down.
- If needed, modify your import units.
- Click Link to insert the DWG.
Link a DWF Markup from Vault
- Launch Link from Vault.
- Select the DWF Markup that you want to Link from Vault.
- Click the Link button.
Vault Revit Add-in for 2013 Subscription Extension
You can select a file in Vault to be linked to the current Revit project on the Link File from Vault dialog.
Link a File from Vault
- Launch Link from Vault.
- Select the file to be linked from Vault.
- Click the Link button.
The file is imported and the positioning is set to Auto-Center.