
When you create an object, normals are generated automatically. Usually objects render correctly using these default normals. Sometimes, however, you need to adjust the normals.
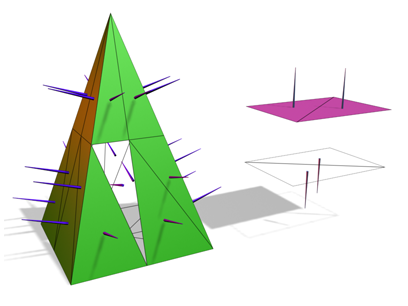
Left: The normals shown as spikes indicate the orientation of faces on the pyramid.
Right: Flipping normals can make faces invisible (or visible) in shaded viewports and renderings.
Undesired normals can appear in these objects:
- Meshes imported from other applications.
- Geometry generated by complex operations such as Boolean objects, lathe objects, or lofts.
Normals are used to define which side of a face or vertex is considered the "out" side. The out side of a face or vertex is the side that gets rendered unless you are using two-sided materials, or turn on the Force 2-Sided option on the Render Setup dialog  Common panel
Common Parameters rollout.
Common panel
Common Parameters rollout.
Do one of the following to view or change face normals:
- Apply a Normal modifier. If a Face sub-object selection is active, Normal applies to the selected faces. If no faces are selected, Normal applies to the entire object.
- Apply an Edit Mesh modifier, enable Face, Polygon or Element sub-object mode, and then use the features on the Surface Properties rollout to change the directions in which normals point.
- Convert the object to an editable mesh, enable Face, Polygon or Element sub-object mode, and use the features on the Surface Properties rollout
Viewing Normals
The easiest way to view normals is to look at an object in a shaded viewport. In this case, you are not viewing the normal arrows themselves, but rather their effects on the shaded surface. If the object looks as if it is inside-out, or has holes, then some of the normals might be pointing in the wrong direction.
You can display the normal vectors for selected faces or vertices by enabling Show Normals on the Selection rollout of an editable mesh object or the Edit Mesh modifier.
Unifying Normals
Use Unify Normals to make normals point in a consistent direction. If an object has normals that are inconsistent (some point outward and others inward) the object will appear to have holes in its surface.
Unify Normals is found on the Surface Properties rollout and on the Normal modifier.
If you are animating the creation of a complex object such as a nested Boolean or a loft, and you think the operation might result in inconsistent faces, apply a Normal modifier to the result, and turn on Unify Normals.
Flipping Normals
Use Flip Normals to reverse the direction of all selected faces. Flipping the normals of an object turns it inside-out.
Flip Normals is found on the Surface Properties rollout and on the Normal modifier.
The Lathe modifier sometimes creates an object with normals pointing inward. Use the Flip Normals checkbox on the Lathe modifier's Parameters rollout to adjust the normals. You can also use the Normal modifier with both Unify and Flip turned on to fix inside-out lathed objects.