
The Scene Converter dialog includes several presets for converting lights, materials and objects between render engines.
Interface
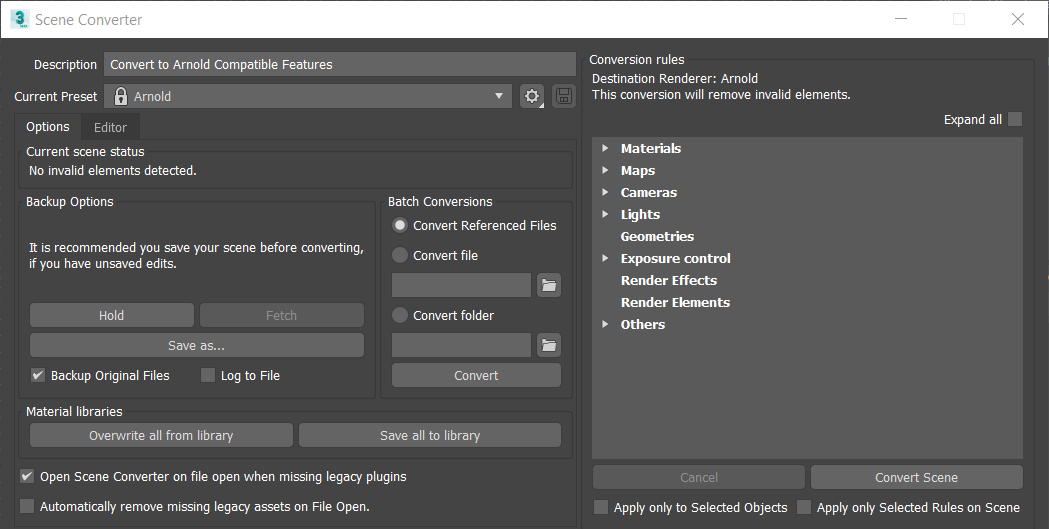
- Description
- Shows a brief description of the currently-selected preset.
- Current Preset
- Shows the name of the currently-selected preset. A warning is shown if there are any unsaved changes to the preset. You will be prompted to save if you select another preset or close the Scene Converter.
Presets displaying the
 icon are locked and cannot be overwritten. Any changes will be saved to a duplicate in the following directory:
C:\Users\<USER>\Autodesk\3ds Max 2021\User Tools\Scene Converter\ConversionPresets.
icon are locked and cannot be overwritten. Any changes will be saved to a duplicate in the following directory:
C:\Users\<USER>\Autodesk\3ds Max 2021\User Tools\Scene Converter\ConversionPresets.
Custom conversion scripts must be stored in the following directory: C:\Users\<USER>\Autodesk\3ds Max 2021\User Tools\Scene Converter\ConversionScripts.
Preset Commands

- Save
- Save the current preset by updating the last saved version.
- Save As...
- Save the current preset as a new file with a different file name.
- New
- Clears the loaded preset file and creates a new one.
- Reset
- Resets any changes to the currently-selected preset.
- Quick Save button

- Saves any changes to the currently-selected preset. If the preset is locked, a duplicate will be saved.
Options panel
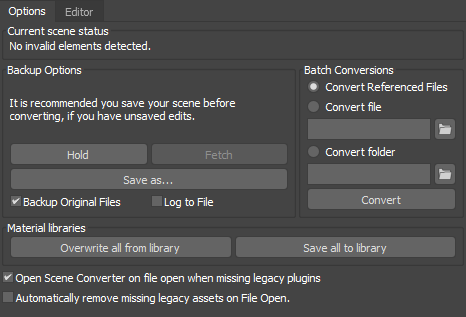
- Current scene status
- Lists any missing DLLs to assist with troubleshooting.
Backup Options group
- Hold
- Saves the scene and its settings to a disk-based buffer. The information stored includes geometry, lights, cameras, the viewport configuration, and selection sets.
Note: The Hold buffer is a temporary file (maxhold.mx) in the directory specified by the AutoBackup path in the Configure User Paths dialog.
- Fetch
- Restores the contents of the buffer stored by the previous Hold command.
Note: Fetch also deletes all operations recorded in the Undo and Redo History lists.
- Save As...
- Saves the scene and its settings in MAX format under a different file name.
- Backup Original Files
- Automatically copies the file to be converted to a new file with the suffix "_backup". If you are converting multiple files in a batch, one backup file will be created for each file converted.
- Log to File
- Creates log files listing functions performed.
Batch Conversions group
These settings enable you to convert multiple files automatically.
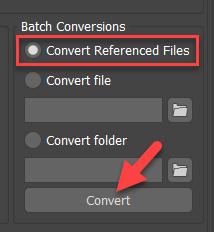
- Convert Referenced Files
- Opens files defined as XRef Scenes and converts them using the current preset. To convert 3ds Max XRef scenes, click the Convert button in the Batch Conversions section while the Convert Referenced Files option is on.
- Convert file
- Navigate to and select the file to convert.
Note: Converting a file while in an empty scene does not save the current scene, and the last file converted remains open after completion.
- Convert folder
- Navigate to and select the folder to convert.
Note: Converting a folder while in an empty scene does not save the current scene, and the last file converted remains open after completion.
- Convert
- Converts all files specified using the current preset. If using the Convert File option, the current file is saved (if required), opened, and converted. If using the Convert Folder option, the current file is saved and then each 3ds Max file in the selected folder is opened, a backup file is created, and the file is converted. The original scene is restored once all conversions are complete.
Material Libraries group
The Material Libraries group enables you to backup all of your materials to a MATLIB file.
- Overwrite all from library
- Replaces any material in your scene that has the same name as one in the library. For example, if both your scene and the library have a material named Chrome, the one in your scene will be replaced by the one in the library.
Note: The Overwrite feature helps you save and restore versions of your materials during conversion, and gives you the ability to quickly restore design options for your scene. It is also useful for general replacement of default materials imported from Autodesk Revit or Inventor. For example, if you are using V-Ray and define V-Ray materials to replace the materials in a typical Revit model and place them in a material library, you can instantly swap the materials to your preferred V-Ray materials with the Overwrite feature.
- Save all to library
- Saves all materials in the scene to a MATLIB file.
- Open Scene Converter on file open when missing plugins
- When selected, loading a scene containing missing DLLs will automatically open the Scene Converter. Default=off.
- Automatically remove missing legacy assets on File Open
- Removes legacy assets when opening a file to improve compatibility.
Editor panel
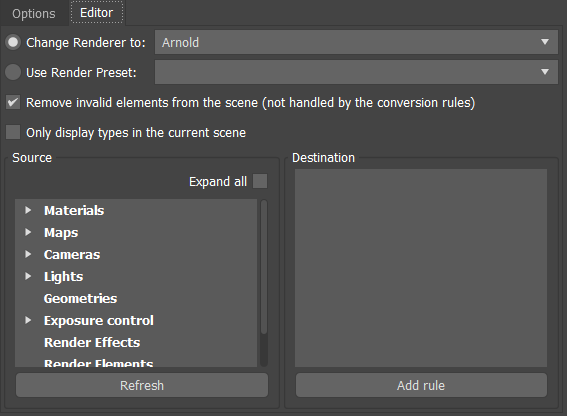
Use the Editor panel to create rules using elements found in the Source group and conversion actions in the Destination group.
- Change Renderer to
- List of available renderers. The default is Arnold.
Note: Selecting Any Renderer will not modify the renderer in your scene.
- Use Renderer Preset
- List of available previously configured presets. Selecting Load Preset... opens the RenderPresets folder for your current project. The preset file must exist in the right path for the preset to load.
Note: Render presets can be created in the Render Setup dialog.
- Remove invalid elements from the scene
- Removes elements from the scene that are not managed by the conversion rules.
- Only display types in the current scene
- List is restricted to source types found in your scene.
Note: Do not select this option for large scenes, as it may take a long time for all objects and settings in the Source column to be evaluated.
Source group
- Expand all
- Maximizes all nested items in listed categories.
- Refresh
- Updates the ConversionPresets and ConversionScripts folders to include any new scripts provided by Autodesk or the user community.
Destination group
The Destination group lists how the source elements are to be managed during conversion. For example, if you select a specific light element from the Source group, your options in the Destination group may include Do not convert, Physical Sky, or Remove from scene.
When a new source and destination are selected and that there is no associated rule, the button will display Create Rule.
When a different destination is selected, the button will display Change Rule.
When a file is selected, the associated source and destination are highlighted, the button will display Delete Rule. You can select multiple files at once and delete them.
- Add rule
- Adds the rule created using the Source and Destination groups to the script. Once added, the rule appears in the Conversion Rules.
- Create Rule
- Creates a rule for the selected source and destination.
- Change Rule
- Changes an existing rule when a new destination is selected.
- Delete rule
- Deletes the rule for the selected file.
Conversion Rules group
- Expand all
- Displays all conversion rules used in the loaded preset.
- Remove Selected
- Removes the selected rules from the preset.
Tip: Save your preset file to make the change permanent.
- Apply Only Selected
- Only uses the selected rules during file conversion; no other rules will process. Allows you to optimize the conversion on a portion of the scene. For example, when converting the material on a single object that is merged into a larger architectural model, it will take time to inspect all of the objects but converting just the newly merged object will be quite fast.
- Cancel
- Attempts to stop a conversion that is in progress.
- Convert Scene
- Starts the conversion according to the set conversion rules.