Move beyond the Hello World tutorial to begin adding beams and plates via the Advance Steel API.
This walkthrough will help familiarize you with basic concepts of creating beams and plates in an Advance Steel model using the API.
Refer back to the Hello World walkthrough to create an empty Advance Steel addon project, up to the point of creating the command class. This tutorial assumes you have a new Advance Steel addon project with one class file that implements the IExtensionApplication interface.
Create a new class called CreateElements and add the following code:
|
Code Region: CreateElements command class |
using Autodesk.AdvanceSteel.CADAccess; using Autodesk.AdvanceSteel.DocumentManagement; using Autodesk.AdvanceSteel.Runtime; namespace HelloWorld { public class CreateElements { [CommandMethodAttribute("TEST_GROUP", "CreateElements", "CreateElements", CommandFlags.Modal | CommandFlags.UsePickSet | CommandFlags.Redraw)] public void Create() { using (DocumentAccess da = new DocumentAccess(null, false)) { da.Commit(); } } } } |
This is the outline for the command. We will be adding code inside using DocumentAccess block. The DocumentAccess utility is designed to simplify reading and committing changes to the Advance Steel model document.
Adding beams
- StraightBeam - for straight beams and columns
- BentBeam - for curved beams
- BeamTapered - for tapered beams
- PolyBeam - for poly beams
- CompoundStraightBeam - for a straight beam that is composed of 2 or 4 sections
To create a straight beam, you need to have a profile name, the start and end points of the beam, and the orientation. The simplest way to add a new beam is to use a default shape. By using one of the overloads of the static method ProfilesManager.GetProfTypeAsDefault(), you can quickly obtain a ProfileName object whose Name property can be used in beam creation. In the sample below, the overload of ProfilesManager.GetProfTypeAsDefault() that only takes a letter representing the profile class name is used to get a default profile with an I shape. The letters supported by this overload of ProfilesManager.GetProfTypeAsDefault() are A, C, D, F, H, I, K, O, Q, T, U, W, and Z. Another overload of the method takes the entire profile class name as a parameter. For information on finding a profile class name, see Profile Names
Prior to adding the code to create a new beam, you will want to add 3 more using statements at the top of the file. The ProfileName class used in the code below is in the Autodesk.AdvanceSteel.Profiles namespace, Point3d is in the Autodesk.AdvanceSteel.Geometry namespace, and all beam classes are in the Autodesk.AdvanceSteel.Modelling namespace. So add the following lines to the top of the file:
|
Code Region: Namespaces needed for creating elements |
using Autodesk.AdvanceSteel.Geometry; using Autodesk.AdvanceSteel.Modelling; using Autodesk.AdvanceSteel.Profiles; |
Next, add the following code inside the using DocumentAcccess block.
|
Code Region: Adding a column with a default size |
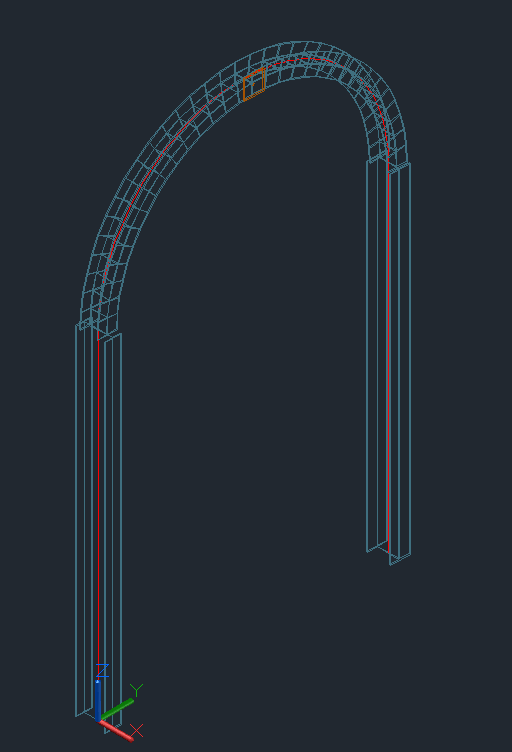
//create column (vertical beam) with a default size ProfileName profName = new ProfileName(); ProfilesManager.GetProfTypeAsDefault("I", out profName); Point3d beamStart = Point3d.kOrigin; Point3d beamEnd = new Point3d(0, 0, 3500); StraightBeam myBeam = new StraightBeam(profName.Name, beamStart, beamEnd, Vector3d.kXAxis); myBeam.WriteToDb(); |
The code above will create a vertical straight beam that starts at the origin and is 3500 mm long, with a default I shape section size. Note that all length units in the Advance Steel API are given in millimeters.
The last parameter of the StraightBeam constructor defines the beam's orientation around the axis defined by the start and end points, in this case aligned with the x-axis. Each beam has its own local coordinate system, with the X/Y plane parallel to the flange and the z-axis pointing to the top of the beam.
Once the straight beam is created, you must call the WriteToDb() method so that the beam becomes part of the model. Prior to calling this method, it is just a temporary structure in memory.
In the case that you want to create a beam with a specific section profile, the profile name is created by concatenating the profile class name with a fixed string separator ("#@§@#") and the profile name. For more information on profile class names and profile names, see Profile Names
Add the following code after the previous code to add a new column.
|
Code Region: Adding a beam with a specific section size |
//create a wide flange column beamStart = new Point3d(0, 3000, 0); beamEnd = new Point3d(0, 3000, 3500); myBeam = new StraightBeam("AISC 14.1 W Shape#@§@#W10x33", beamStart, beamEnd, Vector3d.kXAxis); myBeam.WriteToDb(); |
The code above will create another vertical straight beam (column) 3000 mm away from the first one, with a W10x33 section size.
Add the following code to your command to create a curved beam supported by the two columns created above.
|
Code Region: Adding a curved beam |
//create a curved beam beamStart = new Point3d(0, 0, 3500); beamEnd = new Point3d(0, 3000, 3500); Point3d arcPoint = new Point3d(0, 1500, 5000); BentBeam myBentBeam = new BentBeam("HEA DIN18800-1#@§@#HEA200", Vector3d.kZAxis, beamStart, arcPoint, beamEnd); myBentBeam.WriteToDb(); |
The BentBeam constructor takes the start and end points of the beam as well as a point along the curve of the element. In this case, the center point of the curved beam is defined. The rotation of the beam is defined by a vector. In this case the top of the beam is up.
Adding plates
The Plate class represents a plate in Advance Steel. There are several overloads for the Plate constructor to create rectangular or circular plates in the document. The following code will add a square plate (100mm) at the center point and on the face of the curved beam created above.
|
Code Region: Adding a square plate |
//create a plate on the curved beam Point3d plateOrig = arcPoint; plateOrig.x = 100; // 1/2 of curved beam width Plane platePlane = new Plane(plateOrig, Vector3d.kXAxis); Plate myPlate = new Plate(platePlane, plateOrig, 100, 100); myPlate.WriteToDb(); |
Running the command
Putting all the code together, your file should look like this:
|
Code Region: The CreateElements class implementation |
using Autodesk.AdvanceSteel.CADAccess; using Autodesk.AdvanceSteel.DocumentManagement; using Autodesk.AdvanceSteel.Runtime; using Autodesk.AdvanceSteel.Geometry; using Autodesk.AdvanceSteel.Modelling; using Autodesk.AdvanceSteel.Profiles; namespace HelloWorld { public class CreateElements { [CommandMethodAttribute("TEST_GROUP", "CreateElements", "CreateElements", CommandFlags.Modal | CommandFlags.UsePickSet | CommandFlags.Redraw)] public void Create() { using (DocumentAccess da = new DocumentAccess(null, false) { //create column (vertical beam) with a default size ProfileName profName = new ProfileName(); ProfilesManager.GetProfTypeAsDefault("I", out profName); Point3d beamStart = Point3d.kOrigin; Point3d beamEnd = new Point3d(0, 0, 3500); StraightBeam myBeam = new StraightBeam(profName.Name, beamStart, beamEnd, Vector3d.kXAxis); myBeam.WriteToDb(); //create a wide flange column beamStart = new Point3d(0, 3000, 0); beamEnd = new Point3d(0, 3000, 3500); myBeam = new StraightBeam("AISC 14.1 W Shape#@§@#W10x33", beamStart, beamEnd, Vector3d.kXAxis); myBeam.WriteToDb(); //create a curved beam beamStart = new Point3d(0, 0, 3500); beamEnd = new Point3d(0, 3000, 3500); Point3d arcPoint = new Point3d(0, 1500, 5000); BentBeam myBentBeam = new BentBeam("HEA DIN18800-1#@§@#HEA200", Vector3d.kZAxis, beamStart, arcPoint, beamEnd); myBentBeam.WriteToDb(); //create a plate on the curved beam Point3d plateOrig = arcPoint; plateOrig.x = 100; // 1/2 of curved beam width Plane platePlane = new Plane(plateOrig, Vector3d.kXAxis); Plate myPlate = new Plate(platePlane, plateOrig, 100, 100); myPlate.WriteToDb(); da.Commit(); } } } } |
Prior to running this command in Advance Steel, you will need to add the necessary Informational Attribute directives in the AssemblyInfo.cs file as shown in the Hello World Walkthrough.
After running the CreateElements command in Advance Steel and zooming in, you should see something like this: