
Use the Advance Steel API and C# to create a Hello World program using the directions provided.
The Hello World walkthrough covers the following topics:
- Create a new project
- Add references
- Add code
- Register the addon with Advance Steel
- Run the addon
Create a New Project
The first step in writing a C# program with Visual Studio is to choose a project type and create a new Class Library.
- From the File menu, select New
 Project…
- In the Installed Templates frame, click Visual C#\Windows Desktop.
- In the right-hand frame, click Class Library (see Figure 1: Add New Project ). This walkthrough assumes that the project location is: C:\Samples.
- In the Name field, type HelloWorld as the project name.
- Verify that the selected .NET is ".NET 8".
- Click OK.
- Once the project is created, navigate to the project in the Solution Explorer Properties Build
- In the Build dialog, select All Configurations from the Configurations drop-down list and change the Platform Target to x64 (see Figure 2: Platform Target).
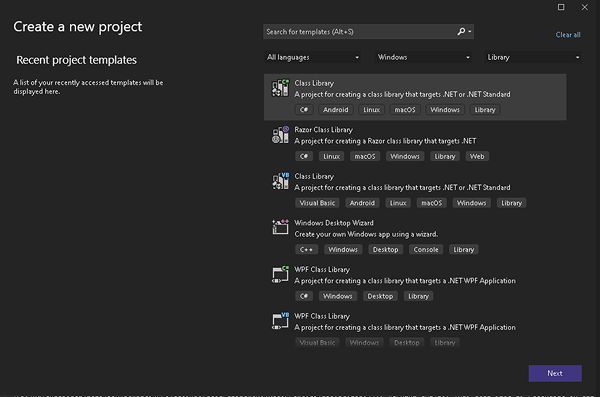
Figure 1: Add New Project
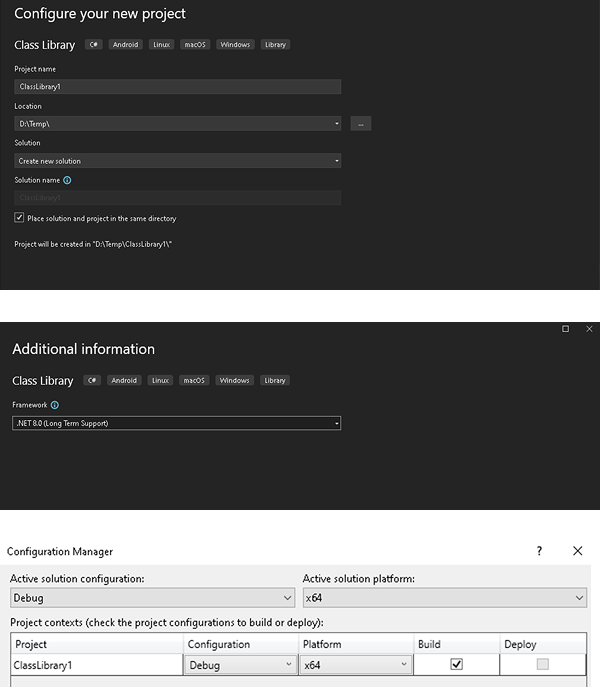
Figure 2: Platform Target
Add References
A number of components make up the Advance Steel API. They are installed with Advance Steel and can be found in subdirectories of Advance Steel 2025 installation folder. The Advance Steel 2025 installation folder is stored in the 'BinPath' value of the HKEY_LOCAL_MACHINE\SOFTWARE\Autodesk\AutoCAD\R23.1\ACAD-3026 registry key. You need to add references to the following components in order to compile the project.
| Component | Description |
|
ASNetRuntime.dll |
Required to compile the Addon |
|
ASMgd.dll |
Main Advance Steel access |
|
ASCADLinkMgd.dll |
CAD - related objects access (database, object id, …) |
|
ASGeometryMgd.dll |
Advance Steel geometry - needed to interact with Advance Steel objects |
|
ASProfilesMgd.dll |
Advance Steel profiles database access |
|
ASModelerMgd.dll |
Advance Steel modeler access |
| ASObjectsMgd.dll | Main Advance Steel objects access |
To add references to the required components, follow these steps:
- If the Solution Explorer window is not open, select Solution Explorer from the View menu.
- In the Solution Explorer, right-click References to display a context menu.
- From the context menu, click Add Reference. The Reference Manager window appears.
- In the Reference Manager window, click the Browse button. A window to select files appears.
- Browse to the Advance Steel 2025 installation folder.
- Click the Add button to select the dll and close the window.
- The selected dll should now be listed in the Reference Manager with a checkmark next to it.
- Repeat steps 4-8 until all components in the table above are added. Note that when selecting dlls to add, multiple dlls may be selected at one time.
- In the Reference Manager, click OK to close the window.
- The selected components will now appear in the Solution Explorer under the References folder.
- Select the newly added references and change their Copy Local property to False.
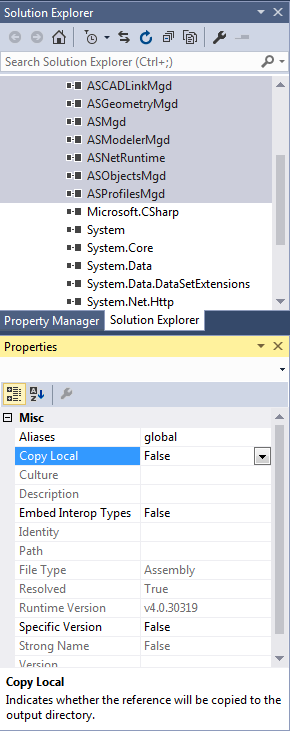
Figure 3: Set Copy Local to False for Advance Steel References
- Return to the Reference Manager window.
- Click Assemblies in the left-hand pane.
- Scroll down the list in the right-hand pane to find System.Windows.Forms.
- Click the checkbox next to System.Windows.Forms.
- Click OK to close the Reference Manager window.
Add Code
There are three main steps to adding code to an Advance Steel Addon:
- Implement the IExtensionApplication interface
- Create your command class
- Edit the AssemblyInfo.cs file
Implement IExtensionApplication
A default class called Class1 should have been created with the new project.
- Right-click on Class1.cs in the Solution Explorer and select Rename from the context menu.
- Rename the file Plugin.cs (and select 'Yes' when Visual Studio prompts you to perform a renaming in your project of all references to the code element 'Class1') .
- Replace the text in Plugin.cs with the sample code below.
|
Code Region: Implement IExtensionApplication |
using Autodesk.AdvanceSteel.Runtime; namespace HelloWorld { public sealed class Plugin : IExtensionApplication { void IExtensionApplication.Initialize() { } void IExtensionApplication.Terminate() { } } } |
Implement Interface from the Intellisense menu to have code added for the IExtensionApplication methods Initialize() and Terminate().

Figure 4: Use Intellisense to implement the interface
Create a command class
- Add a new class to the project called TestClass.
- Place the following code in TestClass.cs:
|
Code Region: Create a command class |
using Autodesk.AdvanceSteel.CADAccess; using Autodesk.AdvanceSteel.DocumentManagement; using Autodesk.AdvanceSteel.Runtime; using System.Windows.Forms; namespace HelloWorld { public class TestClass { [CommandMethodAttribute("TEST_GROUP", "HelloWorld", "HelloWorld", CommandFlags.Modal)] public void SayHelloWorld() { MessageBox.Show("Hello World!"); } } } |
An Advance Steel addon must have a method with the CommandMethodAttribute as shown in the sample code above. The parameters for the CommandMethodAttribute are:
- groupName - The name of the group to which the command will be added. If the group does not exist, it will be created before the command is added.
- globalName - The command name to add. This name represents the global or untranslated name.
- localizedNameId - The command name to add. This name represents the local or translated name.
- flags - Flags associated with the command.
Note that the options for CommandFlags are the same as for the AutoCAD Managed .NET API and the full list of options can be found here.
Edit the AssemblyInfo.cs File
An Advance Steel addon must include certain Informational Attribute directives. These belong in the AssemblyInfo.cs files.
- In the Solution Explorer, click on the Properties folder to expose the AssemblyInfo.cs file.
- Open the AssemblyInfo.cs file. This file already contains some assembly attributes such as the title and copyright.
- Add a using statement at the top of the file for Autodesk.AdvanceSteel.Runtime.
- Add a new informational attribute directive called ExtensionApplicationAttribute as shown below. Note that it takes as a parameter the type of the class which implements IExtensionApplication. This is what makes your .NET DLL an Advance Steel addon.
Code Region: Add an ExtensionApplicationAttribute
[assembly: ExtensionApplicationAttribute(typeof(HelloWorld.Plugin))]
- Add a new informational attribute directive called CommandClassAttribute as shown below. Note that it takes as a parameter the type of the class which implements a command. This is required to be able to register the command with Advance Steel.
Code Region: Add a CommandClassAttribute
[assembly: CommandClassAttribute(typeof(HelloWorld.TestClass))]
After following these steps, the AssemblyInfo.cs file will look something like this:
|
Code Region: Sample AssemblyInfo.cs |
using Autodesk.AdvanceSteel.Runtime; using System.Reflection; using System.Runtime.CompilerServices; using System.Runtime.InteropServices; // General Information about an assembly is controlled through the following // set of attributes. Change these attribute values to modify the information // associated with an assembly. [assembly: AssemblyTitle("HelloWorld")] [assembly: AssemblyDescription("")] [assembly: AssemblyConfiguration("")] [assembly: AssemblyCompany("")] [assembly: AssemblyProduct("HelloWorld")] [assembly: AssemblyCopyright("Copyright © 2015")] [assembly: AssemblyTrademark("")] [assembly: AssemblyCulture("")] [assembly: ExtensionApplicationAttribute(typeof(HelloWorld.Plugin))] [assembly: CommandClassAttribute(typeof(HelloWorld.TestClass))] // Setting ComVisible to false makes the types in this assembly not visible // to COM components. If you need to access a type in this assembly from // COM, set the ComVisible attribute to true on that type. [assembly: ComVisible(false)] // The following GUID is for the ID of the typelib if this project is exposed to COM [assembly: Guid("85900596-22ee-4873-bbd6-7f970d32b5af")] // Version information for an assembly consists of the following four values: // // Major Version // Minor Version // Build Number // Revision // // You can specify all the values or you can default the Build and Revision Numbers // by using the '*' as shown below: // [assembly: AssemblyVersion("1.0.*")] [assembly: AssemblyVersion("1.0.0.0")] [assembly: AssemblyFileVersion("1.0.0.0")] |
Register the Addon
Third party addons will be loaded according to information read from a configuration xml, which should be placed in the Addons folder: The Addons folder has to be a direct subfolder of the Advance Steel install folder. If the Addons folder is not there it should be created. A sample configuration xml can be found below (see MyAddons.xml):
<?xml version="1.0" encoding="utf-8"?>
<AddonsData xmlns:xsi="http://www.w3.org/2001/XMLSchema-instance" xmlns:xsd="http://www.w3.org/2001/XMLSchema">
<Addons>
	<Addon>
		<Name>HelloWorld</Name>
		<FullPath>C:\Samples\HelloWorld\HelloWorld\Bin\Debug\HelloWorld.dll</FullPath>
	</Addon>
	<Addon>
		<Name>MyAddon1</Name>
		<FullPath>C:Samples\MyAddon1.dll</FullPath>
	</Addon>
	<Addon>
		<Name>MyAddon2</Name>
		<FullPath>C:Samples\MyAddon1.dll</FullPath>
	</Addon>
</Addons>
</AddonsData>
This only needs to be done once per addon .dll. Any new commands added to the assembly designated by the " CommandMethodAttribute" attribute will be automatically recognized as a separate command that can be run when Advance Steel is loaded.
Run the Addon
To run the addon command, start Advance Steel. Then simply type in the name of the command, in this case, HelloWorld, and hit enter.
If you need to debug your addon, you can follow these steps:
- Start Advance Steel.
- In Visual Studio, put a breakpoint where you would like to stop the code in your command.
- From the Debug menu, select Attach to Process...
- Select the acad.exe process.
- Run your command in Advance Steel and your breakpoint will be triggered in Visual Studio.