Folder-Level File Attributes
Members with Edit permission or above for a specific folder can create, edit, reorder, add, remove, and delete those folder-level custom attributes. Project administrators have manage permissions for all folders by default.
- Access Folder-Level Attributes Settings
- Add or Remove Attributes from Folders
- Set Custom Attributes as Required
- Create Custom Attributes
- Display Folder Attributes
- Hide or display folder attributes
- Edit File Attribute Values
Access Folder-Level Attributes Settings
There are two ways to access the folder attributes settings.
- Click the Files tool.
- Click the More menu
 of the relevant folder.
 - Hover over More.
- Click Attributes settings.
OR
Click the Files tool.
Click the relevant folder from the folder tree.
Click
 .
.
Click Attribute settings.

Add or Remove Attributes from Folders
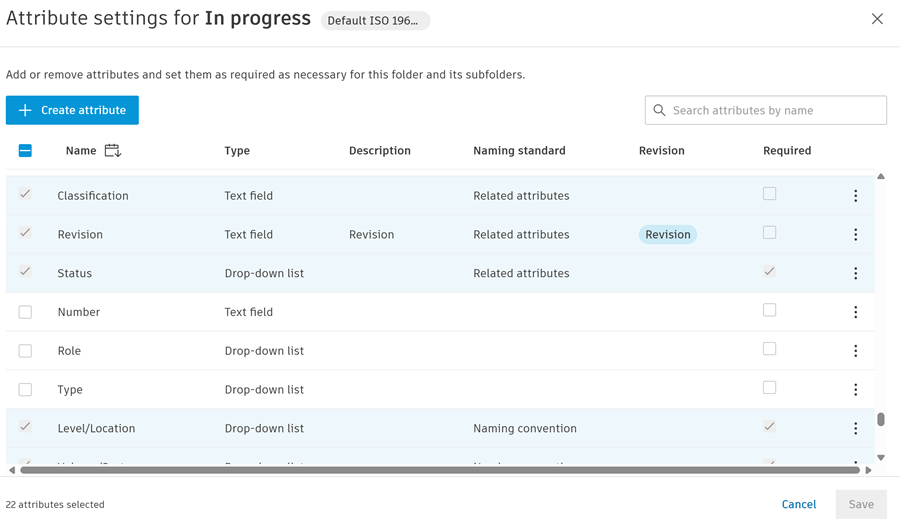
Once you've clicked Attribute settings, the attributes settings dialog box for the relevant folder will open. If any attributes are already added to the folder, those attributes will be selected.

Members with Edit permission or above can add custom attributes to a folder. They can also remove attributes they themselves have added to folders.
Members with Manage permission and project administrators can also remove attributes they haven't added themselves, and set custom attributes as required.
The following table shows how attributes can be added, removed, and set as required in non-naming standard folders and naming standard folders:
| Attribute Type | Non-Naming Standard Folder | Naming Standard Folder | ||
|---|---|---|---|---|
| Added | Required | Added | Required | |
| Non-Naming standard attributes | Can be added/removed | Can be set as required/not required | Can be added/removed | Can be set as required/not required |
| Naming convention attributes | Once added, can't be removed. | Can be set as required/not required | Always added | Always required |
| Related attributes (Required in naming standard setting) | Once added, can't be removed. | Can be set as required/not required | Always added | Always required |
| Related attributes (Optional in naming standard setting) | Once added, can't be removed. | Can be set as required/not required | Once added, can't be removed | Can be set as required/not required |
Select and deselect attributes as required.
Set any added attributes as Required as necessary. See []
Click Save.
By default, subfolders will automatically inherit their parent folder’s folder settings. This includes:
- Added or removed attributes
- Attributes set as required (does not apply to subfolders that contain files)
- Attributes set as optional
Set Custom Attributes as Required
Custom attributes can be set as required for folders. This helps to prevent key metadata from being missing and ensure that attribute values are correctly inputted before files can upload. The file validator will open so members can check and edit attribute values during the workflow. If the holding area is turned on, members can choose not to correct attribute values in the file validator and continue. Compliant files will display in the target folder and non-compliant files will are stored in the holding area.
Members with Manage permission or above can set custom attributes as Required at folder level.
Project administrators can access Folder settings of individual custom attributes at project level and set them as required.
When you set an attribute as required on a parent folder, any empty subfolders will also inherit the setting.
When a required attribute is changed to optional by deselecting Required, and this action results in files in the holding area becoming compliant, these files will be automatically moved from the holding area to their respective folders.
Create Custom Attributes
Members with Edit permission or above for a specific folder can create attributes and add them to that folder.
See Create and Edit Custom Attributes for full details.
Display Folder Attributes
Members with Edit permission or above can also organize and choose to hide, show, and reorder folder attributes.
Click the relevant folder from the folder tree.
Click
 .
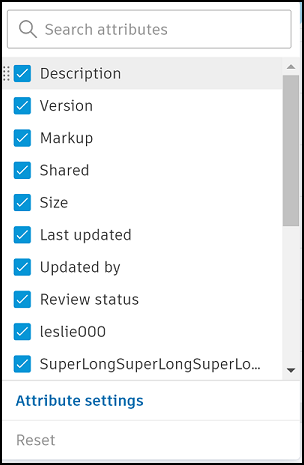
.The attributes panel lists all the attributes added to the current folder.

You can now organize which of these attributes to display using search and reorder.
Search
You can search for the attributes added to the current folder and choose whether to show or hide these.
- Click the search box in the attributes flyout panel.
- Enter the name of the attribute. Only the names of those attributes added to the current folder will be discoverable.
Reorder
Hover over the relevant attribute.
Click
 and drag into the desired order.Note: Click Reset to restore the original attribute order as defined in Settings > Attributes.
Hide or display folder attributes
Select the folder attributes that you want to display in the folder, and deselect the attributes you want to hide.
