
Use drawing templates to eliminate duplication of effort and to help maintain consistency across drawings.
As a basis for configuring your drawing settings, you can choose an existing template that is closest to your needs.
To see the available templates, click ![]()
 New. If you want some preset object styles, the templates that have names beginning with “_AutoCAD Civil 3D”, are recommended.
After choosing your initial template, the next logical step is to review and edit settings. On the Toolspace Settings tab, right-click the drawing name and click Edit Drawing Settings. The Drawing Settings dialog box includes five tabs and many settings.
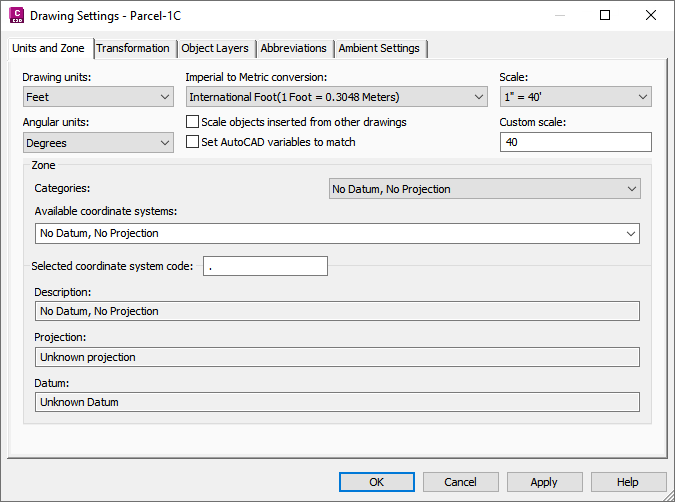
Drawing Settings dialog box
- The Units and Zones tab is used to set linear and angular units, intended plot scale, and coordinate zone for the current drawing.
- The Transformation tab provides functionality to transform the coordinate system specified on the Units And Zones tab to local specifications.
- The Object Layers tab provides a convenient table for assigning objects to layers, and creating or renaming layers. Objects on the same layer are turned on and off together if you change the layer visibility. For maximum display flexibility, spread objects and their components across several layers. The color of a layer affects all objects assigned to that layer and drawn in a style that uses the ByLayer color setting. If you set up styles this way, you can change the color of many objects by simply changing the layer color.
- The Abbreviations tab is a central location in which to set the abbreviations used in object labels, especially for alignment and profile geometry points.
- The Ambient Settings tab provides global default settings, such as the precision of numeric values, and the visibility of tooltips.
One setting on this tab often overlooked is the Save Command Changes To Settings under the General setting group. If you set this to Yes, then whenever you change a setting, such as the radius of an alignment curve, it is saved as the default value for next time.
Another important setting is Independent Layer On. Set it to No if you want to be able to control object visibility by turning layers on and off.
The ambient settings you configured at the drawing level are available at the feature level in case you want to override them.
On the Ambient Settings tab, you see an arrow in the Child Override column next to any setting that is changed for one or more features (objects) in the drawing. You can cancel the override by clicking the arrow, and you can click the lock icon to lock any setting and prevent overrides at the feature level.
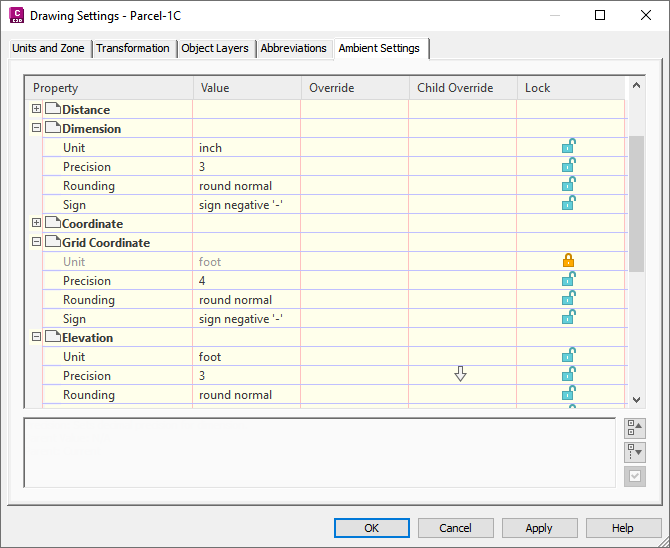
Use Ambient Settings to cancel style overrides.
After configuring the drawing settings, you should work down through Point, Surface, and other features in the Settings tree, right-clicking each feature and selecting Edit Feature Settings. Doing this allows you to examine the default styles for each feature and its labels, the feature name format, and other settings that you may want to modify.