
Use the Layout tab to create a tick component for a label style.
From the Create Component list ![]() , click
, click ![]() to create a new tick component.
to create a new tick component.
General
- Name
-
Specifies the name of the tick component.
The default name, such as “Tick.1,” is the component name with a numeric increment. If the tick component exists in a parent label style, then the name cannot be edited.
- Visibility
-
Specifies whether the tick component is visible in the label style.
- Used In
-
Specifies whether the component is visible in Tag Mode, Label Mode, or both. Select a mode on the General tab in the Label Style Composer.
- Label Mode: Displays the tick component when Display Mode is set to Label.
- Tag Mode: Displays the tick component when Display Mode is set to Tag.
- Label and Tag Modes: Displays the tick component regardless of the display mode setting.
Note: If a label style type does not support tables, then this control is not available.
Tick
- Block Name
-
Specifies the block to use for the tick component.
Click the Value column, and then click
 to open the Select A Block dialog box.
 In the Select A Block dialog box, click
 to open a Viewer in which you can use standard AutoCAD viewing tools to preview the block. Note: The block must exist in the current drawing.
 - Block Height
-
Specifies the height to which the tick block is scaled to fit. The block’s extents in the X direction are used for scaling the height. The block’s aspect ratio is maintained when scaled.
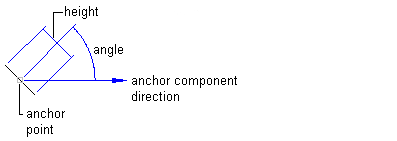
- Rotation Angle
-
Specifies the angle for the tick component. Enter a positive or negative value, or click
 to select an angle in the drawing.
 - Align With Object
-
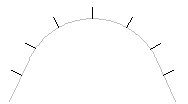
Specifies whether the tick is inserted at an angle relative to the object.
- True: Inserts the tick at an angle relative to the object:
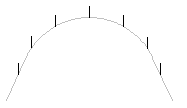
- False: Inserts the tick at an angle relative to the UCS setting:
Note: The specified Rotation Angle is applied in conjunction with this setting. - True: Inserts the tick at an angle relative to the object: