
Modifying Clips with Clip History
To create clip history while rendering:
In the Preferences menu, click the General tab.
Under Default Rendering Options, enable Include History.
Note: In Batch and Tools editors, you also have this option in the Render box, but by setting it in the Preferences menu, you can make sure that history is enabled for all renders (including tools that render a result directly in the workspace without entering the editor).
To view clip history in the timeline and desktop clips:
Select a source or sequence clip with history.
From the Timeline View Mode box, select History.
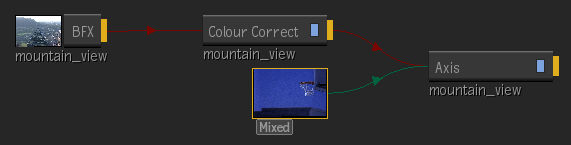
The view changes to a history view of the selected clip. Batch FX and Timeline FX applied to a clip are included in its history. From the history view you can see and edit all of the effects or tools applied to a clip. Double-click effects to re-enter the editor, or use the right-click context menu for other editing options.
 Tip: To quickly enter the history view, double-click the "H" icon on a clip on a desktop clip.
To bypass history view, and quickly re-enter the last tool used on a desktop clip with history, press Shift and double-click the “H” icon on the clip. In this case, you enter the last tool, but if you make any changes, you need to re-render and create a new clip. If you click Exit after making changes, a message appears stating that all changes made since the last render will be lost.
To modify clip history through History View:
- Display the clip history of a clip.
- Double-click a node (in schematic view) or an entry (in list view) to open the corresponding tool or Timeline FX editor.
- Edit the settings as needed.
- If you loaded the clip into a tool editor, do one of the following:
- To save your changes, select Return from the Exit Options box.
- To exit without saving your changes, select Cancel from the Exit Options box, and then confirm.
- If you loaded the clip into a Timeline FX editor, click Exit.
To replace sources in a clip’s history:
Display the history of a clip.
Do one of the following:
Double-click a source to swap the original source with another.
Press
Ctrl+double-click a tool node to swap all of the sources used in a tool.
The cursor becomes a coloured crosshair to indicate what type of source you can select.
Click the source clips you want to swap in to the clip history. The sources you swap must be of the same resolution and bit depth. If the new source is longer than the original source, the new source is shortened to fit the duration of the original source. If the new source is shorter that the original, the last frame of the new source is repeated to the end of the segment.
The sources are swapped and the Render button becomes active.
Click Render to render the swapped sources.
To explode clip history in Batch or Batch FX:
Double-click a clip with history in the Batch or Batch FX schematic to view its clip settings.
In the History section, select Explode History to expand the entire clip history into the process tree, or Explode One to expand only the most recent step of the clip's history.
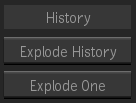
Explode History and Explode One are also available from the right-click context menu on clip nodes with history.
If the input clip to the last node also contains history, you can also expand the history for that clip.
Note: These history options are not available for Batch or Batch FX clips with non-supported effects (the clip appears with a lowercase "h" next to its name in the schematic). In this case, if you double-click the clip again, you are returned to the timeline view. You can switch to History view to see its clip history.