
Using Tangent Arc Control Surface
The Tangent Arc Control Surface is designed to improve interactivity when colour grading film and video footage. You can accomplish all the main grading tasks you do in the Lustre user interface using the Tangent Arc Control Surface.
Modules Description
The Tangent Arc is composed of three modules: Function (left), Grading (center), and Navigation (right). For left handed artist, the location of the Function and Navigation modules can be swapped.
Every module has a large display, located on top, showing the current mode and the current page of controls. For advanced customization, the 55 buttons, the 27 knobs, and the 5 trackballs can be redefined with the Tangent Mapper application. See Tangent Mapper section for more details.
Visit http://www.tangentwave.co.uk/products/ for more details.
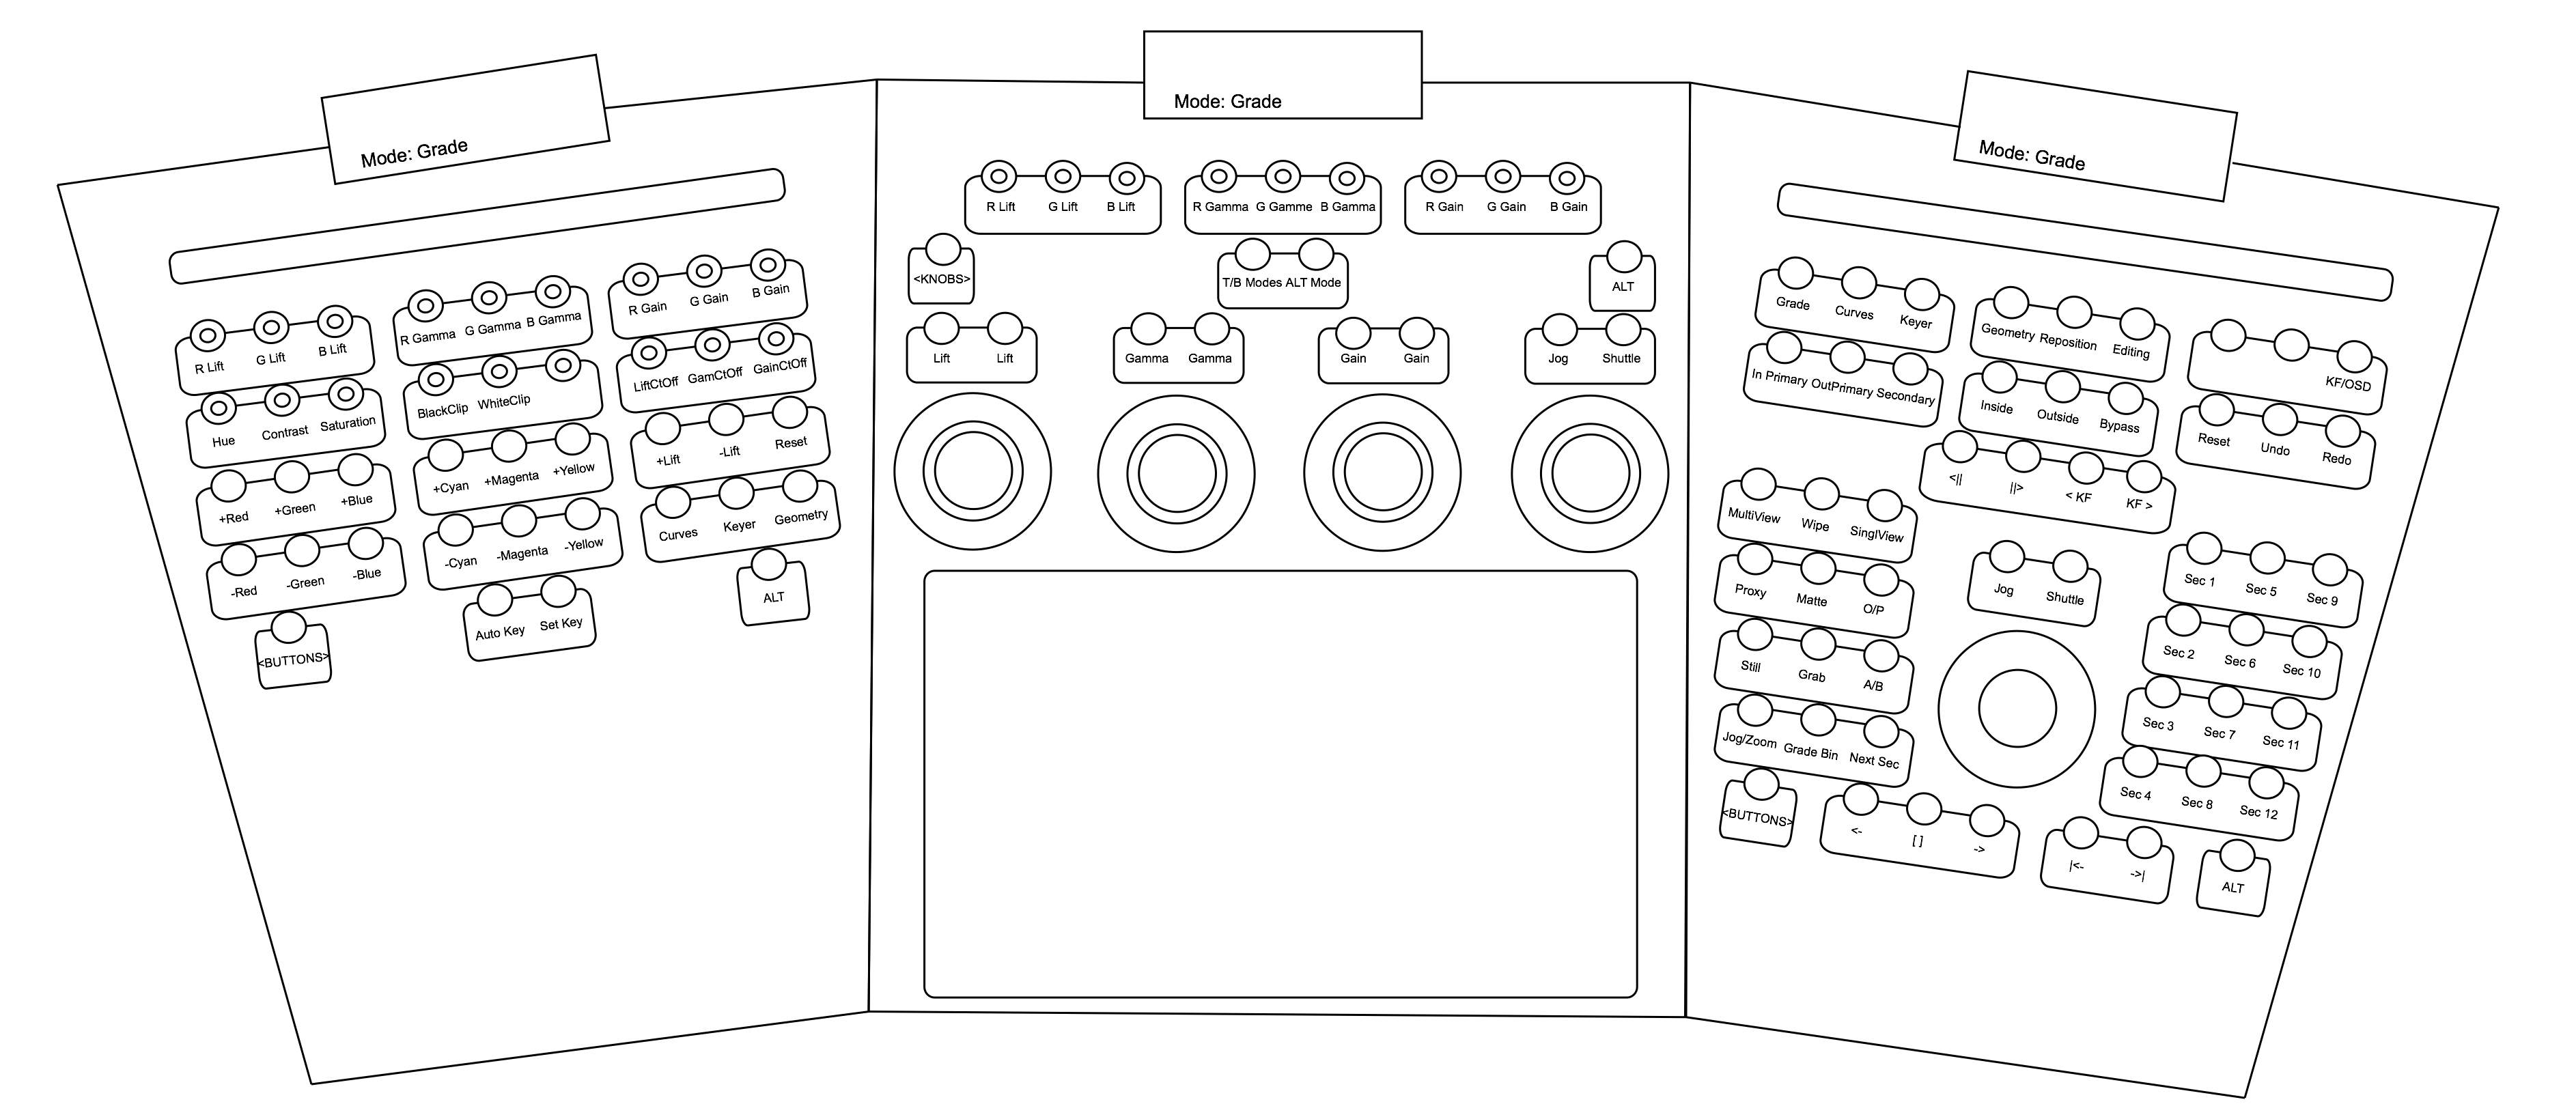
Navigation module
Use the Navigation module to select the working and viewing modes, and define the keypad's behaviour. Finally, use the transport section to navigate with the trackball and ring.
The Navigation module has five sections:
- Modes (first row of buttons)
- Grading modes and utility functions (second row of buttons): Bypass, Reset, Undo/Redo, Save, Shot Reactor controls and software exit).
- Navigation (third row of buttons, ring and balls and bottom row of buttons)
- Viewing and utility functions (left bank of buttons)
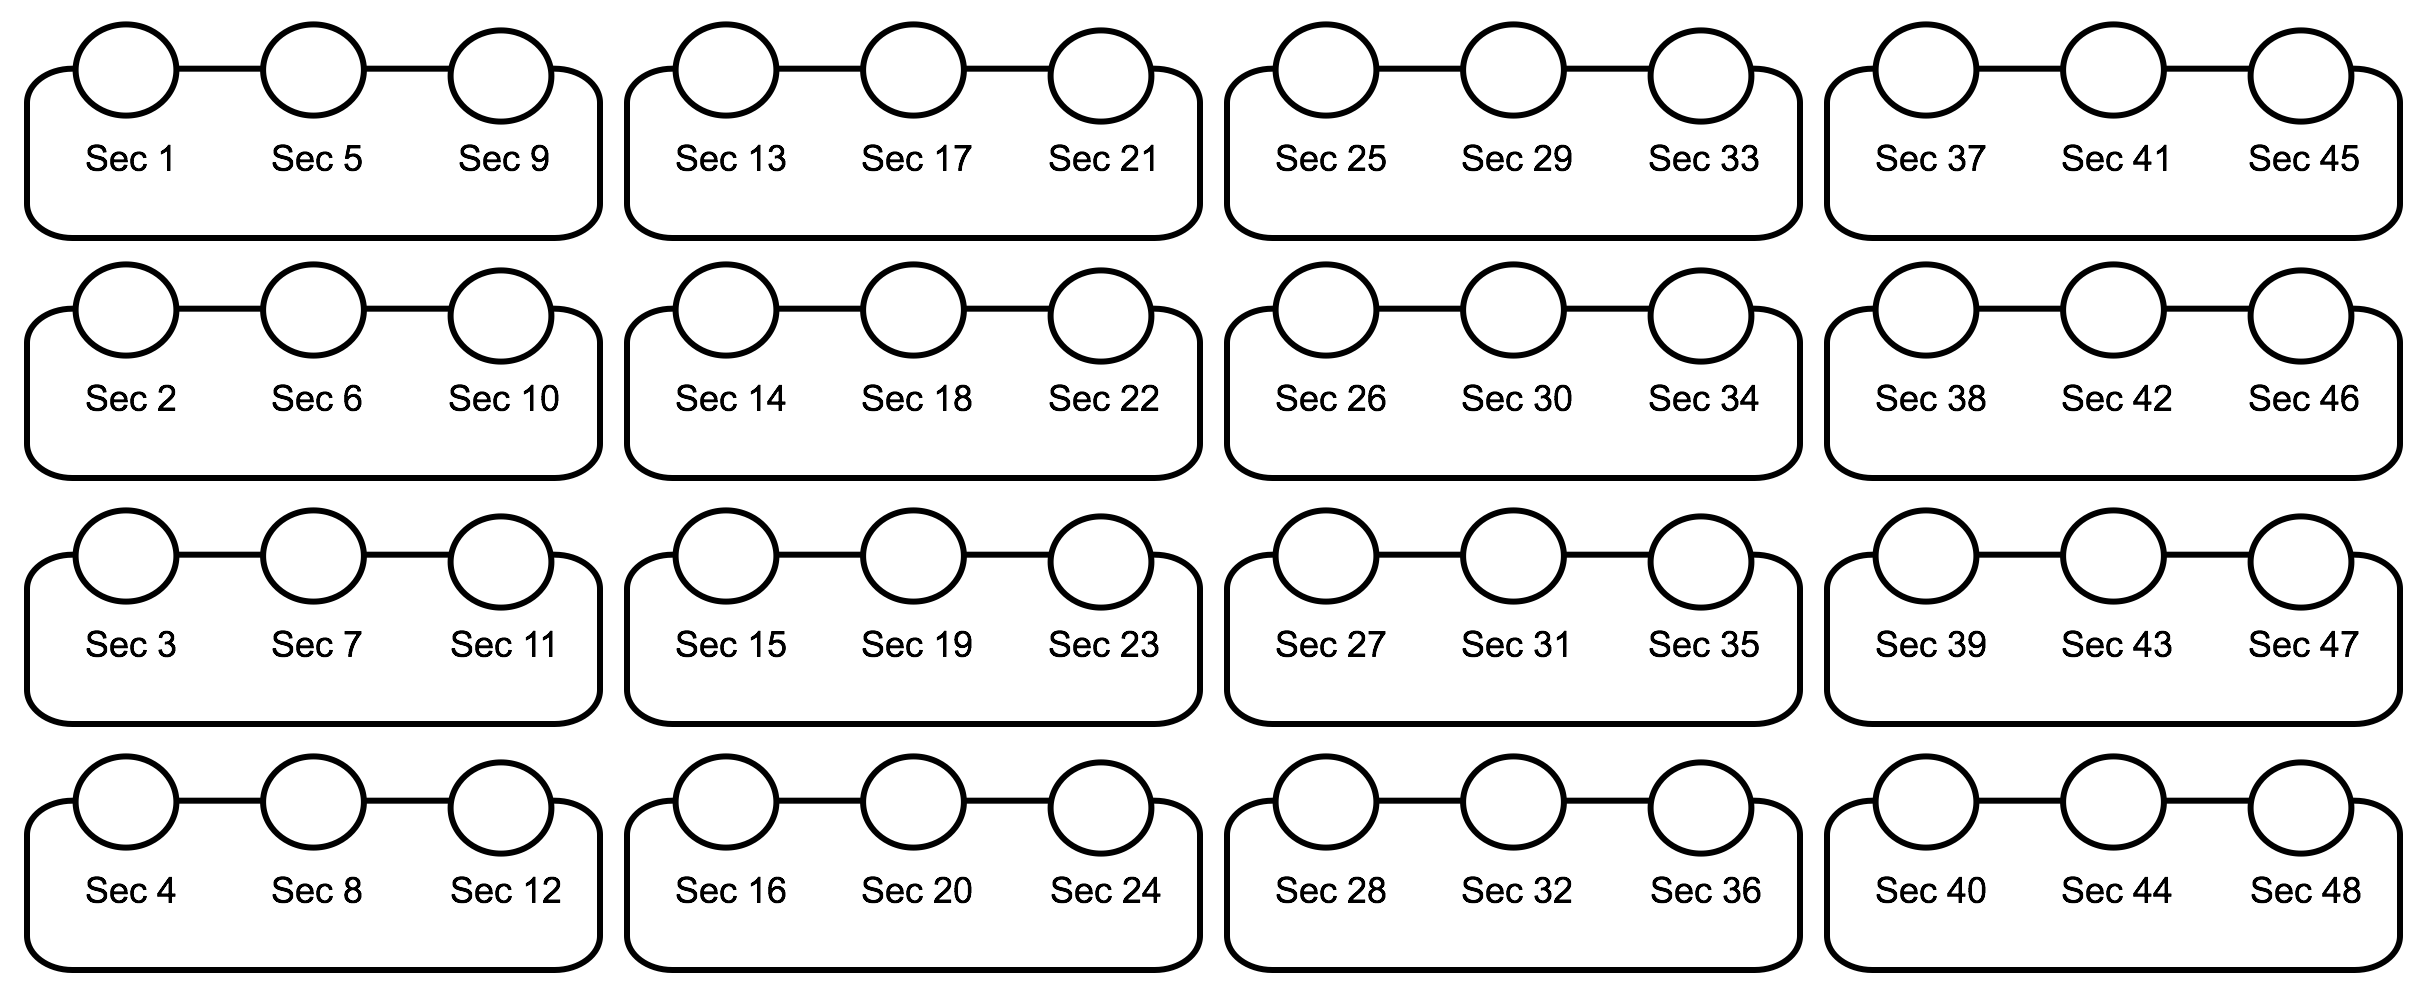
- Keypad (right bank of buttons) for Secondaries, Grade Bins and Numeric Keypad
<BUTTONS>: Cycle through the different pages of functions mapped to the module.
ALT: Enable Alternate mode, either Precise Mode or Turbo Mode, according to your user settings, for all knobs, trackballs and rings. In Alternate mode, the labels of the various controls are followed by Pr (for Precision) or TB (for Turbo).
Grading module
The Grading module is the interface for user input parameters. The trackballs and rings provide an intuitive way of precisely modifying parameters and are especially well suited for grading, among other things.
Moving the trackball from left to right / right to left has the same effect as moving them up and down /down and up.
Turning the ring from left to right increases the value of the assigned parameter, whereas turning the ring from right to left decreases the value.
The values of each parameter assigned to each trackball and ring can be reset by pressing the Reset button above them. Left button resets the Balls while right button resets Rings
<BUTTONS>: Cycle through the different pages of functions mapped to the module.
ALT: Enable either Precise Mode or Turbo Mode, according to your user settings, for all knobs, trackballs and rings.
Function module
The Function module is a knob-based and buttons interface for user input parameters related to the current mode. The values of each parameter assigned to the knobs can be reset by pressing the knob.
<BUTTONS>: Cycle through the different pages of functions mapped to the module.
ALT: Enable either Precise Mode or Turbo Mode, according to your user settings, for all knobs, trackballs and rings.
Navigation module
Modes
The basic Tangent Arc workflow is mode based. This means that you set the appropriate mode for the grading tasks you wish to accomplish and the knob, button and trackball functions are dynamically updated.
Each mode consists of multiple pages of parameters that can be cycled through.
To select a mode, press the appropriate button on the Navigation module, as indicated on the module's screen (first row of buttons).
When a mode is selected, the Grading and Function modules display is updated to show the various controls available in the selected mode. The following modes are supported by the Tangent Arc Control Surface:

Grade Mode (Linear and Logarithmic)
The available functions in this mode correspond to those in the Colour/Grading menu in the application.
By default, the control surface is in Grade Mode (Linear or Logarithmic, according to your project settings).
Curves Mode
The available functions in this mode correspond to those in the Colour/Grading menu in the application.
Keyer Mode
The available functions in this mode correspond to the HLS Keyer / Diamond Keyer functions in the Colour/Secondaries menu in the application.
Geometry Mode
The available functions in this mode correspond to those in the Colour/Secondaries menu in the application.
Reposition Mode
The available functions in this mode correspond to those in the Image/Reposition menu in the application.
Editing Mode
The available functions in this mode correspond to those in the Editing/Timeline menu in the application.
KF/ OSD
The available functions for Keyframes animation and On-Screen Display.
Grading Modes and Utility functions
The second row of buttons on the Navigation module let user selects the Grading mode and shows utility functions.

In Primary
Enable input primary grading mode.
OutPrimary
Enable output primary grading mode.
Secondary
Press to set the Keypad to display the Secondaries.
Inside
When a Shape or a Key is defined on a Secondary, press Inside to affect the region located inside of the isolation. You can also double-press Inside to temporary disable the grading decisions. Double-press Inside to re-enable the grading decisions.
Outside
When a Shape or a Key is defined on a Secondary, press Outside to affect the region located outside of the isolation. You can also double-press Outside to temporary disable the grading decisions. Double-press Inside to re-enable the grading decisions
Bypass
Press once to bypass the currently selected grading tool. Press twice to bypass all grading tools.
Reset
Press once to reset the currently selected grading tool. Press twice to reset all grading tools.
Undo
Undo the last operation performed.
Redo
Redo the last operation performed.
If you hold the ALT button, a second page of Utility Functions is available.

Save All
Save your current cut and grade.
SR On/Off
Enable or Disable rendering via Shot Reactor.
SR Render
When Shot Reactor is configured in Manual mode, use this button to send the current or a selection of shots to Shot Reactor.
SR Reset
Reset Shot Reactor rendering queue.
Cancel
Cancel action for dialogs.
Confirm
Confirm action for dialogs.
EXIT
Exit the application without confirmation.
Navigation

Use the following buttons and controls to navigate your sequence.
<II
Navigate to the previous frame.
II>
Navigate to the next frame.
<KF
Navigate to the previous keyframe
<KF
Navigate to the next keyframe
Ring
Use the ring to shuttle the sequence. Hold Alt to shuttle in alternate mode (Precise or Turbo, based on the selected mapping)
Trackball
Use the trackball to jog the sequence. Hold Alt to jog in alternate mode (Precise or Turbo, based on the selected mapping)
<-
Backward Play button. Holding Stop button while pressing this button moves the positioner backward by one frame in your sequence..
[]
Stop the playback (Alternate: Nav Mode). Toggle between the various Navigation mode when using the Previous and Next Shot controls:
- First Frame (default)
- Last Frame
- Middle Frame
- First/Last Frame
- First/Middle/Last Frame
->
Forward Play button. Holding Stop button while pressing this button moves the positioner forward by one frame in your sequence.
I←
Navigate to the previous shot in your sequence.
→I
Navigate to the next shot in your sequence.
Viewing and Utility functions
The bank of buttons located on the left side of the trackball and ring contains the various viewing mode and utility functions of Lustre. There are three banks of functions that can be navigated to using the BUTTONS located under the bank of buttons.
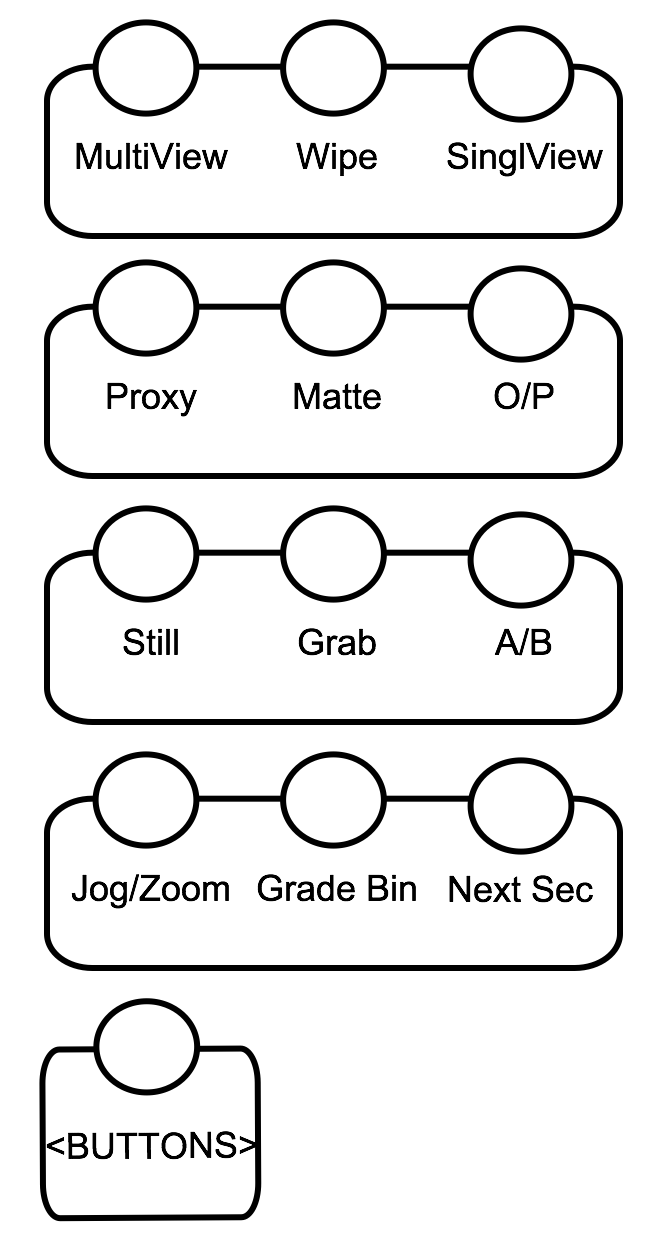
Page 1
MultiView
Toggle the number of active viewports when in multi view. Options are:
- 2
- 4
- 9
- 16
Wipe
Sets the viewing to Dual View and toggles between Horizontal, Vertical and Dual View viewing modes
Single/Dual/MultiView
Toggles between Single, Dual and MultiView viewing modes.
Proxy
Toggles between Full resolution and Proxy viewing mode.
Matte
When a Secondary defines an isolation, the Matte view can be displayed.
O/P
Toggles between Output and Print viewing modes.
Still
When a reference image has been loaded in the Reference Buffer, the Still button toggles the current viewing mode (Output or Print) and Still viewing mode.
Grab
Saves the current image in the viewer in the Reference Buffer.
A/B
Toggles between A and B playheads.
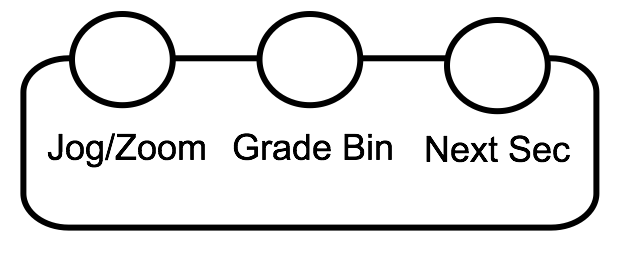
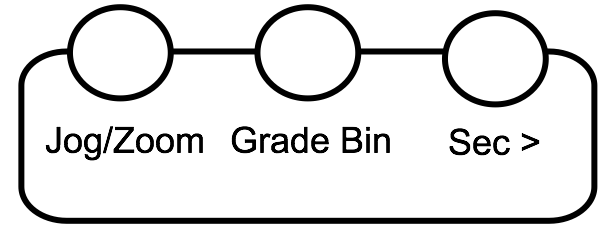
Jog/Zoom
Toggles the trackball and the ring modes
- Transport
- Pan and Zoom
- GradeBin and Transport
Grade Bin
This button toggles the Keypad, located on the right side of the trackball and ring, from Secondary to Grade Bin (Load/Save). See Grade Bin section for more details.
Next Sec
Toggles Secondary pages on the Keypad.
When holding the ALT button, this button becomes Sec > (Next Enabled Secondary, allowing navigating between enabled secondaries.
When Grade Bin mode is selected, the button is relabeled Next Bin and it allows cycling between Global/Project/Scene/User/Quick and Marry Grade Bins.
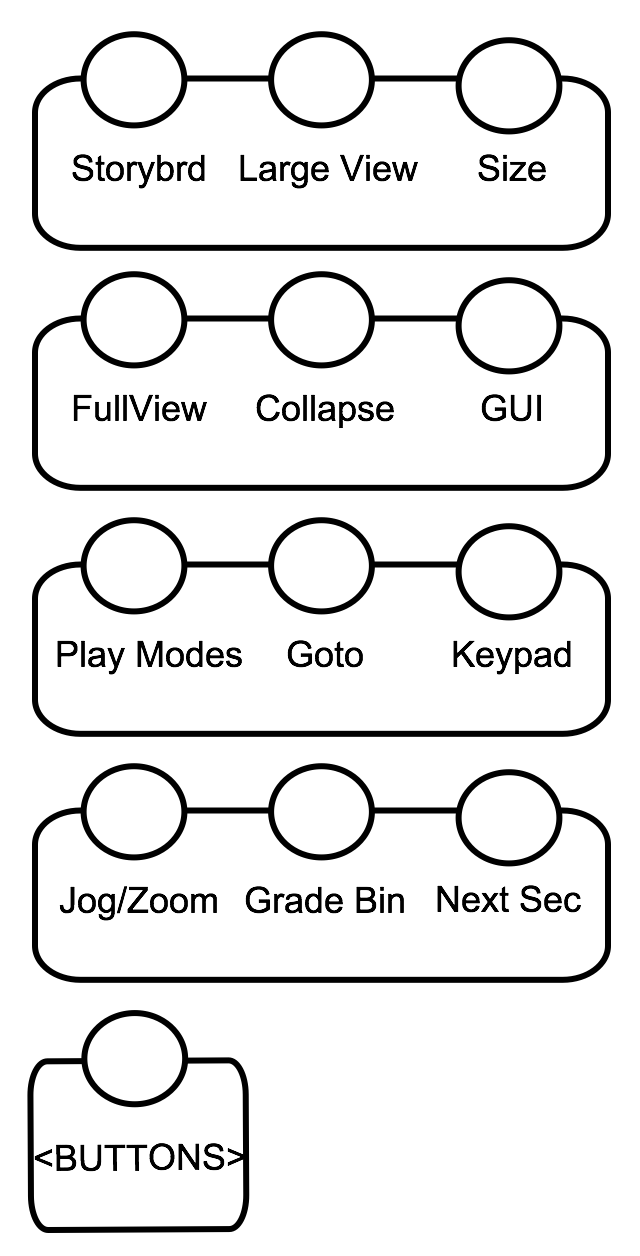
Page 2
Storyboard
Toggles Storyboard On/Off
Large View
When Storyboard is enabled, the Large View button toggles the large and the regular Storyboard view.
Size
When Large Storyboard view is displayed, the Size button toggles between small and large thumbnails.
FullView
When Large Storyboard view is displayed, the FullView button toggles between Dual (Large Storyboard and Viewer) and Single views (Large Storyboard only).
Collapse
When shots are selected in the sequence, Collapse toggles between all shots and selected shots.
GUI
Disable/enable the user interface on the DVI monitor.
Play Modes
Toggles between the various play modes (regular, loop current shot and loop between In/Out marks).
GoTo
Shows the calculator for sequence navigation. Use the Keypad to enter the frame or timecode value of the destination location.
Keypad
Toggles the various Keypad modes (Secondaries, Load Grade Bin, Save Grade Bin and numerical).
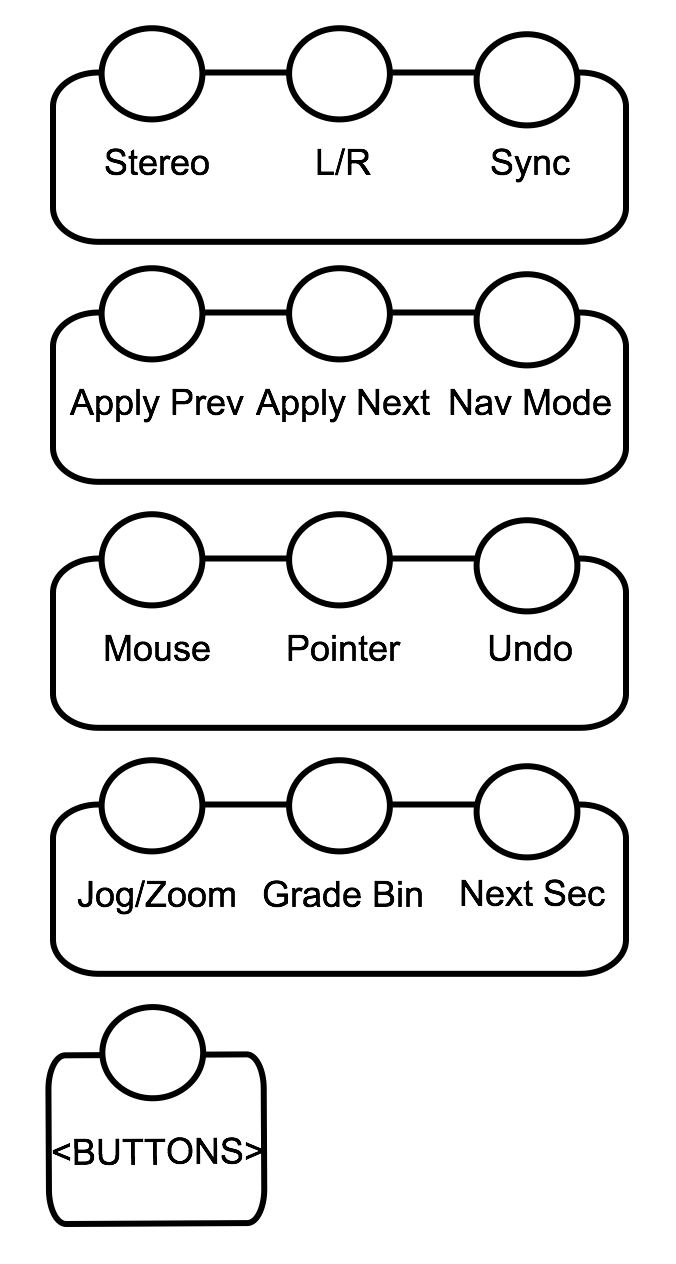
Page 3
Stereo
Toggles between Stereo3D and regular modes
L/R
When working in Stereo3D, toggles Left and Right viewer.
Sync
When working in Stere3D, toggle the Sync mode on and off.
Apply Prev
Use Apply Prev to preview the current shot with the grading decisions of the previous shot. If you press multiple times on the Apply Prev button, the grading decisions of the previous shots will be previewed. You can also use the navigation trackball and ring to navigate to the previous or next shots. Press the Apply button to copy the previewed grade on the current shot. Press the MultiCopy button to revert to the original grading decision.
Apply Next
Use Apply Next to preview the current shot with the grading decisions of the next shot. If you press multiple times on the Apply Next button, the grading decisions of the next shots will be previewed. You can also use the navigation trackball and ring to navigate to the previous or next shots. Press the Apply button to copy the previewed grade on the current shot. Press the MultiCopy button to revert to the original grading decision.
Copy
Copy mode is similar to the Apply Prev/ Apply Next copy grade mode but the difference is that when you press the Apply button, you are still in a grade copy mode so you can continue navigating to other shots in your sequence (with the Next/Previous shot or the trackball and ring navigation) and apply the grading decision. Use Next / Previous shots to navigate to the desired shots to copy the grade to and use the trackball and ring to navigate the grading decisions of the previous or next shots. To exit the Copy mode, press Copy button.
Mouse
The Mouse button allow to enter the Mouse emulation mode. In this mode, the trackball can be used as a mouse to navigate the user interface and the buttons located on top of the trackball act as left and right mouse click.
Pointer
Use the Pointer button to toggle between the three cursor modes: crosshair (default), point and invisible.
Undo
The Undo button becomes Apply when Copy Grade mode is enabled. When not using the Copy Grade mode, you can use Uno button to undo the last operation.
Keypad
The Keypad, located on the right side of the trackball, can be use to enable / disable a given Secondary, Load or Save Grade Bin (in Grade Bin mode) and as a numeric keypad. Use the Keypad button, located on page 2 of the left button bank, to toggle between the different mode.
When working in one of the various Grading modes (Grading, Curves, Keyer, etc), the keypad is used for the Secondaries access. Using the Next Sec button on the left button bank, user can navigate between the four Secondaries banks. When holding ALT button, the Next Sec button becomes Sec >, enabling navigation through enabled Secondaries.
Grade Bin
When working in Grade Bin mode (i.e. pressing the Grade Bin button on the left button bank), the keypad allows Loading or Saving Grade Bins. In this mode, the trackball is used to navigate the content of the Grade Bin and the keypad buttons can be used to Load or Save Grade Bin (ALT).
To exit Grade Bin mode, just press the current mode button (i.e. when you enter Grade Bin mode from the Grade mode, the Grade Bin button becomes Grade to go back to the mode).

In Grade Bin mode, the button Next Sec becomes Next Bin, allowing you to switch the various Grade Bin containers (i.e. Global, Project, Scene, User, Quick and Marry). You can also use the Grab GB button to load the Grade Bin reference image to the Still Store.
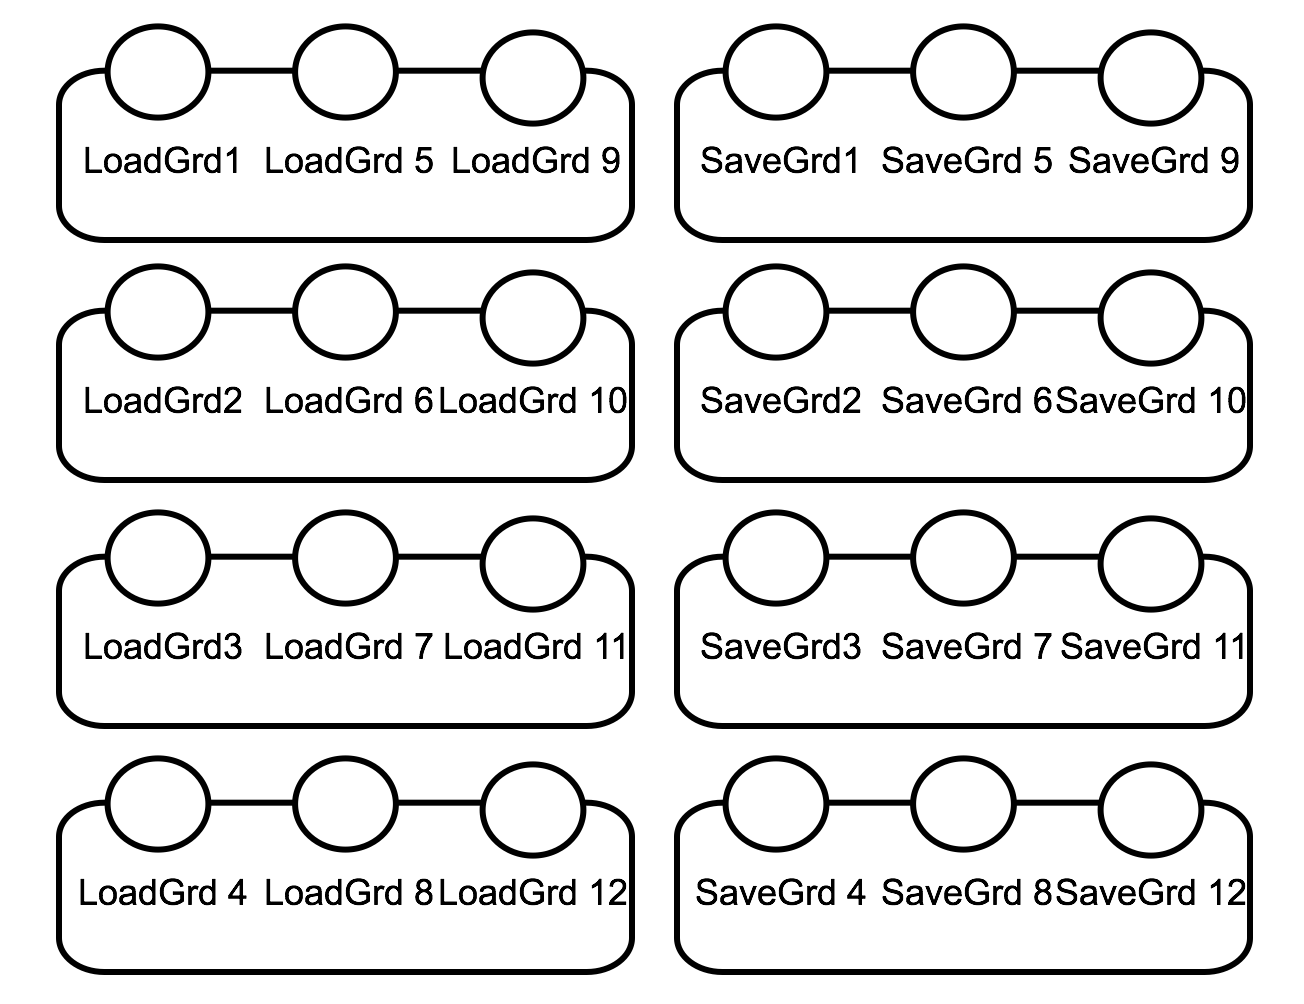
Alternate mode displays the Grade Bin saving mode. If you double press on the ALT button, the alternate mode is enabled.
To Load or Save a Grade Bin, navigate to the Grade Bin page to a Grade Bin slot and press the key on the keypad matching the Grade Bin slot you want to Load from or Save to.
Grading Module
The Grading module has nine knobs and four Trackball. The Trackball on the right is reserved for navigation.
Tablet
The Grading module has a slot to insert a tablet. The model of the tablet is the Wacom Intuos Pro (Medium size).The model number is PTH660.
Modes
When a given mode is selected from the Navigation module, the Grading module shows the available controls of the mode. Here are the various modes.
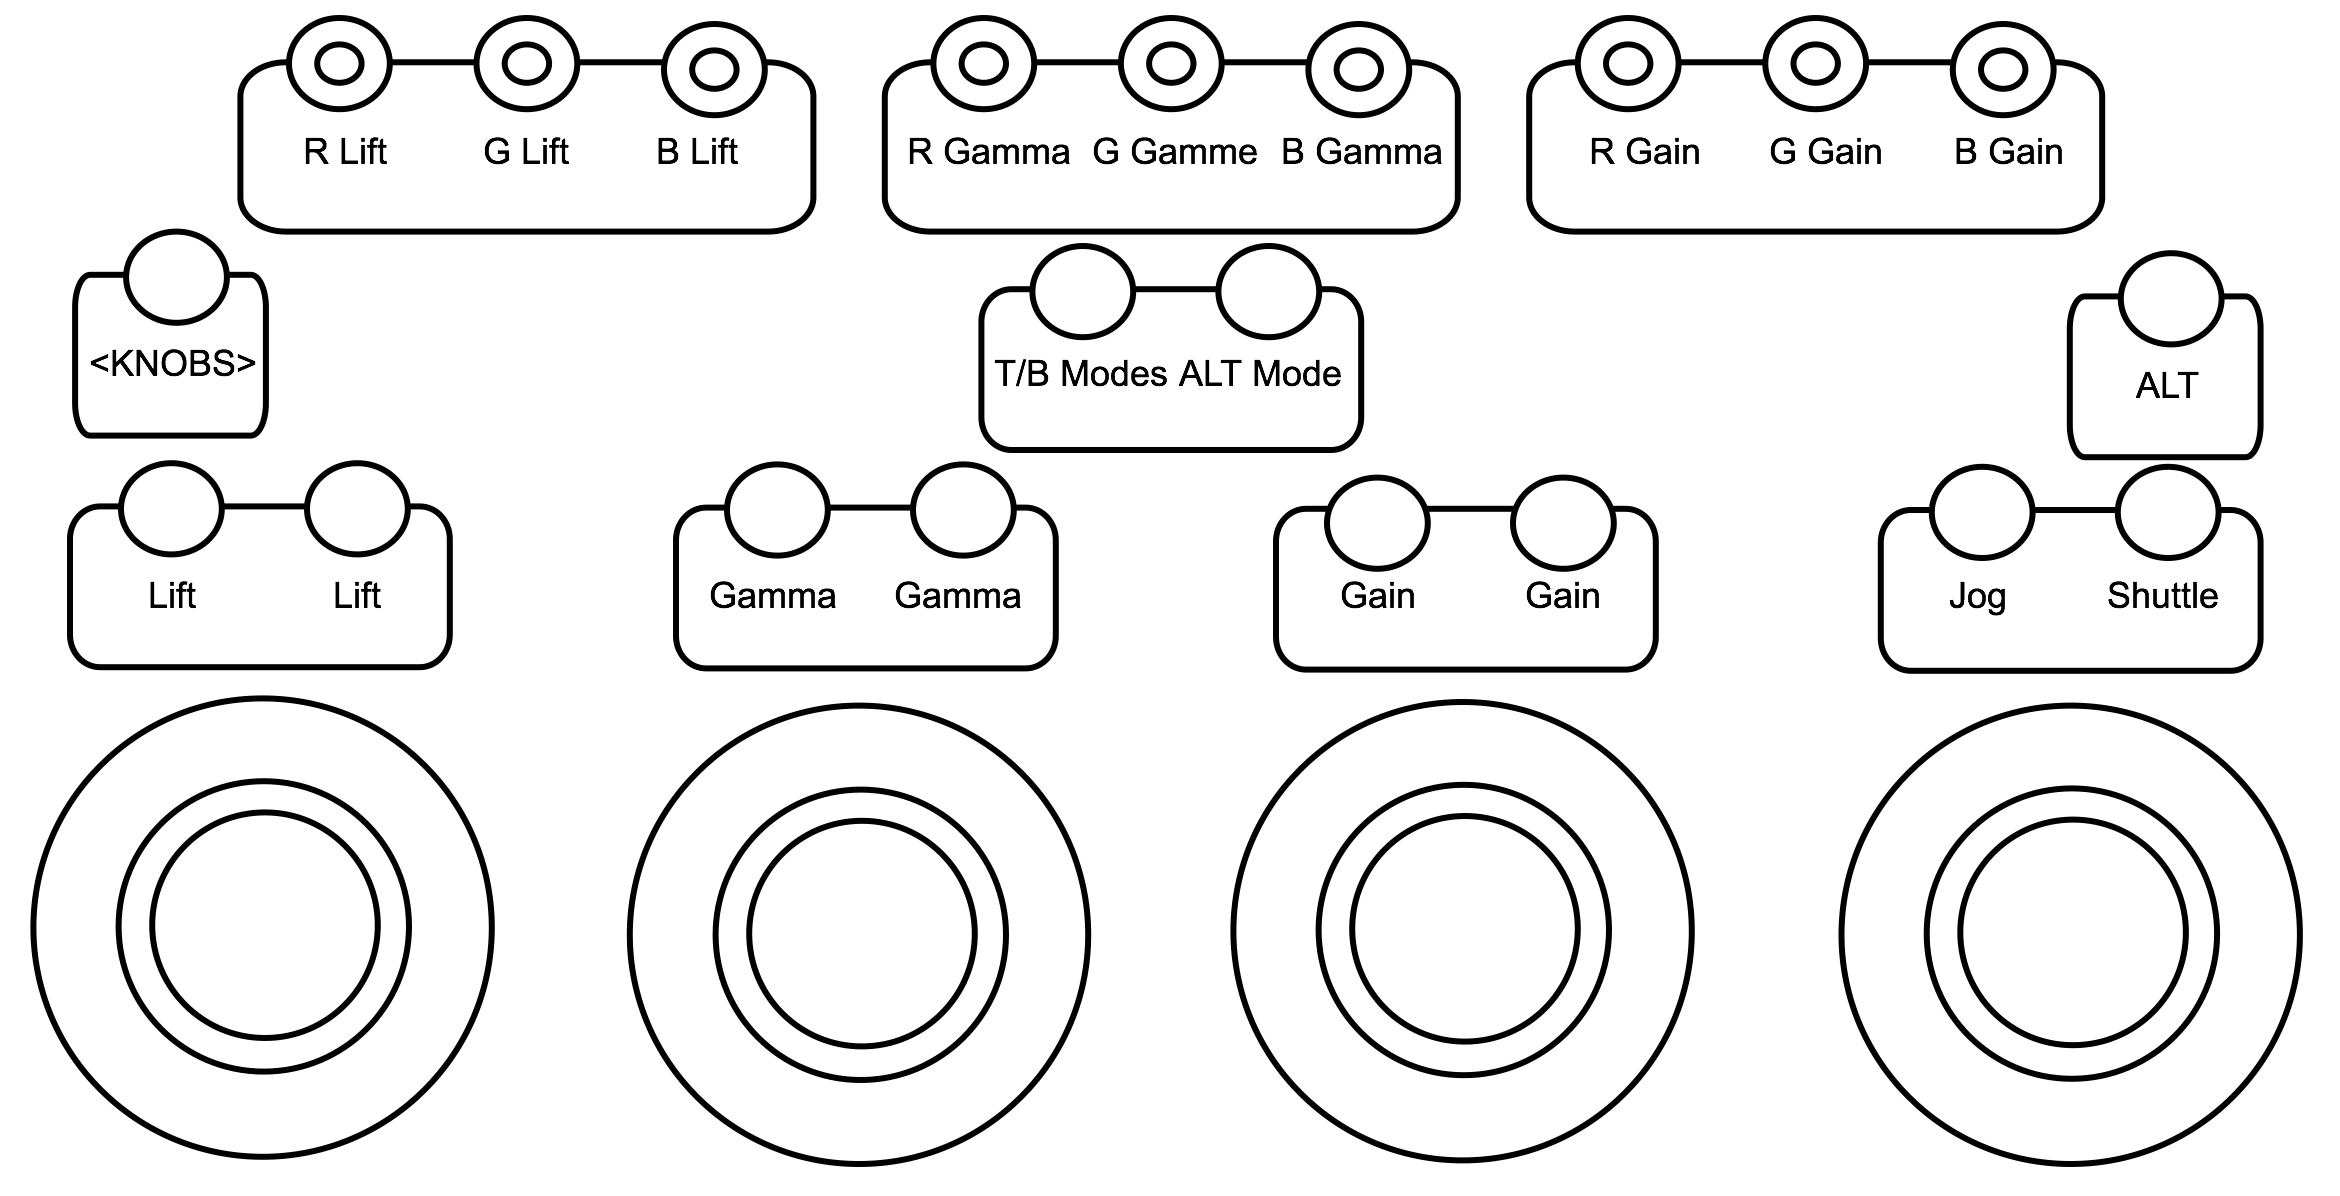
Grading mode (Linear architecture)
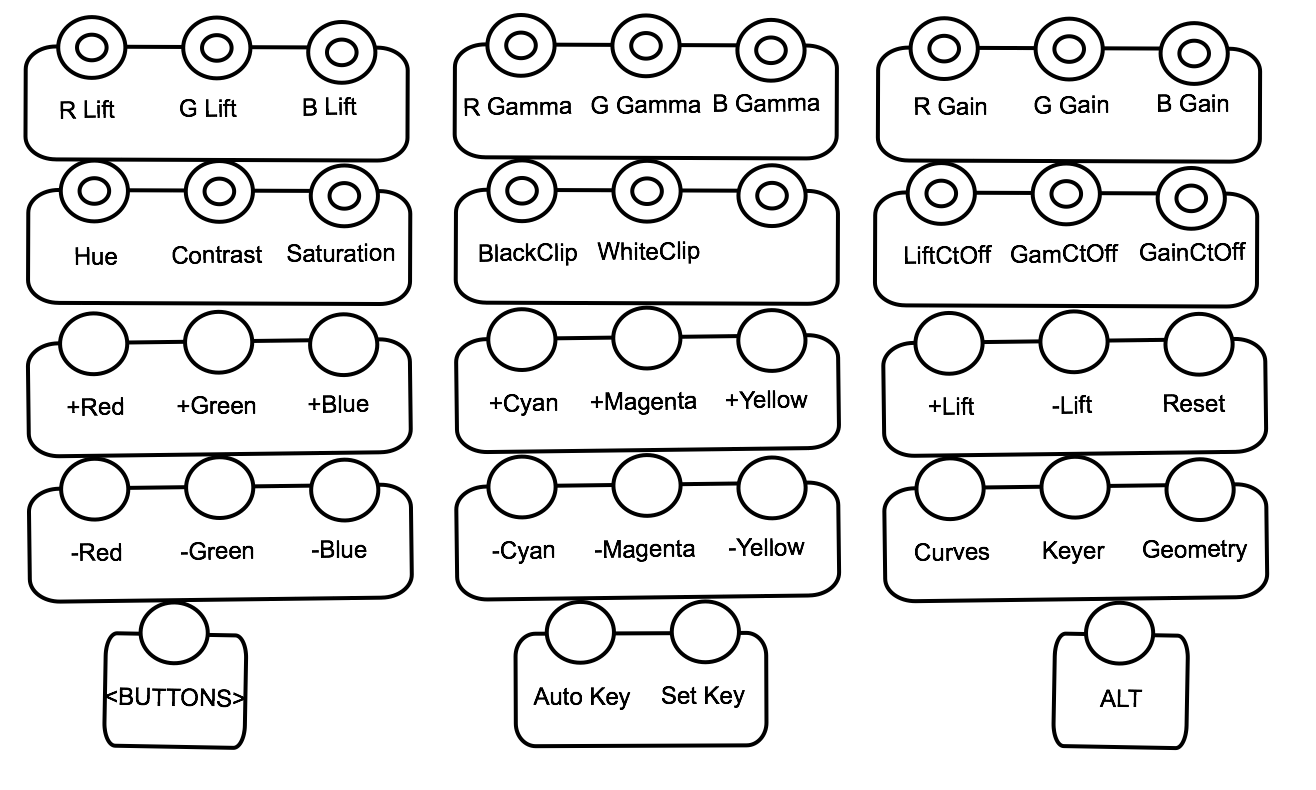
The nine knobs located at the top of the Grading module allow modifying the grading decisions of the current shot with the following controls:
Page 1
- R Lift: Modify the lift of the red channel.
- G Lift: Modify the lift of the green channel.
- B Lift: Modify the lift of the blue channel.
- R Gamma: Modify the gamma of the red channel.
- G Gamma: Modify the gamma of the green channel.
- B Gamma: Modify the gamma of the blue channel.
- R Gain: Modify the gain of the red channel.
- G Gain: Modify the gain of the green channel.
- B Gain: Modify the gain of the blue channel.
Page 2
- Hue: Modify the hue value (for Secondary only)
- Contrast: Modify contrast value.
- Saturation: Modify the saturation value.
- Black Clip: Modify the black clip value.
- White Clip: Modify the white clip value.
- LiftCtOff: Modify the lift cutoff value.
- GamCtOff: Modify the gamma cutoff value.
- GainCtOff: Modify the gain cutoff value.
If you hold the ALT button, the Black Clip / White Clip knobs are replaced with the following controls:
- Black Ref: Modify the black reference value.
- White Ref: Modify the white reference value.
The four trackballs and rings allow modifying the grading decisions of the current shot with the following controls:
Page 1
Master Lift / Gamma / Gain (from left to right)
Lift:
Move the ring left or right to modify the lift of the luminance channel.
Move the trackball right, left, up or down to modify the lift range colour values.
Gamma
- Move the ring left or right to modify the gamma of the luminance channel.
- Move the trackball right, left, up or down to modify the gamma range colour values.
Gain
- Move the ring left or right to modify the gain of the luminance channel.
- Move the trackball right, left, up or down to modify the gain range colour values.
Transport
- Move the ring left or right to shuttle the sequence.
- Move the trackball left or right to jog the sequence.
- Page 2: Low Lift / Gamma / Gain / Transport
- Page 3: Mid Lift / Gamma / Gain / Transport
- Page 4: High Lift / Gamma / Gain / Transport
To reset the trackballs and rings, press the buttons located on top of each trackball:
- Reset trackball (left button)
- Reset ring (right button)
Hold the ALT button to use the alternate mode (Precise or Turbo) for all controls on the Grading panel. You can also double press on the ALT button to lock the alternate mode for all controls.
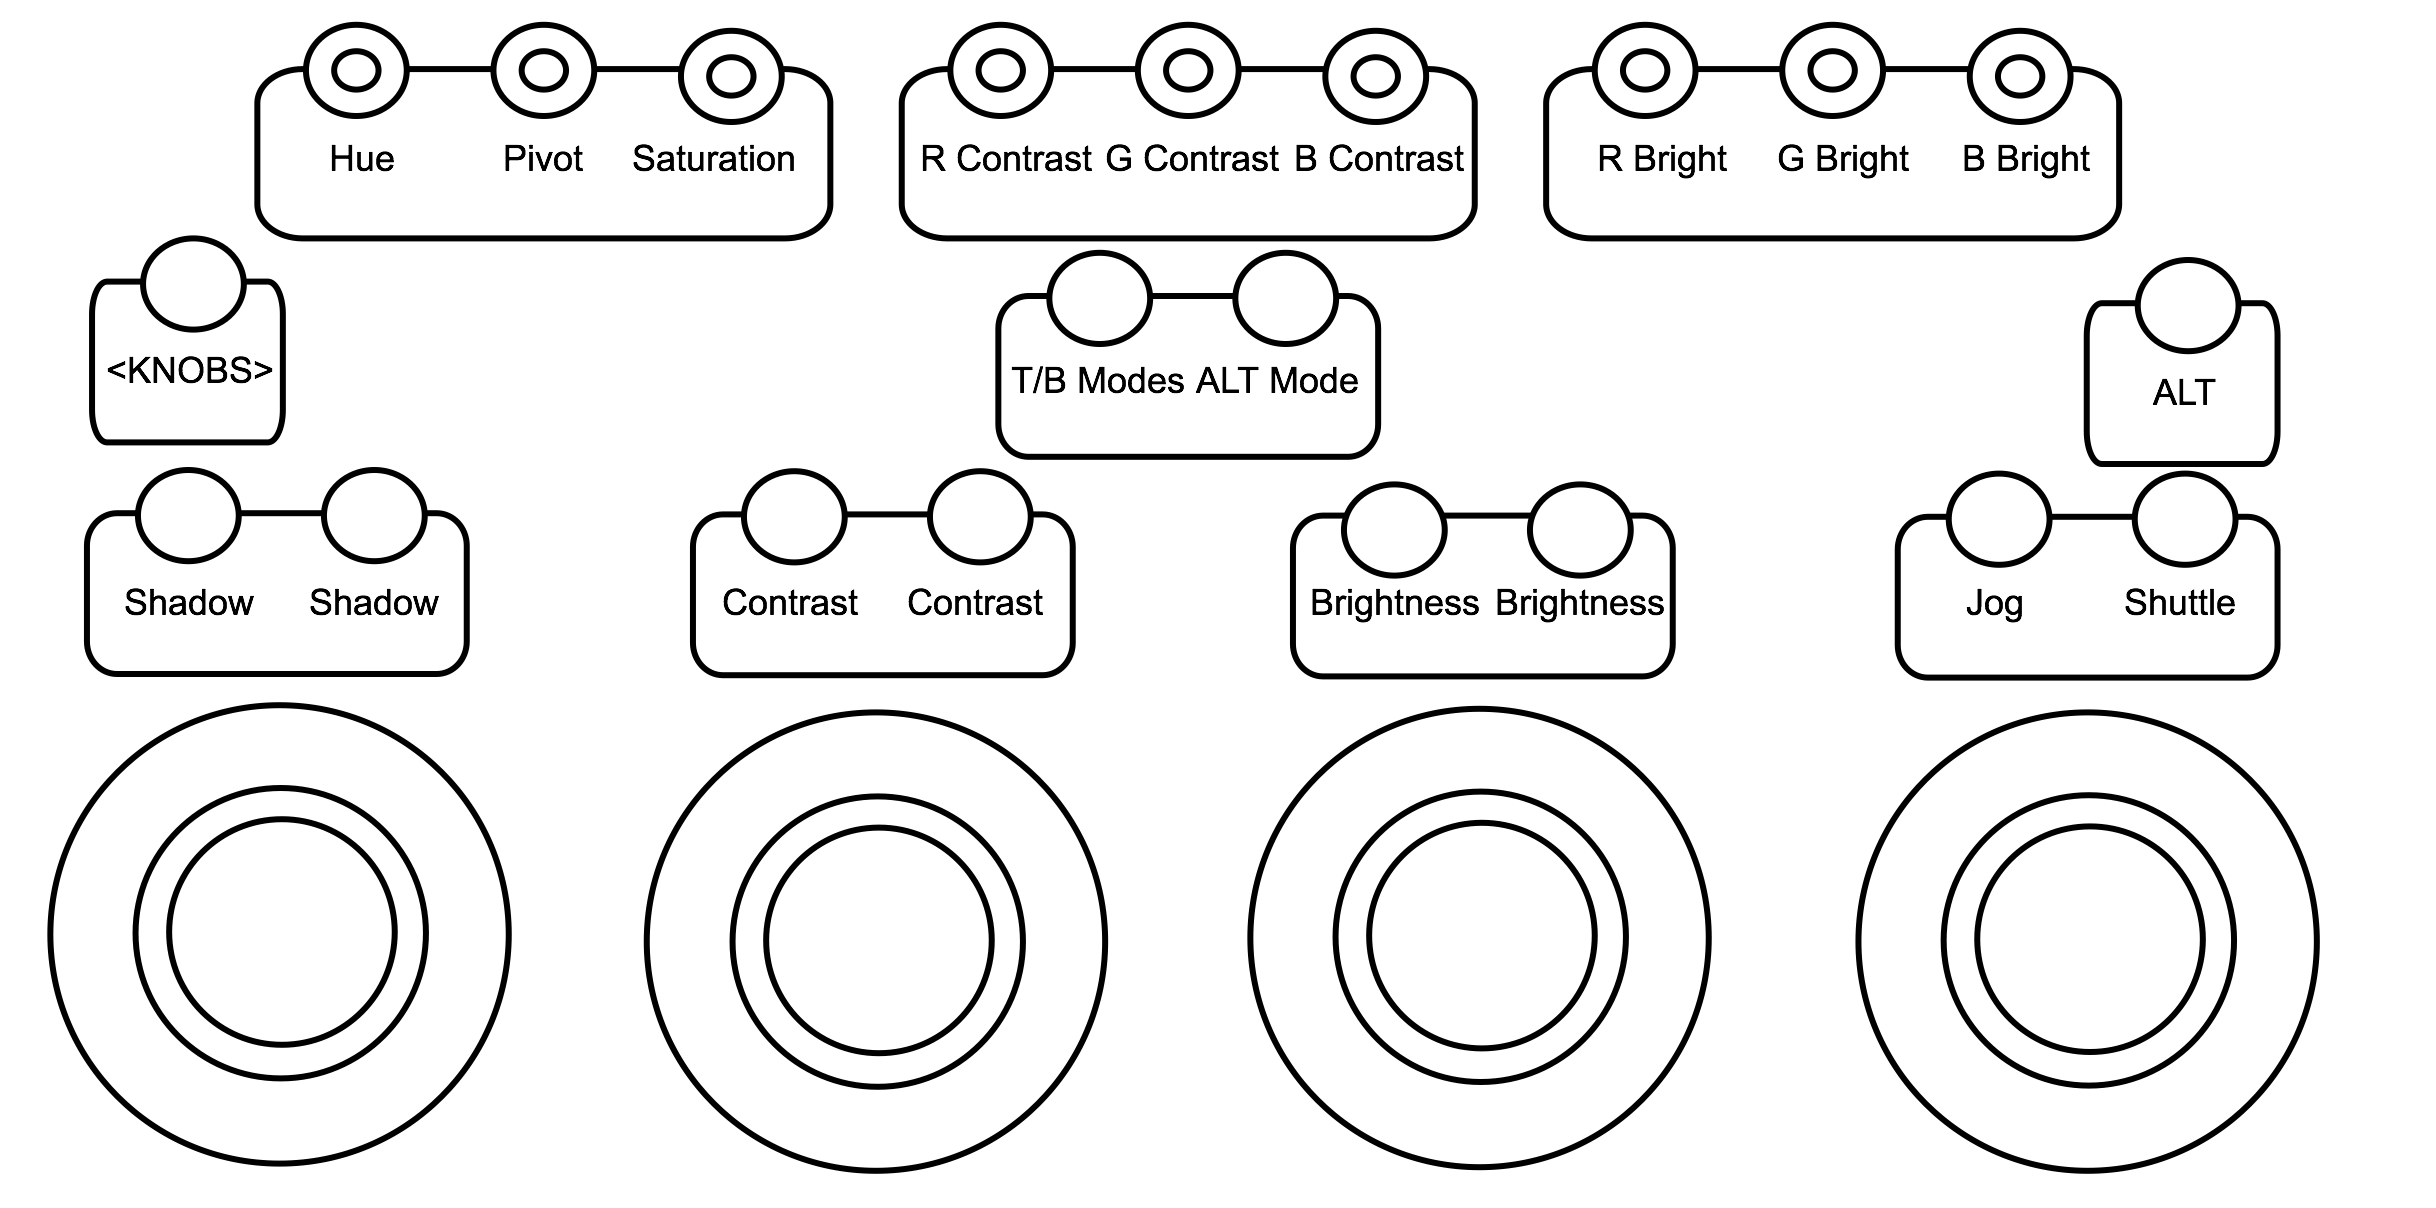
Grading mode (Log architecture)
The nine knobs located at the top of the Grading module allow modifying the grading decisions of the current shot with the following controls:
Page 1
- Hue: Modify the hue value (for Secondary only)
- Pivot: Modify the pivot value.
- Saturation: Modify the saturation value.
- R Contrast: Modify the contrast of the red channel.
- G Contrast: Modify the contrast of the green channel.
- B Contrast: Modify the contrast of the blue channel.
- R Bright: Modify the brightness of the red channel.
- G Bright: Modify the brightness of the green channel.
- B Bright: Modify the brightness of the blue channel.
Page 2
When navigating to the second page, only the last three controls (on the right side) are updated:
- LiftCtOff: Modify the lift cutoff value.
- GamCtOff: Modify the gamma cutoff value.
- GainCtOff: Modify the gain cutoff value.
The four trackballs and rings allow modifying the grading decisions of the current shot with the following controls:
Page 1
Shadow / Contrast/ Brightness (from left to right)
Shadow :
- Move the ring left or right to modify the luminance of the low range colour values.
- Move the trackball right, left, up or down to add colour to low range colour values.
Contrast
- Move the ring left or right to modify the luminance of the contrast ratio.
- Move the trackball right, left, up or down to add colour to the contrast ratio.
Brightness
- Move the ring left or right to modify the luminance of the brightness channel.
- Move the trackball right, left, up or down to add colour to the brightness channel.
Transport
- Move the ring left or right to jog the sequence.
- Move the trackball left or right to scrub the sequence.
Page 2:
Midtones / Highlight
Midtones
- Move the ring left or right to modify the luminance of the mid range colour values.
- Move the trackball right, left, up or down to add colour to the mid range colour values.
Highlight
- Move the ring left or right to modify the luminance of the high range colour values.
- Move the trackball right, left, up or down to add colour to the high range colour values.
To reset the trackballs and rings, press the buttons located on top of each trackball:
- Reset trackball (left button)
- Reset ring (right button)
Hold the ALT button to use the alternate mode (Precise or Turbo) for all controls on the Grading panel. You can also double press on the ALT button to lock the alternate mode for all controls.
Curves mode
When Curves mode is enabled, the nine knobs located at the top of the Grading module are set to the Curves. The other controls on the Grading module are still showing the grading controls of the current architecture (Linear or Logarithmic).

If you press the <KNOBS> button, the Light curve will be replaced with the L-S Curve. The Cyan, Magenta and Yellow knobs will also be changed to Shadows, Midtones and Highlights.
- Red: Adjust the red point on the hue, lightness or saturation curve, according to the selected curve.
- Green: Adjust the green point on the hue, lightness or saturation curve, according to the selected curve.
- Blue: Adjust the blue point on the hue, lightness or saturation curve, according to the selected curve.
- Hue: Press on the knob to enable the hue curve. Turning the knob left or right will raise or lower the Hue across the entire spectrum.
- Light: Press on the knob to enable the lightness curve. Turning the knob left or right will raise or lower the lightness across the entire spectrum.
- Sat: Press on the knob to enable the saturation curve. Turning the knob will raise or lower the saturation across the entire spectrum.
- Cyan: Adjust the cyan point on the hue, lightness or saturation curve, according to the selected curve.
- Magenta: Adjust the magenta point on the hue, lightness or saturation curve, according to the selected curve.
- Yellow: Adjust the yellow point on the hue, lightness or saturation curve, according to the selected curve.
- L-S: Press on the knob to enable the lightness - saturation curve. Turning the knob left or right will raise or lower the lightness - saturation across the entire spectrum.
- Shadows: Adjust the shadows point on the lightness - saturation curve.
- Midtones: Adjust the midtones point on the lightness - saturation curve.
- Highlights: Adjust the highlights point on the lightness - saturation curve.
Geometry mode
When Geometry mode is enabled, the Trackballs of the Grading module show the various Geometry controls. If you press the T/B Modes button, you can navigate to the grading controls of the current architecture (Linear or Logarithmic).
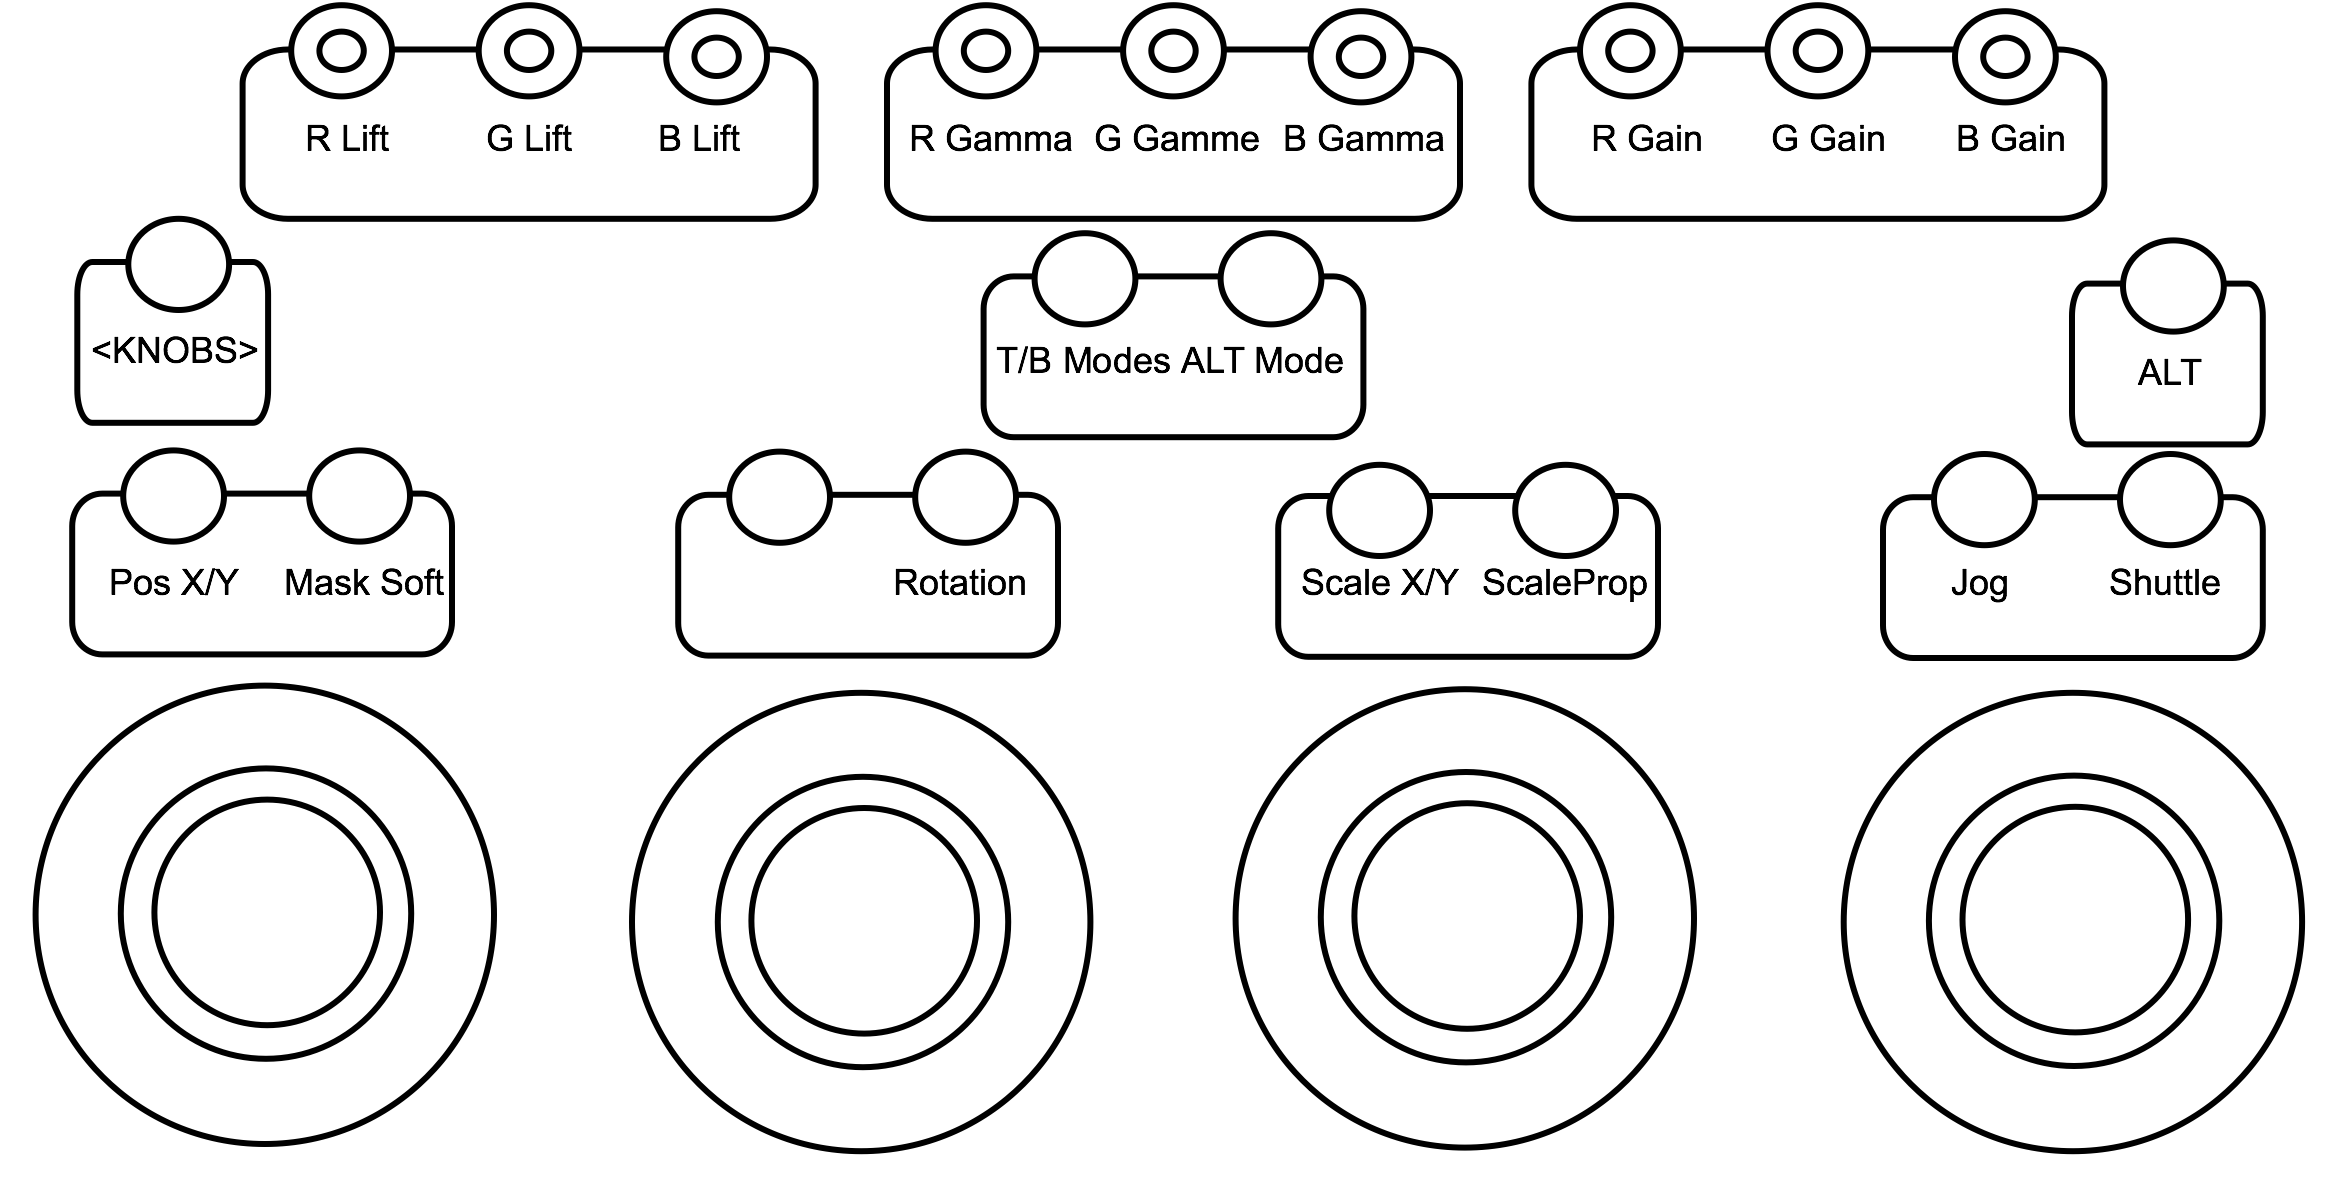
- Pos X/Y: Move your geometry on the X and Y axises.
- Mask Soft: Set the level of mask softness.
- Rotation: Rotate your geometry.
- Scale X/Y: Scale your geometry proportionally.
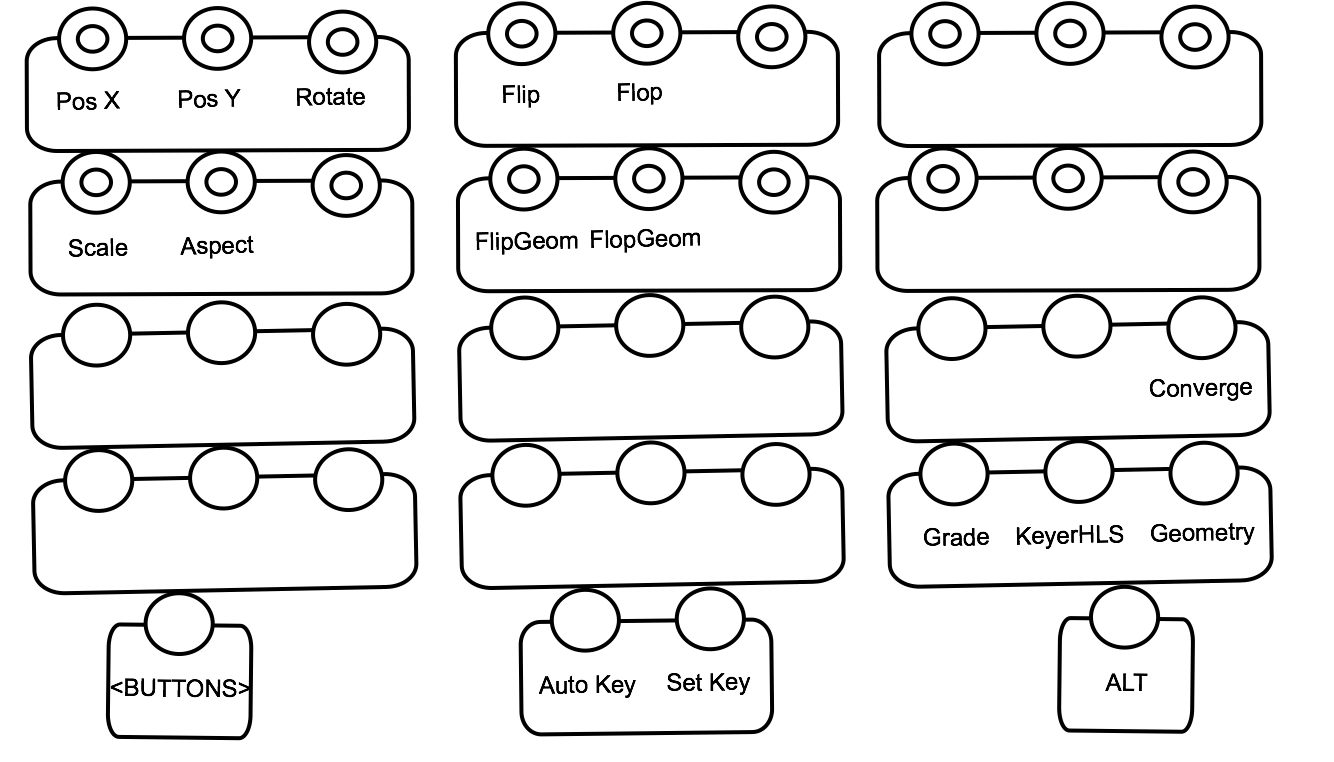
Reposition mode
When Reposition mode is enabled, the Trackballs of the Grading module show the various Reposition controls. If you press the T/B Modes button, you can navigate to the grading controls of the current architecture (Linear or Logarithmic).
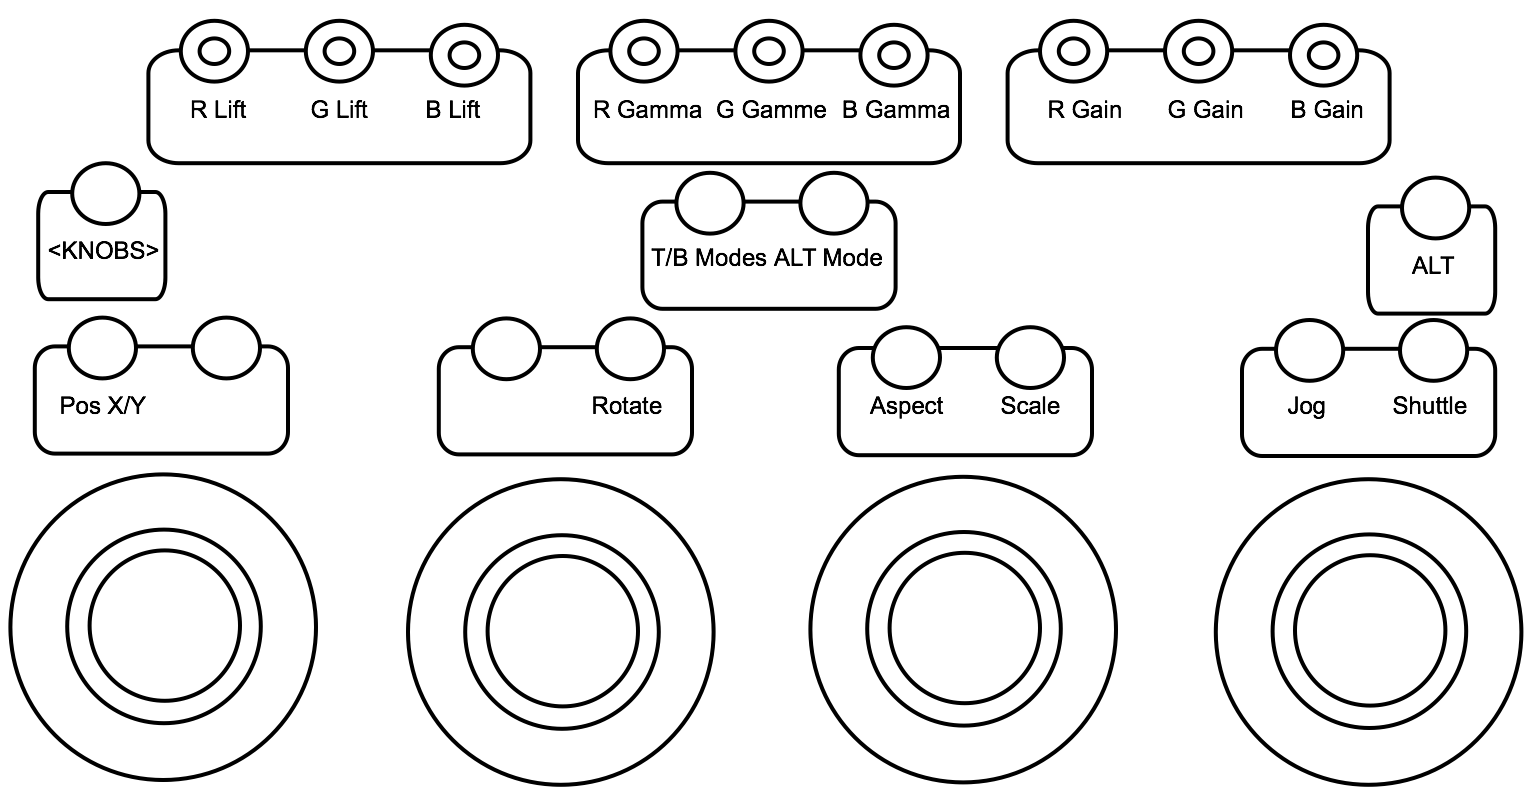
- Pos X/Y: Move your image on the X and Y axises.
- Rotate: Rotate your image.
- Aspect: Scale your image in X.
- Scale: Scale your image proportionally.
Function Module
The Function module is updated based on the selected mode.
Grading mode (Linear architecture)
The two row of knobs show the same controls as the two pages of knobs located on the Grading module. The idea is for colorist to not have to navigate between the two pages on the Grading module to access controls. That way you can concentrate on the trackballs and rings on the Grading module.
The two rows of buttons are assigned to Printer Lights. There are four pages of Printer Lights controls:
- Page 1: Full Printer Lights controls
- ALT: 1/2 Printer Lights controls.
- Page 2 (press <BUTTON> to navigate to page 2) 1/4 Printer Lights controls.
- ALT: 1/8 Printer Lights controls.
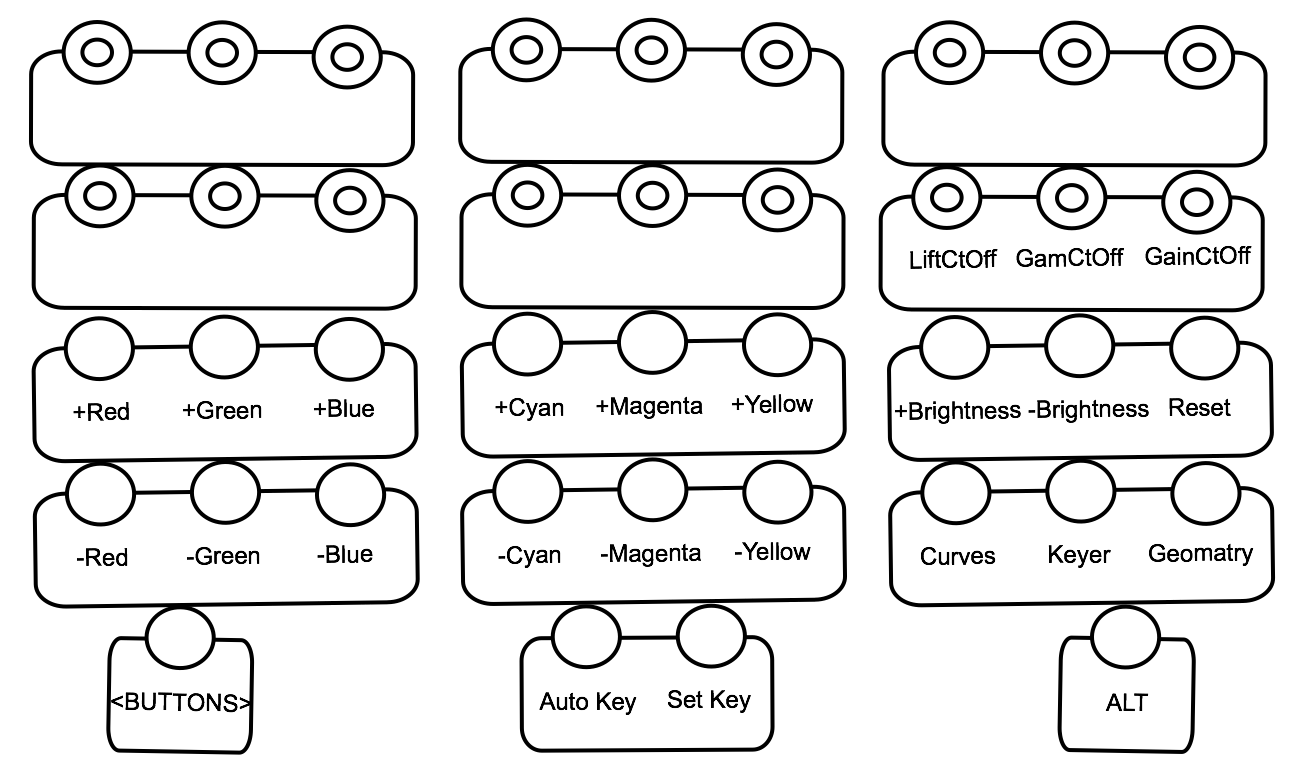
Top row of knobs
- R Lift: Modify the lift of the red channel.
- G Lift: Modify the lift of the green channel.
- B Lift: Modify the lift of the blue channel.
- R Gamma: Modify the gamma of the red channel.
- G Gamma: Modify the gamma of the green channel.
- B Gamma: Modify the gamma of the blue channel.
- R Gain: Modify the gain of the red channel.
- G Gain: Modify the gain of the green channel.
- B Gain: Modify the gain of the blue channel.
Second row of knobs
- Hue: Modify the hue value (for Secondary only)
- Contrast: Modify contrast value.
- Saturation: Modify the saturation value.
- Black Clip: Modify the black clip value.
- White Clip: Modify the white clip value.
- LiftCtOff: Modify the lift cutoff value.
- GamCtOff: Modify the gamma cutoff value.
- GainCtOff: Modify the gain cutoff value.
If you hold the ALT button, the Black Clip / White Clip knobs are replaced with the following controls:
Black Ref: Modify the black reference value.
White Ref: Modify the white reference value.
The two rows of buttons give access to Printer Light and Curves, Keyer and Geometry modes.
First row of buttons
- +Red: Increase red brightness by one step.
- +Green: Increase green brightness by one step.
- +Blue: Increase blue brightness by one step.
- +Cyan: Increase cyan brightness by one step.
- +Magenta: Increase magenta brightness by one step.
- +Yellow: Increase yellow brightness by one step.
- +Bright: Increase overall brightness by one step.
- -Bright: Decrease overall brightness by one step.
- Reset: Reset Printer Lights
Second row of buttons
- -Red: Increase red brightness by one step.
- -Green: Increase green brightness by one step.
- -Blue: Increase blue brightness by one step.
- -Cyan: Increase cyan brightness by one step.
- -Magenta: Increase magenta brightness by one step.
- -Yellow: Increase yellow brightness by one step.
- Curves: go to Curves mode
- Keyer: Go to Keyer mode
- Geometry: Go to Geometry mode
The last row of button shows the following:
- <BUTTON>: use to change page of buttons.
- Autokey: toggle Autokey state on/off. When enabled, Autokey is underlined.
- Set Key: add a keyframe on the currently channel.
- ALT: hold the ALT button to use the alternate mode (Precise or Turbo for knobs and trackball and alternate mapping). You can also double press on the ALT button to lock the alternate mode for all controls.
Grading mode (Log architecture)
When working with the Log architecture, only the last row of knobs is available and shows the same three controls as the second page on the Grading module. The idea is for colorists to not have to navigate between the two pages on the Grading module to access controls. That way you can concentrate on the trackballs and rings on the Grading module. The two rows of buttons are assigned to Printer Lights. There are four pages of Printer Lights controls:
- Page 1: Full Printer Lights controls
- ALT: 1/2 Printer Lights controls.
- Page 2 (press <BUTTON> to navigate to page 2) 1/4 Printer Lights controls.
- ALT: 1/8 Printer Lights controls.
Second row of knobs (right)
- ShaCtOff: Modify the lift cutoff value.
- MidCtOff: Modify the gamma cutoff value.
- HighCtOff: Modify the gain cutoff value.
The two rows of buttons give access to Printer Light and Curves, Keyer and Geometry modes.
First row of buttons
- +Red: Increase red brightness by one step.
- +Green: Increase green brightness by one step.
- +Blue: Increase blue brightness by one step.
- +Cyan: Increase cyan brightness by one step.
- +Magenta: Increase magenta brightness by one step.
- +Yellow: Increase yellow brightness by one step.
- +Bright: Increase overall brightness by one step.
- -Bright: Decrease overall brightness by one step.
- Reset: Reset Printer Lights
Second row of buttons
- -Red: Increase red brightness by one step.
- -Green: Increase green brightness by one step.
- -Blue: Increase blue brightness by one step.
- -Cyan: Increase cyan brightness by one step.
- -Magenta: Increase magenta brightness by one step.
- -Yellow: Increase yellow brightness by one step.
- Curves: go to Curves mode
- Keyer: Go to Keyer mode
- Geometry: Go to Geometry mode
The last row of button shows the following:
- <BUTTON>: use to change page of buttons.
- Auto Key: toggle Autokey state on/off. When enabled, Autokey is underlined.
- Set Key: add a keyframe on the currently channel.
- ALT: hold the ALT button to use the alternate mode (Precise or Turbo for knobs and trackball and alternate mapping). You can also double press on the ALT button to lock the alternate mode for all controls.
Curves mode
In Curves mode, the controls are the same as the Grading mode. The only difference is the three Navigation button which are Grade, Keyer and Geometry.
Keyer mode
When a Secondary is activated, it is possible to navigate to the Keyer mode to create an isolation. You can toggle between the HLS or the Diamond keyer. Based on the selected Keyer, the Function panel will display the available functions.
HLS Keyer
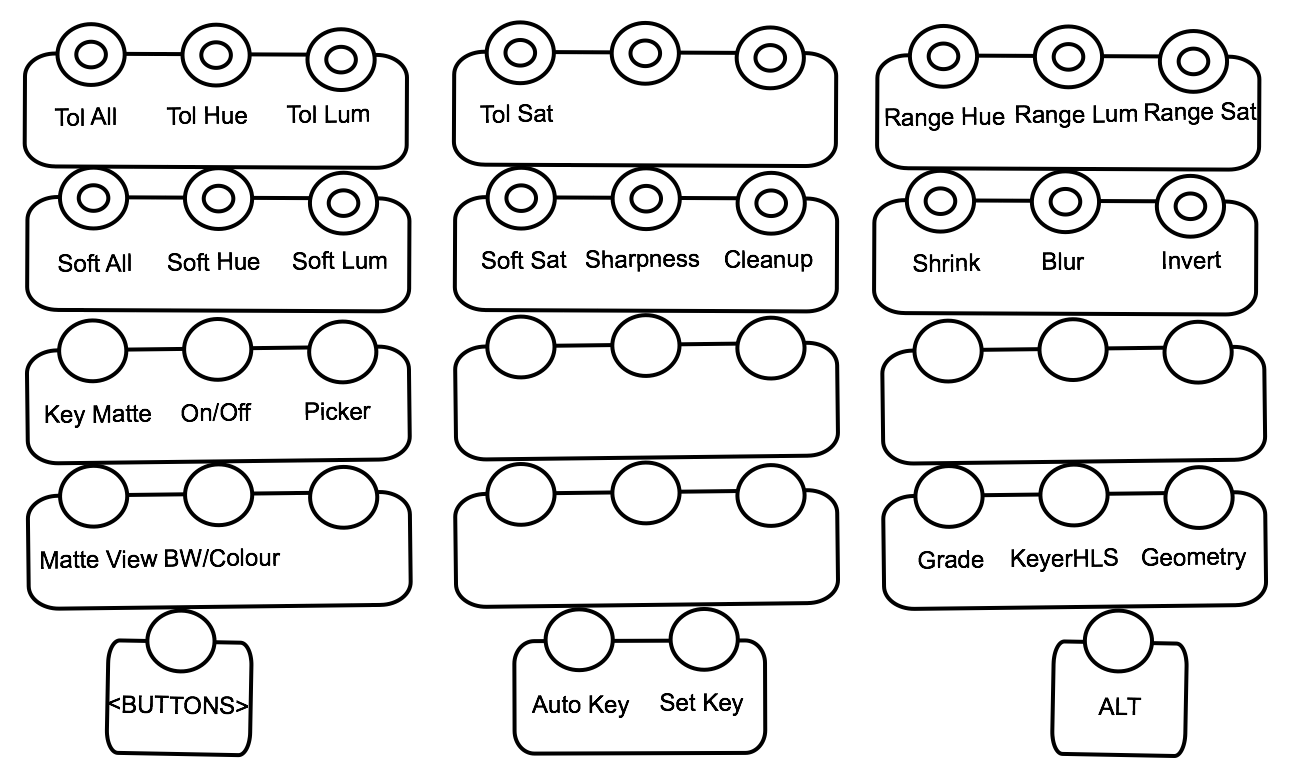
HLS Keyer controls
- Tol All: Set the global tolerance for your key (hue, luminance and saturation channels).
- Tol Hue: Set the tolerance for the hue channel.
- Tol Lum: Set the tolerance for the luminance channel.
- Tol Sat: Set the tolerance for the saturation channel.
- Range Hue: Offset the tolerance range for the hue channel.
- Range Lum: Offset the tolerance range for the luminance channel.
- Range Sat: Offset the tolerance range for the saturation channel.
- Soft All: Set the global softness for your key (hue, luminance and saturation channels).
- Soft Hue: Set the softness for the hue channel.
- Soft Lum: Set the softness for the luminance channel.
- Soft Sat: Set the softness for the saturation channel.
- Sharpness: Drag the Sharpness slider to adjust softness and reduce noise if the matte appears grainy.
- Cleanup: Remove stray pixels from the key to clean it up for colour grading
- Shrink: Shrink a key to remove pixels from the edge of the key
- Blur: Blur a key to apply a softening filter to its edge.
- Invert: Press the knob to invert the isolation
- Key Matte: Toggle the Matte or the Key-In controls.
- On/Off: toggle Keyer On/Off
- Picker: press to enable the Picker
- Matte View: Show the Matte of the key.
- BW/Colour: toggle between Black and White or Coloured Matte View
- Grade: Navigate to the Grade mode
- KeyerHLS: press to toggle to Diamond Keyer
- Geometry: Navigate to the Geometry mode
Diamond Keyer
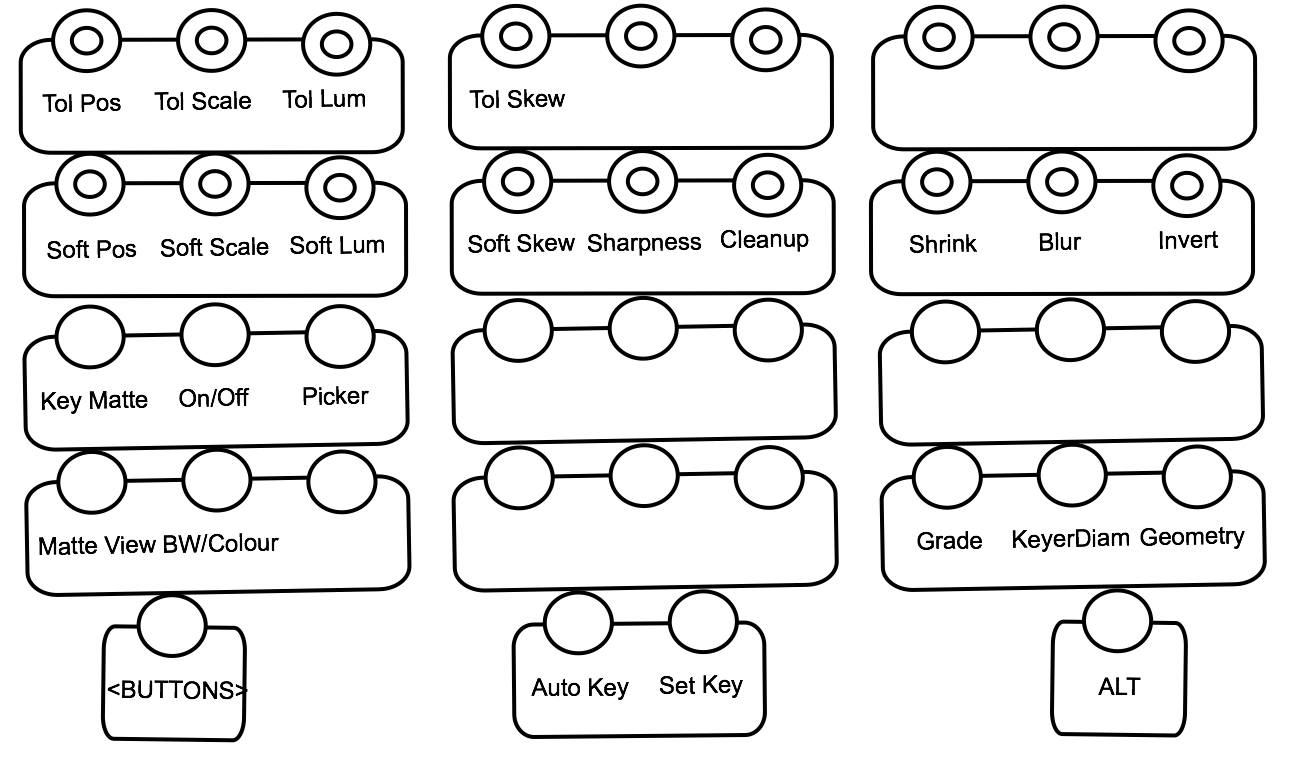
Diamond Keyer controls:
- Tol Pos: Set the tolerance position value.
- Tol Scale: Set the tolerance scale value.
- Tol Lum: Set the tolerance luminance value.
- Tol Skew: Set the horizontal tolerance skew value.
- Soft Pos: Set the softness position value.
- Soft Scale: Set the softness scale value.
- Soft Lum: Set the softness luminance value.
- Soft Skew: Set the horizontal softness skew value.
- Sharpness: Drag the Sharpness slider to adjust softness and reduce noise if the matte appears grainy.
- Cleanup: Remove stray pixels from the key to clean it up for colour grading
- Shrink: Shrink a key to remove pixels from the edge of the key
- Blur: Blur a key to apply a softening filter to its edge.
- Invert: Press the knob to invert the isolation
- Key Matte: Toggle the Matte or the Key-In controls.
- On/Off: toggle Keyer On/Off
- Picker: press to enable the Picker
- Matte View: Show the Matte of the key.
- BW/Colour: toggle between Black and White or Coloured Matte View
- Grade: Navigate to the Grade mode
- KeyerHLS: press to toggle to Diamond Keyer
- Geometry: Navigate to the Geometry mode
Geometry mode
When a Secondary is activated, it is possible to navigate to the Geometry mode to create shapes. The Function panel will display the available functions.

Geometry controls:
- Pos X: Move your geometry on the X axis.
- Pos Y: Move your geometry on the Y axis.
- Rotate: Rotate your geometry.
- Mask Blur: Set the level of mask blur.
- Mask Clr: Set the level of mask colour.
- Mask Opac: Set the level of mask opacity.
- Scale X: Scale your geometry in X.
- Scale Y: Scale your geometry in Y.
- ScapeProp: Scale your geometry proportionally.
- Mask Soft: Set the level of mask softness.
- Show: Press to toggle Show On/Off
- Invert: Press the knob to invert the Matte of the Shape
- Rectangle: Press to create a Rectangle shape
- Circle: Press to create a Circle shape
- Wipe: Press to create a Line shape
- Shape: Press to create a custom shape
- Edit Shape: Press to show the Edit Shape controls (these will replace the current buttons on Function panel)
- Go Rect: Navigate to the Rectangle shape
- Go Circle: Navigate to the Circle shape
- Go Wipe: Navigate to the Wipe shape
- Go Shape: Navigate to the Shape
- Prev Shape: Navigate to the previous shape in the scene
- Next Shape: Navigate to the next shape in the scene
- Grade: Navigate to the Grade mode
- KeyerHLS: Press to navigate to Keyer mode
- Reposition: Navigate to the Reposition mode
Reposition mode
The Reposition mode allows changing the size and appearance of the image.
Reposition controls:
- Pos X: Move your image on the X axis.
- Pos Y: Move your image on the Y axis.
- Rotate: Rotate your image.
- Flip: Press to Flip the image
- Flop: Press to Flop the image
- Scale: Scale your image proportionally.
- Aspect: Scale your image in X.
- FlipGeom: Press to Flip the Shapes
- FlopGeom: Press to Flop the Shapes
- Converge: Enable the Stereo3D Convergence mode
- Grade: Navigate to the Grade mode
- KeyerHLS: Press to toggle to Diamond Keyer
- Geometry: Navigate to the Geometry mode
Editing mode
The Editing mode shows all Timeline editing control
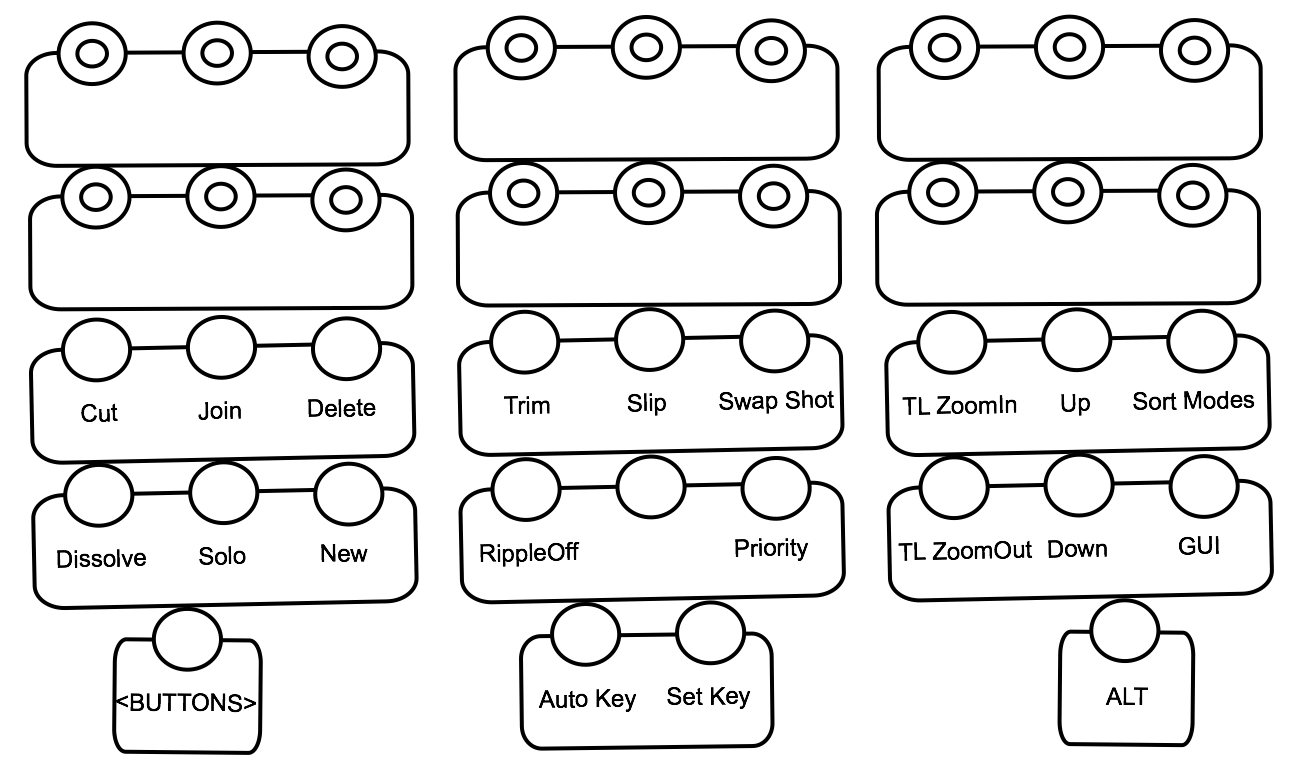
Editing controls:
- Cut: Insert a cut at the current location of the positioner.
- Join: Join the timeline segment on which the positioner is parked with the segment immediately succeeding it.
- Delete: Delete the timeline segment on which the positioner is parked.
- Dissolve: Add a Dissolve transition at the nearest transition location.
- Solo: Solo the currently selected track/layer.
- New: copy the current shot and its grade to a top video track.
- Trim: Enable trim mode.
- Slip: Enable slip mode.
- Swap Shot: swap selected shots locations.
- RippleOff: Toggle Ripple modes (Off, Start or End)
- Priority: Add or Remove a Shot Priority flag on the current shot.
- TL ZoomIn: Zoom-in the Timeline view
- TL ZoomOut: Zoom-out the Timeline view
- Up: Set the track focus to the next video track.
- Down: Set the track focus to the previous video track.
- Sort Modes: Navigate to the Sort Modes page.
- GUI: Enable or Disable the User Interface on the GUI monitor.
KF/OSD mode
The KF/OSD mode shows Keyframes Animation and On-Screen Display controls over two pages on the Function module.
Keyframe Animation controls
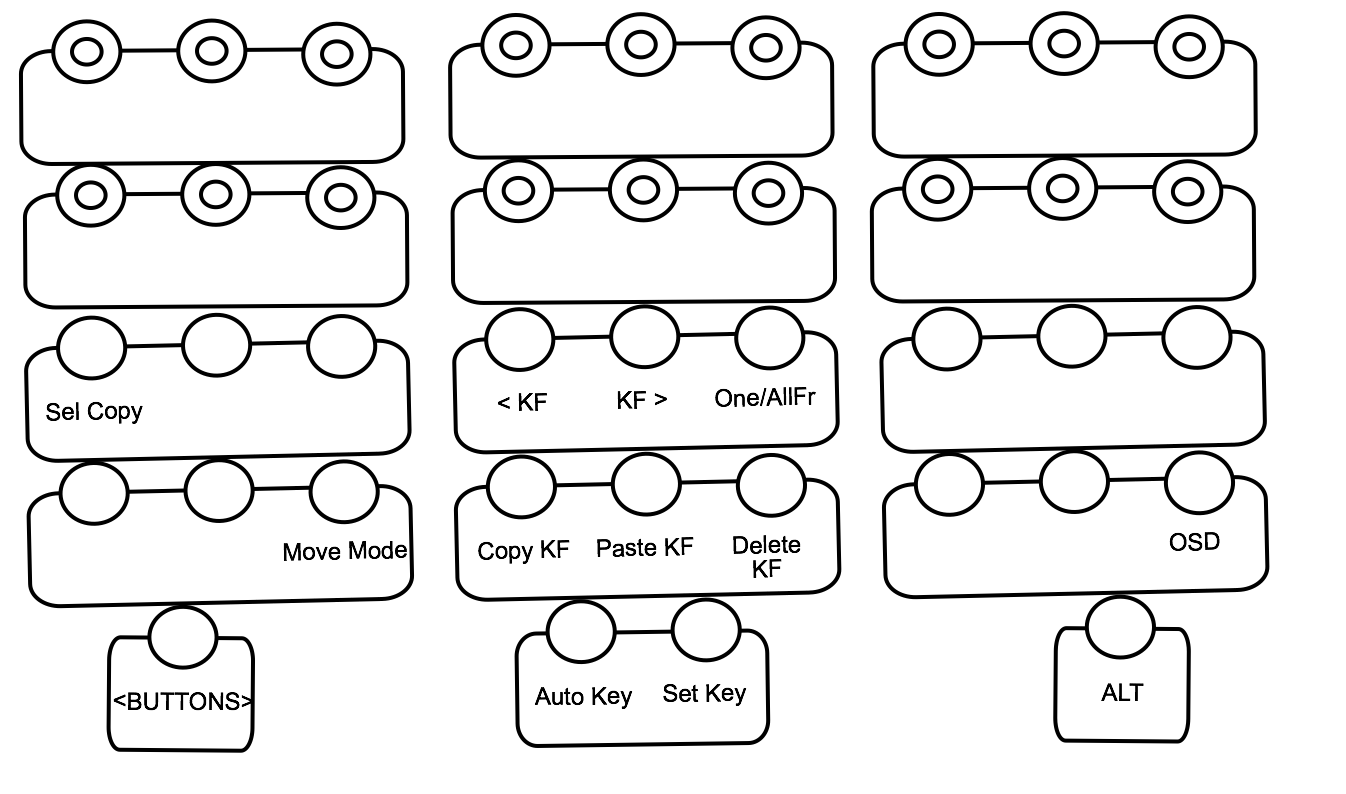
- Sel Copy: Copy the grade of the current shot using Selector to the currently selected shots.
- < KF: navigate to the previous keyframe of the selected channel
- KF >: navigate to the next keyframe of the selected channel
- One/AllFR: Toggle between 'One Fr' and All Fr' copy modes.
- Move Mode: Enable Move mode in the Animation Editor.
- Copy KF: Copy keyframe(s).
- Paste KF: Paste keyframe(s).
- Delete KF: Delete keyframe(s).
- OSD: navigate to the On-Screen Display mode
On-Screen Display controls
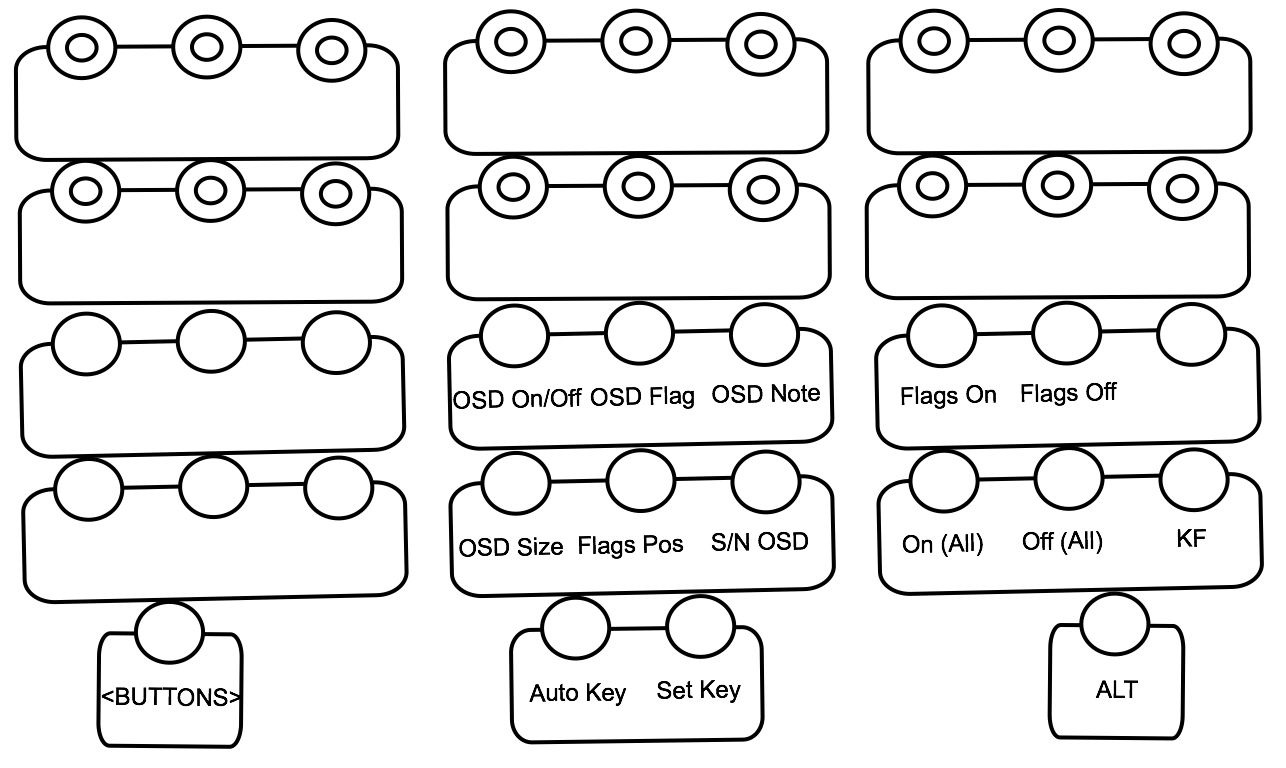
- OSD On/Off: Toggle On-Screen Display On/Off.
- OSD Flag: Toggle Flags display on On-Screen Display.
- OSD Note: Toggle Note display on On-Screen Display.
- OSD Size: Toggle size of On-Screen Display.
- Flags Pos: Toggle position of On-Screen Display
- S/N OSD: Toggle Shot Name display on On-Screen Display.
- Flags On: Enable current flag.
- Flags Off: Disable current flag
- On (All): Enable all flags
- Off (All): Disable all flags
- KF: navigate to the KeyframeAnimation mode