
Menu System
The menu system has been completely re-written in 3ds Max 2025, and many previous APIs have been deprecated. See the Deprecated section of the C++ API Reference for a list of these APIs.
In 3ds Max 2025 the old menu system was completely replaced with a new one that uses a transformation approach. The new system has several benefits:
- Menus can now be created with the updated 3ds Max Menu Editor and shipped in the Application Plug-in Package. This approach greatly simplifies the creation and management of menus.
- The system provides MAXScript exposure (as well as C++ and Python).
- The new menu system uses a transformation approach, where each plug-in adds its menus at startup, so menus always correctly reflect the currently loaded plug-ins. In the previous system, menu customizations were not as tightly coupled with plug-in loading and could be incorrect when plug-ins were missing or failed to load.
- For end users and administrators, menu customizations are now portable between 3ds Max versions, so they do not need to be re-created after each upgrade.
- The new system offers an enhanced resource ID-based localization workflow.
We recommend using XML-based menu definition files created with the menu editor as the most straightforward way to add custom menus for your plug-in. MAXScript/Python and C++ exposure is provided for more flexibility, and for creating dynamic menus.
Creating / Customizing Menus
The new menu system lets you create new or customize existing menus in three ways:
Using a menu definition file, which is a new feature for plug-ins. This is an XML file created by the 3ds Max Menu Editor, with a .MNX filetype for menus and .QMNX for quad menus. Menu files can be included in your application plug-in package, in the PackageContents.xml "menu parts" and "quadmenu parts" sections. This is the recommended approach for adding menus. See Example Plug-in Package for an example of how to use this approach.
In code at startup using C++, MAXScript, or Python. In this case plug-ins create menus in code and add them into the 3ds Max menu structure when notified by 3ds Max that they can do so. A plug-in does this in a callback that looks for the new
NOTIFY_CUI_REGISTER_MENUS/NOTIFY_CUI_REGISTER_QUADMENUS(C++) orcuiRegisterMenus/cuiRegisterQuadMenus(MAXScript/Python) notifications. Outside of the registration callback, menus cannot be created, but existing menus can still be accessed and inspected. Scripts must register for notification from the system to create menus at startup, so must be run from a startup Plug-in directory, or specified as "pre-startup scripts parts" in a Package.xml file.In code using dynamic menu APIs in C++, MAXScript or Python. Dynamic menus require a parent menu to display from, and can be used to display menus that change depending on the underlying context or program state. This method is exposed in the
ICuiDynamicMenu(C++) andpopulateDynamicMenu/dynamicMenuItemSelectedevent handlers (MAXScript / Python).
Plug-ins that use the C++ API to modify or create menus cannot be defer loaded because the plug-in registers for the menu notifications, and these are emitted at startup.
Menus and menu items are now identified by unique GUIDs, which are used to find and reference them. When creating a new menu or menu item, you need to provide a GUID, which you can create using a number of tools (such as Visual Studio, or an online generator). You can copy the GUID for an existing menu by right-clicking it in the Menu Editor. The GUIDs for the main 3ds max menus and quad menus are also visible in the ICuiMenuManager.h and ICuiQuadMenuManager.h headers located under maxsdk/include/CUI. GUIDs are 128-bit values consisting of one group of 8 hexadecimal digits, followed by 3 groups of 4 hexadecimal digits, followed by one group of 12 hexadecimal digits. Digits can be upper or lower case.
See the new menu sample project under the 3ds Max SDK howto/ui/menudemo for an example of how to create menus using all three approaches.
Menu Loading Chain
The menu system is transformation-based. A base menu structure is defined in a .MNXB/.QNMXB file. Then .MNX/.QMNX files are loaded, each of which adds transformations to the structure. Transformations can be additions, deletions, and re-orderings.
Menus are loaded in this order:
- Base menu configuration
- Plug-in menu transformations
- API-registered menu transformations
- User-defined transformation files
C++ Classes
The menu system API includes these classes:
ICuiMenuManager– provides access to the 3ds Max main menu bar, as well as methods for creating and managing new top-level menus, as well as loading menus from preset files.ICuiQuadMenuManager– provides access to existing 3ds Max quad menus, as well as methods for creating new quad menus and loading menus from preset files.ICuiMenu– provides access to menus and sub-menus, including methods for adding new items, adding actions to items, and setting the menu appearance.ICuiQuadMenu– provides access to quad menus, including methods for modifying existing menus and creating new ones.ICuiQuadMenuContext- provides access to quad menu contexts, containing methods for getting and setting right-click modifiers.ICuiMenuItem– provides access to individual menu items, and methods for querying the menu item’s properties.ICuiActionMenuItem– inherits from ICuiMenuItem, provides access to action items associated with a menu item.ICuiDynamicMenu– provides access to dynamic menus, which are a special type of menu that is created or updated dynamically based on a plug-in's state, using a callback.- Dynamic menus are created on the fly using callbacks:
ActionCallback->PopulateDynamicMenu()– A callback that is called to populate a dynamic menu.ActionCallback->DynamicMenuItemSelected()– A callback that is called when a dynamic menu item is selected.
The Menu Editor
3ds Max has a Menu Editor that allows you to customize existing menus and create new ones. It is similar in design to the Hotkey Editor.
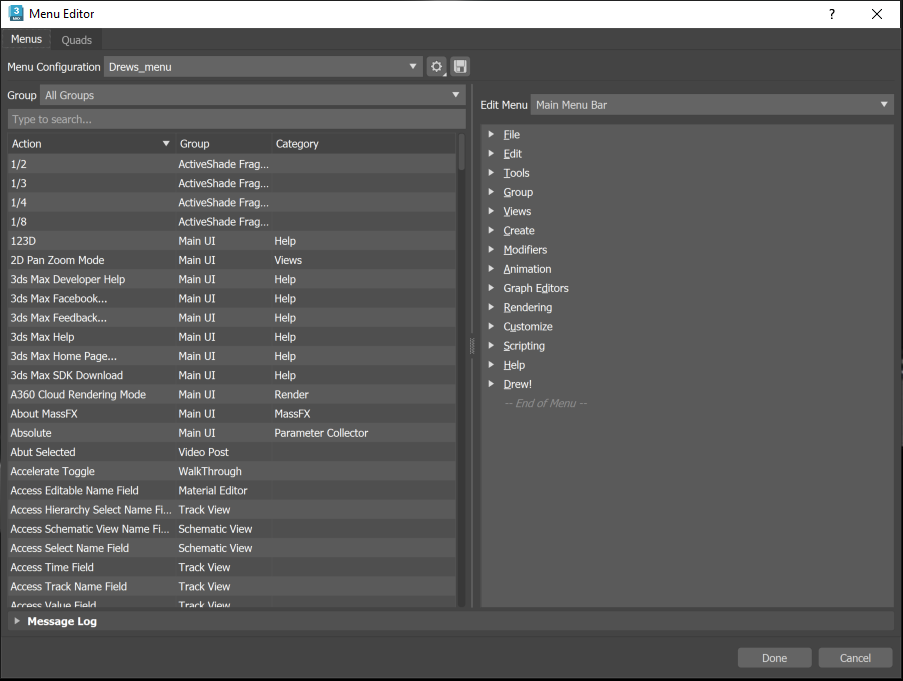
To access the Menu Editor, select Customize > Menu Editor.
The Menu Editor includes a Developer Mode, which you access by selecting the settings icon:

In Developer Mode, you can access additional functionality useful for developing plug-ins that expose their own menus or modify / add to existing ones.
When you switch to Developer Mode, only the base menu configuration and either the selected preset or an empty preset is loaded; plug-in and user defined menus are not loaded. This simplifies the menu structure and provides a clean configuration for a developer to work with.
As a developer, you can add menu items to existing menus (for example, the main menu bar), or create new top-level menus for use as a menu bar in your dialog or right-click context menu.
Developer Mode allows you to create, rename, and delete top-level menus:
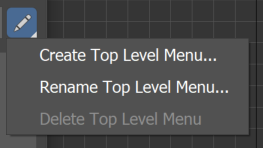
Top-level menus can then be used as a menu bar or right-click context menu in a plug-in.
The delete operation is only available for the currently loaded preset, you cannot delete menus or quads in the base configuration or other plug-in menu contexts.
Customizations are saved as a .MNX /.QMNX transformation file ("Save as..."). The "Save as Base Configuration" option is for internal use only.
For Quad menus, in Developer Mode you get an additional Quad Menu Context selection, to display only the quad menus in that context. This allows you to add/rename/delete quad menus for a specific context, and more importantly, create a new quad menu context for use in your own plug-in. In non-Developer mode, Quad menus are listed for all contexts. Developer mode also provides access to the localization workflow. This is a resource ID based workflow, very similar to the existing process for localizing MAXScript string resources (See the "Resource String Replacement" topic in the MAXScript help for more information).
Localizing Menus
To localize a configuration, select "Create localization file", and select a target .MNX or .QMNX file. This creates a skeleton resource file for the configuration file, which contains the resource ID and display text for each item in the menu/quad. This file is then copied and translated for each target language. Once translated, the .res file is placed in the target language sub-directory for the plug-in (for example, for French, in a directory called fr-FR under the directory containing the .MNX/.QMNX file).
C++ Example
Example Usage The following is a short example of how to create a menu using the new C++ API:
// Test menus added view the API

// Adds a new submenu at the end of the main menubar
static void onCuiRegisterMenus( void* , NotifyInfo* info )
{
              auto menuMgr = static_cast<ICuiMenuManager*>(info->callParam);
              if (!menuMgr) return;

              auto menuBar = menuMgr->GetMainMenuBar();
              auto myMenu = menuBar->CreateSubMenu("0FD8C8B7-9CAC-4D6A-AABE-4F03FAD1B2A1", L"My C++ API Menu");
              myMenu->CreateAction("81F6BDF0-74FC-42B5-8E84-FB1C5C200A1C", CUI::ActionIdentifier (0,"40093"));
              myMenu->CreateSeparator("860176FD-CB64-47F9-A28E-2B04FF11B2B9");
              myMenu->CreateAction("3B5CCE1F-C898-4A15-895C-1157BCD8CCD8", CUI::ActionIdentifier(647394,"Box`Objects Primitives"));
}

// Adds a new submenu to the viewport menu
static void onCuiRegisterQuadMenus( void* , NotifyInfo* info )
{
              auto menuMgr = static_cast<ICuiQuadMenuManager*>(info->callParam);
              if (!menuMgr) return;

              auto vpQuadMenu = menuMgr->GetQuadMenuById("9cf17647-303f-400e-938a-a55058804393"); // Get Default Viewport Quad Menu
              auto transfQuad = vpQuadMenu->GetQuadByPos(QuadPosition::kBottomRight); // Get transform viewport quad
              auto myMenu = transfQuad->CreateSubMenu("0FD8C8B7-9CAC-4D6A-AABE-4F03FAD1B2A1", L"My C++ API Menu");
              myMenu->CreateAction("7AEBFB01-FAED-41C7-BC60-1706E3700FBD", CUI::ActionIdentifier(0,"40093"));
              myMenu->CreateAction("46D16450-0FF1-47F4-A37B-4436C24A5605", CUI::ActionIdentifier(647394,"Box`Objects Primitives"));
}

// Register for the new menu creation notifications
void MyPlugin::init()      {
              // Notifications for the test menus added view the API
              RegisterNotification( &onCuiRegisterMenus, this, NOTIFY_CUI_REGISTER_MENUS );
              RegisterNotification( &onCuiRegisterQuadMenus, this, NOTIFY_CUI_REGISTER_QUADMENUS );
}
For a more complete example, see the howto/ui/menudemo sample provided in the 3ds Max SDK.