
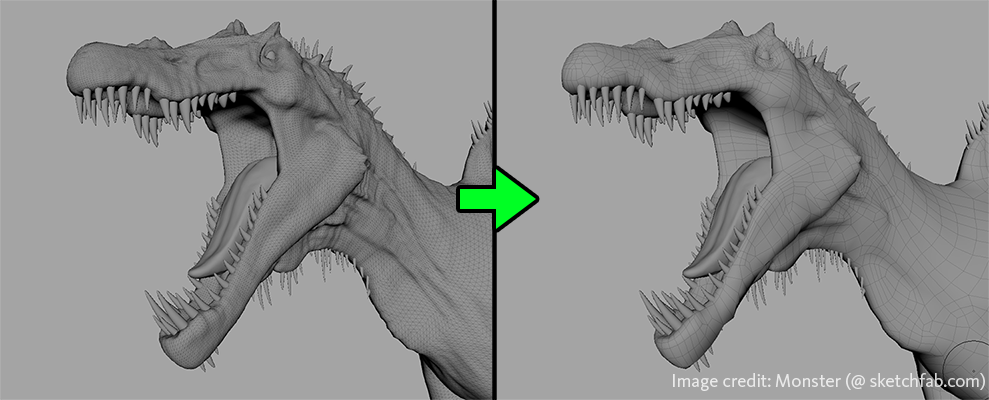
Generates clean, new topology that preserves the surface features of a selected mesh while ensuring all the faces are quads. Use the following options to set what happens when you select
Mesh > Retopologize >
 , or open the
Attribute Editor with the
polyRetopo node selected. You can view
Retopologize progress in the
Output window.
, or open the
Attribute Editor with the
polyRetopo node selected. You can view
Retopologize progress in the
Output window.
Settings
The following options are only available in the Retopologize Options window.
- Keep Original
- Specifies whether to retopologize a copy of the selected object (result mesh), or the object itself (input mesh). If enabled, Retopologize preserves your input mesh by performing the operation on its duplicate.
- Once
Retopologize runs, the result mesh is placed at the same location as the input mesh. The result mesh is given the same name as the input mesh and the input mesh is renamed
<original_name>_original. In the following example, the input mesh is renamed
Hand_Model_Original.
 Tip: When both meshes are visible, it's easier to make edits to your input mesh, like defining component tags, and see updates on your result mesh dynamically.
 - Preprocess Mesh
- Optimizes dense input meshes to speed up and increase the success of the Retopologize operation. This option is specifically designed for input meshes with high triangle counts (100k+) that may contain topological noise and mesh defects. It is not intended for use with low resolution meshes with clean geometry. For more information, see
Best practices for preprocessing a mesh with Retopologize.
Tip: Preprocessing optimizes dense meshes, which entails smoothing and may result in a loss of detail. When Preprocess mesh is turned off, more details are preserved, but the Retopologize operation may take longer to complete.
- Scan mesh for issues
-
When on, your input mesh is checked for potential issues that could either prevent Retopologize from running successfully or have adverse effects on the result. If issues are detected, the Troubleshoot Potential Retopologize Issues dialog box appears with warnings and recommended troubleshooting steps. For more information on each warning, see Troubleshoot Retopologize issues.
Face Count Options
- Target Face Count
-
The desired number of faces for the retopologized mesh. This is not a hard count, but more of a target that Retopologize will attempt to hit.
The Retopologize algorithm prioritizes details of the input mesh over face count. For example, if you try to retopologize a highly detailed mesh and set the Target Face Count very low, the algorithm tries to keep as many details as possible and the resulting face count may not be as low as expected.
Tip: If hitting a low Target Face Count is your top priority, you can turn on Preprocess Mesh and try running Retopologize again. For more information, see Best practices for preprocessing a mesh with Retopologize. - Tolerance (%)
-
The margin of error (%) from the Target Face Count that is considered an acceptable result. Very low values (< 10) can result in slow performance. High values can result in a face count that is not very close to your target setting.
Topology Options
- Topology Regularity
-
Determines the number of singularities (vertices with other than 4 connected edges) in the result. When set to 0, the result is sensitive to the surface, producing more singularities. When set to 1, fewer singularities are produced and the result may smooth over fine details.
- Face Uniformity
-
Represents the overall size and shape of faces. When set to 0, results in varying sizes, with smaller faces in areas of higher curvature. When set to 1, faces are more uniform in size (irrespective of surface curvature).
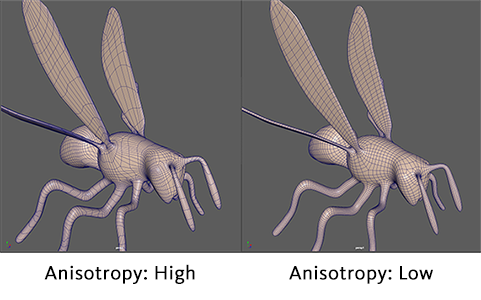
- Anisotropy
-
Adaptivity to the directional curvature of a surface. When set to 0, faces stretch less and square up. When set to 1, faces stretch further to adapt to the surface per curvature direction. Note: If uniformity is set to 1, Anisotropy has no effect.
Feature Preservation Options
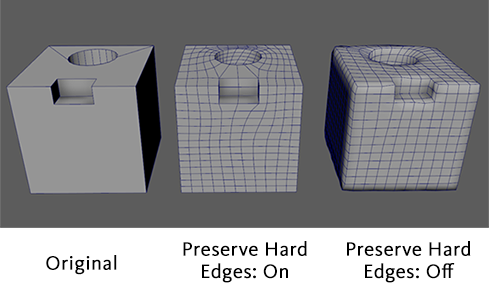
- Preserve: Hard edges
-
When on, explicit hard edges (those defined using Mesh Display > Harden Edges) on the input mesh are used to influence feature preservation on the retopologized mesh. As a result, features around the hard edges (such as wrinkles, brows, lips, etc) are more accurately converted to the new mesh. However, too many hard edges can cause the retopologize algorithm to run very long. Turning this option off treats all edges as soft edges. See Preserve areas of a retopologized mesh.
 Note: The resolution (Target Face Count) of the retopologized mesh determines to what degree the input mesh's shape and edge flow are preserved. For example, a lower Target Face Count value preserves the general shape of the input mesh while a higher Target Face Count value results in a closer match to the input mesh.
 - Preserve: Edges by angle
-
When on, edges are preserved based on the specified angle tolerance. If the angle between its adjacent faces exceeds the specified angle tolerance, the edge between the faces is preserved. - Use this option when your mesh contains edges that aren't visually hard (ie. on the interior of your mesh) or you don't want to explicitly define hard edges. See Preserve areas of a retopologized mesh.
- Preserve: Edge component tags
-
When on, the polyRetopo node searches for the specified edge Component Tags on the input mesh and uses them as an influence on the result mesh. This allows you to preserve edges without making them hard. For more information, see Assign Component Tags to geometry and Preserve areas of a retopologized mesh using Component Tags. - The text box supports comma separated lists of Edge Component Tags. It also supports wildcards in the format
<name>*.
Note: Feature preservation with Edge Component Tags can be useful for guiding the edge flow of the result mesh in specific areas. When used in conjunction with the Keep Original option, you can add and remove edges from the Component Tags on the input mesh and see updates appear dynamically on the retopologized result mesh.
Symmetry
- Symmetry
- Lets you create even edge flow on both sides of your mesh using the following options:
- Axis position
- Lets you select the symmetry plane for the selected object. You can select from the following options:
- Object: Cuts and fills the mesh relative to the selected object's pivot location and orientation
- Bounding Box: Cuts and fills the mesh relative to one side of an invisible cube encompassing the selected object
- World: Cuts and fills the mesh relative to the world space origin
- Axis
- Lets you select the axis and direction that symmetry is performed. For example, when +X to -X is selected, topology is cut and filled from the +X axis to the -X axis.
- You can select from the following options:
- +X to -X
- -X to +X
- +Y to -Y
- -Y to +Y
- +Z to -Z
- -Z to +Z
For more information, see Retopologize a mesh with symmetry.