
Flow Wedging walkthrough
Here is a quick overview of the basic steps for wedging the output of a Bifrost graph using Flow Wedging. If you prefer to look at an example that has already been set up, try the aero_combustion_wedging sample graph that's available in the Bifrost Browser.
Note that Flow Wedging is a cloud service and requires Flex tokens in your Autodesk account. The amount of tokens used is based on computation times.
- Load the Flow Wedging plug-in
- Prepare the graph for wedging
- Set up preview rendering (optional)
- Include file dependencies (optional)
- Submit the wedging job
- Download the cache files
- View the downloaded cache files in the scene
- Apply your preferred settings
Load the Flow Wedging plug-in
The Flow Wedging plug-in is installed with Bifrost for Maya, but it might not be loaded.
Make sure that you are running Maya 2025 with Bifrost 2.12.1.0, or later versions.
Open Maya's Plug-in Manager: Windows > Settings/Preferences > Plug-in Manager.
Make sure that
flowWedging.pyis loaded.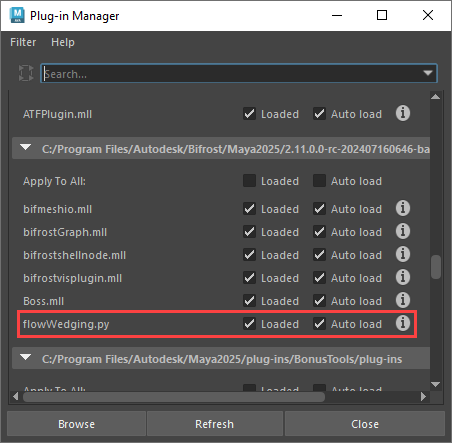
If you'll be wedging often, you can set it to Auto load.
Prepare the graph for wedging
Flow wedging requires special nodes in the graph: mainly wedge_cache for writing and reading the cache files, as well as others like wedge_parameter to determine the variations.
Before you start, it's a good idea to remove unnecessary properties from the objects that you will be wedging. For example, for a combustion effect, you may need only the
voxel_fog_density,voxel_temperature, andvoxel_velocityfor rendering the result and you can erase any other properties that are used only for computing successive frames. This helps to keep the size of the downloaded cache files to a minimum.- Use a watchpoint or a data browser to see the properties that exist on the object. See Diagnose and debug graphs.
- Use
erase_propertyorerase_component_propertiesto remove data that you don't want in the final caches. Make sure to leave properties that are essential to the object's geometry type, such as*_component,*_offset,voxel_tile_tree, and others. - If desired, you can cache out a few frames locally using the regular
file_cachenode to check their file size.
Custom referenced compounds that are not in your default user location may cause problems. It's a good idea to import any such compounds locally into the scene by right-clicking on them and choosing Make Editable.
Add a
wedge_cachenode to the top level of the graph, and connect the objects to be wedged into theobjectsport.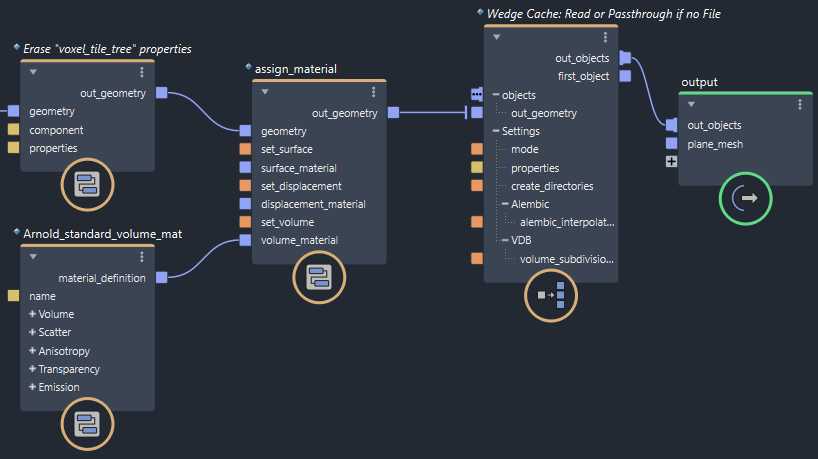
- The output of the
wedge_cachenode must eventually lead to anoutputnode. Wedging does not work if it is connected only toterminalnodes. - It's usually best to assign a material before the
wedge_cachenode so that the material will be included in the caches (as well as preview renders if you generate them). The exception is when you plan to use the VDB format for caches — the VDB format does not support material assignment, so assign the material afterwedge_cacheto ensure that the material is properly applied after the cache files have been read. - Use only one
wedge_cachenode per graph. Flow Wedging will process only the first node it finds in the graph that's selected for a job. However, you can connect multiple objects to theobjectsfan-in port of thewedge_cachenode to process several objects as an array. - By default, the
wedge_cachenode'smodeis set to Read or Passthrough if no File. In this mode, it will automatically read the cache files once they exist later in this procedure. However since you have not downloaded any cache files yet, it instead evaluates the upstream nodes and simply passes the result along to the downstream nodes.
- The output of the
Connect a
wedge_parameternode into an input that you want to vary, and set thestartandendvalues for the range you want to test. The wedges will be evenly spaced between these values based on the number of wedges that you specify in a later step. For example, if you have only one wedge then it will be evaluated at the midpoint betweenstartandend; two wedges will be evaluated exactly atstartandend; three wedges will be evaluated atstart, the midpoint, andend; and four wedges will be evaluated atstart, 1/3 of the range, 2/3 of the range, andend.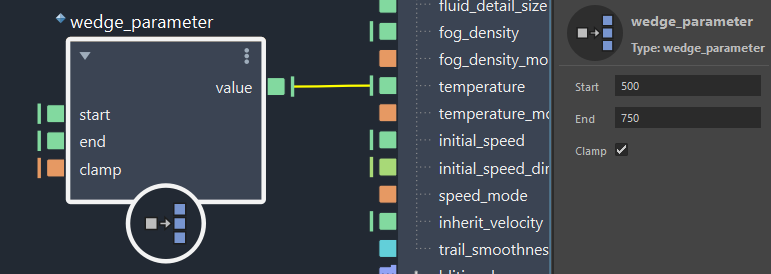
- By default,
startandendareautoports that are set tofloattype. To vary something else such asvector3, right-click on either port and select a different value type. - You can use multiple
wedge_parameternodes to vary multiple inputs. However, they will not be varied independently — instead the parameters will be varied in lock-step between their respectivestartandendvalues based on the wedge being evaluated. - If you do not use any
wedge_parameternodes, you can still submit a job. This may be useful if you simply want to offload the generation of cache files to the cloud without any wedging. - As an alternative to
wedge_parameter, you can usewedge_indexto return the index of the wedge being evaluated (0, 1, 2, etc.) and use custom logic to specify the input value for each case.
- By default,
At the top level of the graph, deselect all nodes. The job ports of the graph appear in the Parameter Editor. Set the Wedge values as desired.
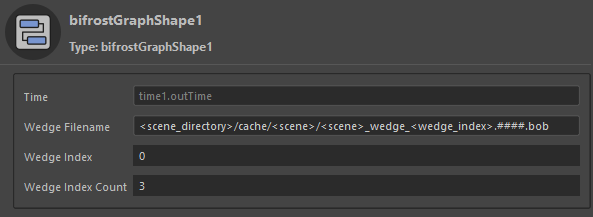
Wedge Filenameis the full path and file name for downloading the caches. A path without tokens is valid for a single cache, but keep in mind that the<wedge_index>token should be used to ensure that different wedges do not overwrite each other's files. Environment variables of the form$variableor${variable}can be used, and will be expanded after takens are replaced. The extension determines the format of the cache files:.bobfor Bifrost object files (any objects),.abcfor Alembic files (meshes, particles, strands), or.vdbfor VDB files (volume). Any other extension will be written as Bifrost object files.Wedge Indexspecifies which set of cache files to read once they have been downloaded. It can also be used to specify which wedge to evaluate if you choose not to evaluate all wedges in a single job.Wedge Index Countsets the total number of wedges that you want to evaluate. It is also used to calculate the fraction of the range between thewedge_parameternodes'startandendvalues. The maximum number of wedges per job is 4.
Set up preview rendering (optional)
Flow Wedging can generate Arnold preview renderings that you can inspect in the Flow Job Monitor. Note that:
- Only Bifrost object (.bob) caches are supported.
- Materials should be assigned to the cache inputs in the graph (not to the cache outputs) using
assign_materialor a similar node. - Materials must be defined in the graph (for example, using
standard_surface_matorArnold_standard_volume_mat) rather than referenced from the host scene. - GPU rendering is not supported. Make sure that Render Device is set to CPU on the Device tab in the scene's Render Settings (Arnold Renderer).
In the Maya scene, create a transform group and name it
preview.Under this group, parent any lights that you want to use for the previews.
- You can additionally parent any extra geometry that you want to include in the previews.
- If there are multiple renderable cameras in the scene, you can specify the one to use by including it under the preview group.
Include file dependencies (optional)
If the graph depends on external files, you must make sure they are included when the graph is uploaded for wedging. This includes image files used for textures and geometry files such as USD or Alembic used for emitters and colliders, as well as others.
To include such files:
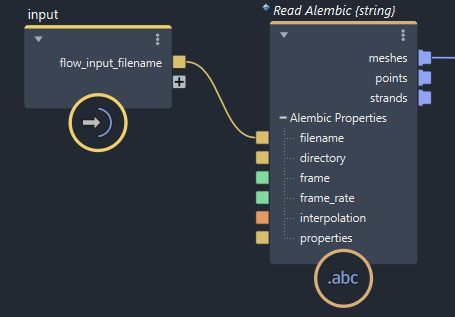
Connect the filename port of a file node to an
inputnode at the top level of the graph.- This creates a corresponding input parameter in the Graph Inputs section of the bifrostGraphShape node in the scene.
- The current path is automatically copied over to the input parameter.
- If necessary, you can modify the path in Maya's Attribute Editor.
Rename the port on the
inputnode toflow_input_filename. This also renames the corresponding parameter of the bifrostGraphShape node in Maya.Repeat for any additional files. Subsequent ports will have an integer appended automatically (
flow_input_filename1,flow_input_filename2, etc.), and the files associated with those ports will be included when you submit a job.
Submit the wedging job
Once the graph has been prepared for wedging, you are ready to submit the job.
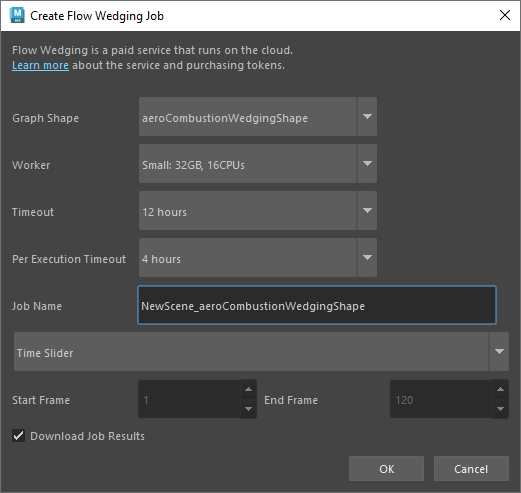
Choose Flow > Flow Wedging > Create New Job from Maya's main menu. After you sign in to your account if required, the Flow Job Monitor window launches and the Create Flow Wedging Job dialog box opens:
Set the options as desired:
- If the scene has multiple graphs with
wedge_cachenodes, make sure to set Graph Shape to the one that you want to evaluate for this job. - Set Wedge to evaluate the current wedge only (Wedge Index in the job parameters at the top of the graph), or all wedges.
- Select a Worker based on the size and complexity of your scene.
- Set Timeout and Per Execution Timeout to prevent excessive computation and token use in case there is a problem with your scene or its settings.
- Job Name is used only to identify the job in the Flow Job Monitor. The default name is based on the names of the scene and graph.
- Select the range of frames to cache: Time Slider for the entire scene length, Animation Range for the current playback range, or Custom to specify Start Frame and End Frame manually. However, note that simulations must start from the first frame.
- If you set up preview rendering, set those options as well.
- If the scene has multiple graphs with
If you set up preview rendering, set those options as well.
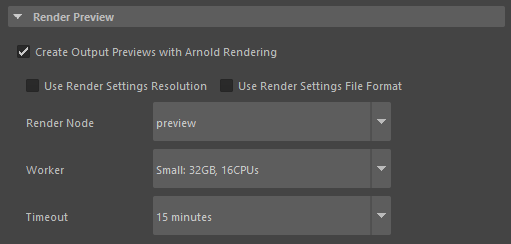
- Turn off Create Output Previews with Arnold Rendering if you want to skip generating previews for this job.
- Select Use Render Settings Resolution and Use Render Settings File Format to use the image resolution and format set in the scene's render settings instead of the default (250 × 250 pixel PNG files).
- Select Worker and Timeout as above.
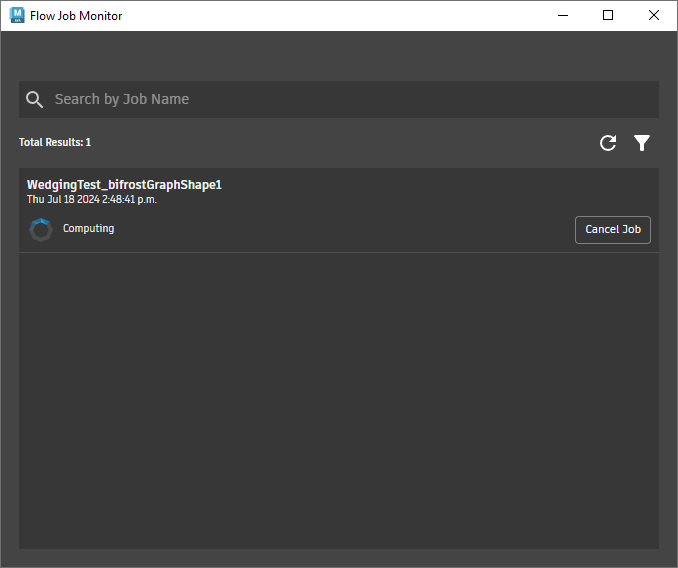
Note: Render Node is not implemented.Click OK. The graph and any connected scene objects are uploaded to the Flow Wedging service and the Flow Job Monitor shows progress.
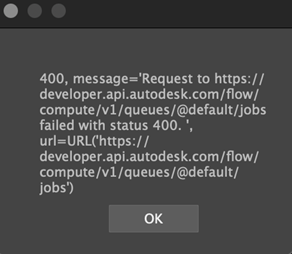
If you receive the errors shown below, it means that you are running unsupported versions of Bifrost or Maya. Ideally, you should use the latest versions, or at least Maya 2025 with Bifrost 2.12.1.0.

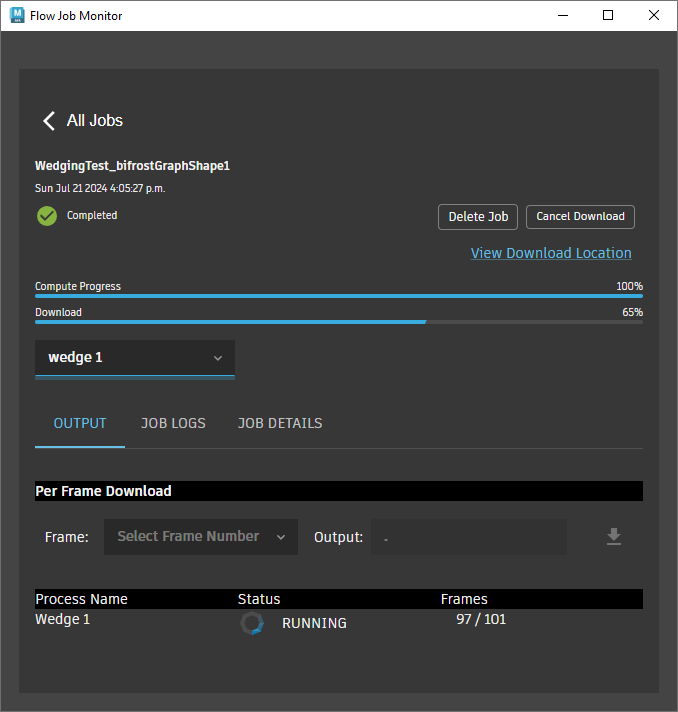
You can close the Flow Job Monitor while the job gets computed in the background, and then choose Flow > Flow Wedging > Open Job Monitor to re-open it at any time to monitor progress. Click on a specific job to view details, log files, play through preview renders, and more.
Progress logs are saved to a local file by default to declutter the script editor as the plug-in uploads and downloads files. These are not the same as the job logs that you can download later, which contain information about the job execution in the cloud. The location of these progress logs depends on the version of Maya — for example in Maya 2026, they are in the following folders:
- Windows:
%LOCALAPPDATA%\Autodesk\FlowGraphEngine\maya2026\FlowWedging.log - Linux:
~/.local/share/Autodesk/FlowGraphEngine/maya2026/FlowWedging.log - MacOS:
~/Library/Logs/Autodesk/FlowGraphEngine/maya2026/FlowWedging.log
Download the cache files
The cache files get downloaded automatically if you left Download Job Results checked when you submitted the job. You can also download them manually from the Flow Job Monitor in case you unchecked that option, or quit your Maya session before the download was complete, or simply need to download them again.
Results are available for download for 30 days. If you delete a job, the results cannot be recovered.
Open the Flow Job Monitor.
Locate the job to download, and click Download.
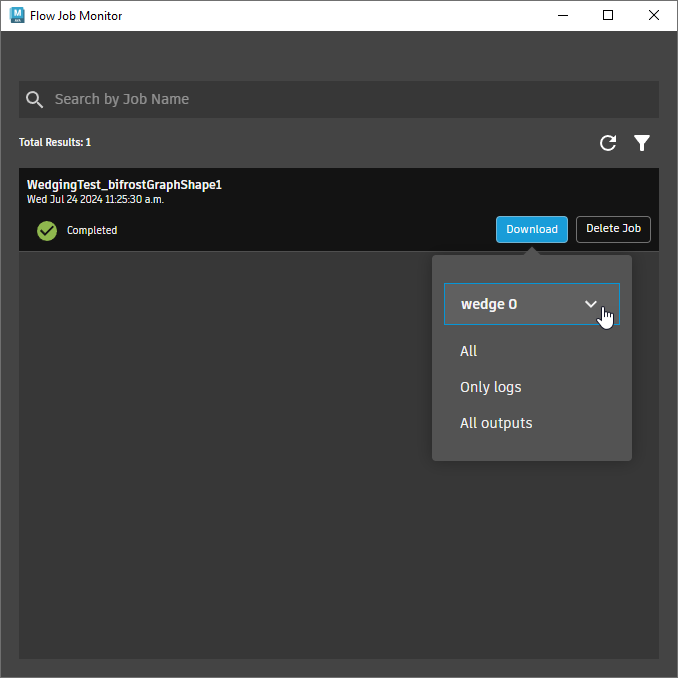
Select a wedge, if there are multiple wedges in the job.
Select the items to download (for example, All or Only logs).
Browse and select a folder on your disk for the downloaded files. You do not need to select the Wedge Filename location that was set on the
wedge_cachenode, but note that the graph will not read the downloaded cache files until you update that parameter with the new location.
If you try to download files manually before the job has completed, you may encounter an error. If this happens, wait until the job has finished and try again.
View the downloaded cache files in the scene
You can begin scrubbing through the results in your scene as soon as first few frames of a wedge are available.
At the top level of the graph, deselect all nodes.
Set
Wedge Indexto the index of the wedge you want to view: 0 for the first wedge, 1 for the second, and so on. You may need to change the frame to see the viewport update.Play through or scrub the timeline.
Apply your preferred settings
When you have found a wedge that you are happy with, you can apply it so that those input settings won't get changed when wedging further parameters. This process replaces wedge_parameter nodes with applied_wedge_parameter nodes, and wedge_index nodes with applied_wedge_index nodes.
At the top level of the graph, deselect all nodes.
Set
Wedge Indexto the index of the wedge that you want to use.If you want to apply the current wedge only to nodes in a particular compound of your graph, navigate into that compound.
Choose Edit > Apply Wedge. A list of nodes that will be affected is displayed.
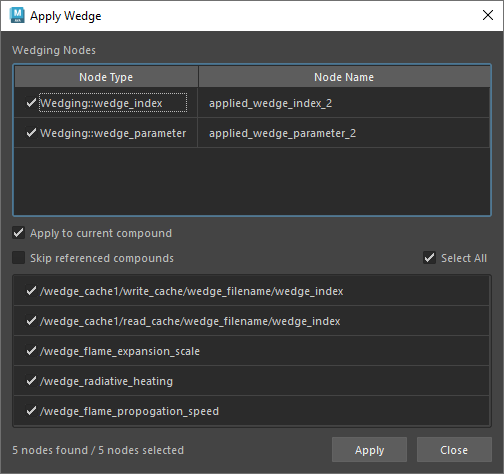
Set the options as desired:
- The upper box shows the node types that will be affected, as well as a tag that will be be used to rename the affected nodes. If you want to lock the settings of only
wedge_parameternodes then you can deselectwedge_index, and vice versa. - Apply to current compound restricts the scope to the compound you navigated into in step 3, if applicable. If you are at the top level of the graph, it has no effect.
- Select Skip referenced compounds to preserve nodes that are inside referenced compounds like
wedge_cache. If you don't do this, then you'll need to use a newwedge_cachenode if you want to continue using the same graph for further wedging. - Deselect any individual nodes that you want to preserve in the lower box, or choose Select All.
- The upper box shows the node types that will be affected, as well as a tag that will be be used to rename the affected nodes. If you want to lock the settings of only
Click Apply.
If desired, you can now wedge other parameters by connecting new
wedge_parameterorwedge_indexnodes. The input values for wedges that you have applied will be maintained.