Duplicate the model
Create multiple copies of the Speedo model used in previous tutorials.
 Download the files for this tutorial from Autodesk Knowledge Network.
Click
 (Start & Learn tab > Launch panel > New Project).
Enter Speedo tutorial in the Project Name of the Create New Project dialog.
Click OK.
Click
 (Home tab > Import panel > Import).
Navigate to where you saved your tutorial files.
Select the study file speedo_initial.sdy from the Single Cavity file and click Open.
Click Finish to complete the import.
Now need to copy and rename the study. Select the Tasks tab from the Project panel.
Right-click the Speedo_initial study name. Select Duplicate from the menu.
A new entry- Speedo_initial (copy) -appears in the Project View pane.
Right-click Speedo_initial (copy) and select Rename from the menu.
A text box appears around the study name.
Edit the text to read Speedo_multi .
Click outside the text box and the new name has been applied.
You will now duplicate the model to produce a simple 2 x 2 cavity mold. Click on the Speedo_multi study to open it.
Using the ViewCube, select Front view
 .
.Click
 (Geometry tab > Layout panel > Rotate).
The Rotate pane appears.
Click on the model to select it.
The Rotate coordinate fields are now editable.
Select Use part center.
In the Z axis field, type in 180 and click Apply. Alternatively, you can click
 or
or  twice in the Z axis.
The part is rotated 180 degrees around the Z axis. When the part is duplicated, the injection location will now be oriented correctly.
Click
 (Geometry tab > Mold Type panel > Single cavity) and select
  ( Multi-cavity) from the Mold Type drop-down list.
Click
 (Geometry tab > Layout panel > Duplicate).
The Duplication pane appears.
Select Grid as the layout pattern.
Click Draw from Sketch grid layout and select a 2 x 2 grid layout.
The Draw function not only allows you to preview the layout or configuration you are about to create for the duplicated parts, it also allows you to specify the number of rows and columns you wish to create. When using the Draw function, the values in Rows and Columns will be updated to reflect the layout you have chosen. Alternatively, you can enter values in the Rows and Columns to specify the number of rows and columns you wish to create.
In Rows spacing enter 75 mm.
Ensure Edge of selection is selected from the Spacing from drop-down list.
In Columns spacing enter 75 mm.
Ensure Edge of selection is selected from the Spacing from drop-down list.
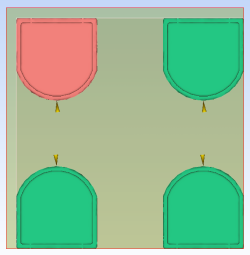
Tip: You can see how many entities you will create in the Total entities section. As we are creating a 2 x 2 cavity mold, the Total entities shown is 4.Click OK, or press Enter.
The model has now been duplicated.