
Use the Angle Between Features area of the Simple Measures wizard to measure the angle between two-dimensional features on a part.
To create an angle measurement using the Simple Measures Wizard::
- Create and open a Simple Measures group in the Sequence Tree.
- Click Home tab > Create panel > Simple Measure > Simple Measures. PowerInspect connects to the measuring device, and opens the Simple Measures Wizard.
- Choose the type of measurement you want to make. Click:
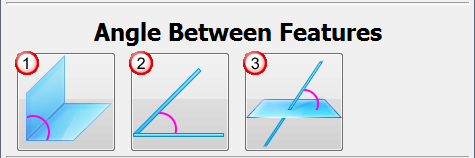
 to measure the
angle between two planes.
PowerInspect creates two Plane items, and an Angle: Plane to Plane item.
to measure the
angle between two planes.
PowerInspect creates two Plane items, and an Angle: Plane to Plane item.
 to measure the
angle between two lines.
PowerInspect creates two Probed Line items and an Angle: Line to Line item.
to measure the
angle between two lines.
PowerInspect creates two Probed Line items and an Angle: Line to Line item.
 to measure the
angle between a plane and a line .
PowerInspect creates a Probed Plane item, a Compound Line item, and an Angle: Plane to Vector item.
to measure the
angle between a plane and a line .
PowerInspect creates a Probed Plane item, a Compound Line item, and an Angle: Plane to Vector item.
PowerInspect creates all the items required to calculate the measurement and adds them to the inspection sequence.
- The wizard displays the
Feature Probing dialog for the first item. Probe the feature, and click
 to save the points.
PowerInspect automatically plays the next item required to calculate the measurement.
to save the points.
PowerInspect automatically plays the next item required to calculate the measurement.
- Probe and save all the items that are displayed. When you have probed the items, the measurement is displayed.
- If the item reports a negative value and you want to suppress the sign, select the
Positive values only
 button.
- Click
to close the measurement dialog. The
Simple Measures Wizard is displayed again.
- Click a measurement button to measure another distance, or click
Close to close the wizard.
When you have finished, PowerInspect opens the simple measures group in the Sequence Tree, and lists the items you created. You can then view the items and display the measurements in the Info and Report tabs.