
In this exercise, you change text in a table from raster text to AutoCAD text in your drawing.
The general process is as follows:
- Enter the parameters for the recognition engine.
- Select a table in your drawing using the rectangular selection method.
- Make corrections to the recognized text using the tools in the Verify Table window.
- Insert the table into the drawing as AutoCAD text.
Related Exercises
Before doing this exercise, ensure that AutoCAD Raster Design toolset options are set as described in the exercise Exercise A1: Setting AutoCAD Raster Design Toolset Options.
Exercise
- In the
..\Program Files\Autodesk\ApplicationPlugins\RasterDesign2025.Bundle\Contents\Tutorials\Tutorial9 folder, open the drawing file
textrec_02.dwg.
Choose an image to insert
- To display the
Insert Image dialog box, on the ribbon, click
Raster Tools tab
 Insert & Write panel
Insert
Insert & Write panel
Insert
 .
.
- In the Insert Image dialog box, from the Files of Type list, select All Image Files.
- If necessary, navigate to the ..\Program Files\Autodesk\ApplicationPlugins\RasterDesign2025.Bundle\Contents\Tutorials\Tutorial9 folder. Select the image file text_rec_table.tif.
- In the
Insert Options area, click
Quick Insert and
Zoom to Image. Click
Open.
The image is inserted.
Convert raster text in a table to AutoCAD text
- To display the
Text Recognition Setup dialog box, on the ribbon, click
Raster Tools tab
Vectorize & Recognize Text panel
OCR drop-down menu
Optical Character Recognition (OCR) Setup
 .
.
- In the
Text Recognition Setup dialog box, under the
Input section, select the following settings:
- Selection Shape is Rectangular.
- Select the Spelling dictionary.
- Select English in the Spelling Language list.
- Select the AutoCAD Custom dictionary.
- Click Language Character Set and select English.
- In the Recognize section, select Upper Case, Numbers, Punctuation, and Miscellaneous.
- In the
AutoCAD Output section, select the following settings:
- Output Type is Text.
- Text Height is Style Height.
- AutoCAD Style is Table Text.
- Removal Method is Rub.
- In the Verification Display section, clear all the check boxes.
- Click OK.
- On the ribbon, click
Raster Tools tab
Vectorize & Recognize Text panel
OCR drop-down menu
Recognize Table
 .
.
- Draw a rectangle to enclose the table as follows: click the upper left corner, press
Enter to set the angle to 0, then click the bottom right corner.
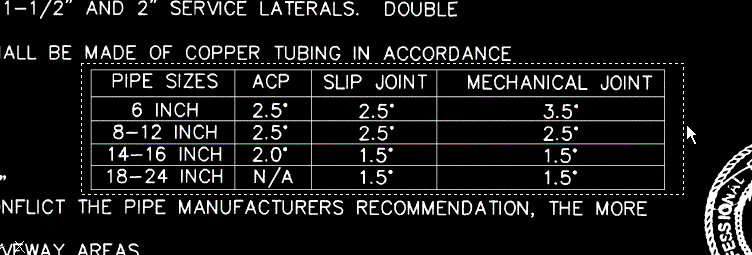
- The
Verify Table window opens. The View pane (upper pane) displays the original raster text; the Edit pane (lower pane) displays the output from the recognition engine.
The following example shows typical results for the Recognize Table command.
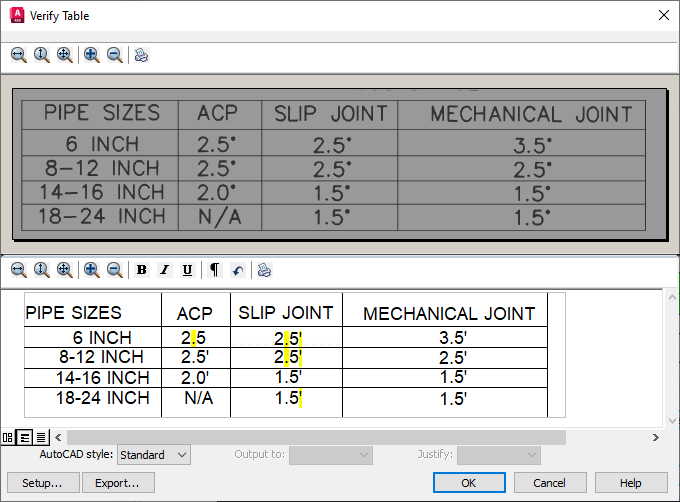
- Review the results in the Edit pane of the
Verify Table window. In this example you would change the $ characters in the first column to the numeral 8 and correct the spacing for the word INCH.
Attention: Because no recognition engine is 100% accurate, you should carefully review the results in the Edit pane, not just the highlighted areas, and make all necessary changes.
- Click
OK to insert the table as AutoCAD text in the drawing and then press
Esc to end the command.
If necessary, you can use standard AutoCAD commands to move or edit the text.
- Close the drawing without saving changes.