Additional Features
SDT includes several helpful commands that extend functionality beyond the core workflows.
Table of Contents
- Batch Operations
- Editing or Copying Extetnded Data
- Adding Custom Properties
- Validating Model Data
- Initialization File (INI)
Batch Operations
The SDT includes many commands and workflows that can act upon multiple project files. These are referred to as the SDT Batch commands. The following commands can be used on multiple JMFs at a time. Note these files must be closed and writable (accessible) at the time that the command is run.
- Batch Sync Data
- Batch Attach Extended Data
- Batch Sync Data
- Add Models to a Job
- Job Validation
Editing or Copying Extended Data
To help users quickly and easily work with Property Set Definitions inside the model space environment, SDT includes commands to modify or duplicate the properties attached to model entities.
The Edit Extended Data command will prompt the user to pick a selection from the model and a palette will display the Property Set Data attached to that entity or feature. This may be a streamlined procedure for those users unfamiliar with the Extended Data tab of the Properties Palette.
The Copy Data command allows users to duplicate the Property Set Definitions from one drawing entity or feature to another. The user has the option to copy all Property Set Definition data over to the selected entity or only blank properties. This command can be useful to manually assign properties to specific entities.
Adding Custom Properties
SDT uses the existing system of Property Sets that any AutoCAD user can leverage and understand. This system tracks every entity in the AutoCAD database (and Civil 3D database) with reliable and relevant model information.
SDT will allow users to setup not only custom Property Set formats as well as to extend the typical expressions beyond normal AutoCAD functionality. This customization will typically occur in the standards file for the job (JSF) and applied across the entire Job. The Standardized Data Tool for Civil 3D comes pre-installed with two JSF templates in drawing and template formats. These files can be found in the SDT installation folder (replacing “202x” with the version of Civil 3D):
- C:\Program Files (x86)\Autodesk\ApplicationPlugins\AeccStandardizedDataTool-202x.Bundle\Contents\Templates
The Standardized Data Tool for Civil 3D comes pre-installed with two JSF templates in drawing and template formats:
- SDT Default Job Standards File Template v3.0.0.3.dwg
- SDT Default Job Standards File Template v3.0.0.3.dwt
- SDT Default Job Standards File Template v3.0.0.3.dws
These files may be duplicated and modified to customize the default Property Set Definitions (PSD) and property data standards utilized by the SDT. When starting a new Job and Collection, the JSF template file can be specified for the project moving forward.
Validating Model Data
The goal of the Standardized Data Tool for Civil 3D is to simplify the process of manipulating the vast amounts of data found within modern data civil infrastructure projects. This data is vital for project simulation or analysis, final deliverables and as-builts, cost estimation, round-tripping to other systems, and so much more. The complexity of these models means that having confidence in the data is paramount. SDT includes a command to ensure that files within a Job are following the project standards in a variety of important checks.
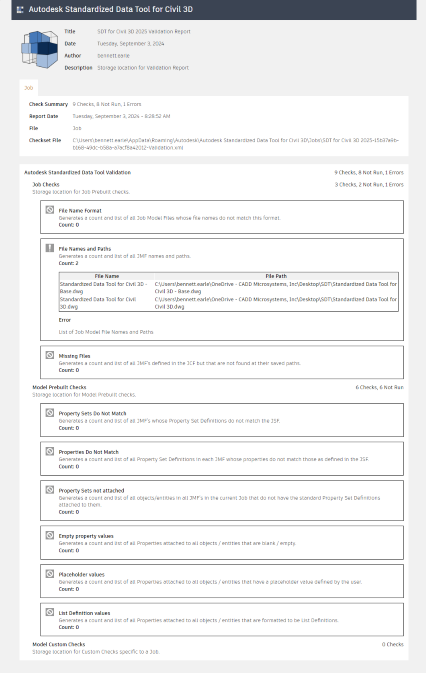
The Job Validation command can be found on the Standardized Data Tool tab of the ribbon on the Job Tools Panel. This command will allow users to review the Job for all or a selection of the following checks:
- Job Checks
• Check File Name Format
• Count and List of File Names and Paths
• Count and List of Missing Files - Model Checks
• Property Sets Do Not Match
• Properties Do Not Match
• Property Sets Not Attached
• Empty Property Values
• Placeholder Values
• Count and List Definition Values - Custom Checks
• User Defined Validation Checks
The Job Validation check can be performed on an entire Job, or a subset of drawings found within a Job. Once a Job Validation is completed the results are compiled into a CSV or HTML format.

Initialization File (INI)
Just as with any piece of software, the Standardized Data Tool for Civil 3D requires settings and initialization files to function correctly. These files allow users to customize the extension to fit the needs of their organization or software configuration.
To create the INI file:
- Run NETLOAD and run either the "SDT.C3D.Management.202X.dll" or "AeccSDTCivil3DManagement.dll", depending on which version of SDT you have installed (insert the product year at 202X).
- Run the command SDT_Management_CreateINIFile.
- Upon running the command, this will generate an initial INI file next to the SDTSettings.xml file.
- Open the INI file in a text editor.
A user can change the following properties to their needs:
Collections
ShowColl: Value is 0 or 1; corresponding to FALSE or TRUE
Path: This is the path to the Collections folder that SDT will use
Templates
Path: This is the path to the templates used by the SDT (JSF, JDF, etc.) - Save the INI file.
Upon running SDT, the extension will look for the INI file first. If this INI file exists, the corresponding data in the INI file is replaced in the SDTSettings.xml file and that is used for the product to force it to use the desired settings.
Thus, from an enterprise perspective, the INI file could be set up and pushed out to all users to their SDTSettings.xml file location and that will force SDT to follow those settings once executed. Once the INI file has been read in, it can be deleted. This does not happen automatically.
SDTSettings.xml location:
- V3.0.0.2 and older: Documents\Autodesk\Autodesk Standardized Data Tool for Civil 3D
- V3.0.0.3 and newer: %APPDATA%\Autodesk\Autodesk Standardized Data Tool for Civil 3D
Installation directory is typically (insert the product year at 202X):
- C:\Program Files (x86)\Autodesk\ApplicationPlugins\AeccStandardizedDataTool-202X.Bundle\Contents\Win64
- C:\ProgramData\Autodesk\ApplicationPlugins\AeccStandardizedDataTool-202X.Bundle\Contents\Win64
