
Purge
Have you tried purge to manage the version history in vault? Versions that are no longer needed can be purged from the vault, creating a more compact vault database, and improving the overall performance of the vault.
Overview
Each time a file is updated in the vault, a version is saved within the vault. The versions range from the initial draft version to versions representing work in progress to the final version. Over time, as the number of versions increases, the file store size will increase to reflect that. Some of these versions are irrelevant to the design history and no longer needed in the vault.
Using the Purge wizard, you can manage the Files and Items version history in a vault. Versions that are no longer needed can be purged from the vault, creating a more compact vault database and improving the overall performance of the vault. Performing a backup before completing the purge operation is highly recommended, as you would not want to delete any important file accidentally.
Purge Guidelines
Here are some of the basic rules of purging:
The latest version in a revision can't be purged (this revision is never removed). To remove a file and all its versions from a vault, use Delete.
File versions that are labeled can't be purged.
Files that are currently checked out can have their older versions purged.
Children with a dependent parent version cannot be purged until the parent version has been purged.
The Administrator role has a further restriction, and a version can't be purged if a parent exists and is not part of the existing action set.
For Autodesk Vault Professional:
- File versions linked to items in Vault Professional cannot be purged. To remove a version linked to an item, the item must first be deleted from the item master.
- File versions marked as Controlled by the lifecycle definition may not be purged.
- Files are purged based on revision and lifecycle rules. Configure the Version Selection Criteria section in the Purge dialog to purge files that are not controlled by a lifecycle.
- Files without a revision scheme are considered a "null" revision and are not purgeable when configured with a lifecycle. To purge based on lifecycle control rules, a revision scheme must be assigned to the lifecycle, and the target of the purge must utilize the revision scheme.
Purging Files/Items
Purging files/items can be done on the entire vault from within the Autodesk Data Management Server (ADMS) console, or you can purge specific versions from the Main Client view or the History tab.
Purge Files/Items in a Vault from the ADMS console
Let's go into the Autodesk Data Management Server Console and look at how to do that.
Purge Files
Files are purged based on revision and lifecycle rules. Configure the version selection criteria section in the Purge Files dialog to purge files not controlled by a lifecycle.
To purge files from the server console:
Log into the ADMS console.
Right-click a vault from within the Vaults folder and select Purge Files, or
Select the vault from the Vaults folder and click Actions > Purge Files.
You are prompted to set the number of files you want to keep (noting you can never purge the latest), how old the files should be, or, based on comments, what files you want to keep. Combining these settings results in a list of file versions that are eligible to be purged.
In the Purge Files dialog, turn on the check box next to each of the selection rules to determine the data to be purged:
Versions except latest Specify how many file versions to leave in the vault. Versions older than days Specify how old the files to purge should be. Exclude versions where comment contains Enter a text string contained within the Comments field of the files in the vault. Any files containing this string will be excluded from the purge process. This option is only available if any of the above checkboxes are selected.
Enter an asterisk (*) in the Comments field. Any file version which has a comment will be excluded from the purge.
Note: This asterisk (*) workflow is supported only for 'Versions not controlled by Lifecycles.’Click Export Candidates to generate a pre-report (.csv file) that shows the list of purge candidates.
Note: The pre-report includes all file versions that can be purged. However, some candidate file versions can't be purged if some non-purgeable parent files use them.Click OK to initiate the purge.
Every version of every file within the vault will be analyzed and purged using these settings. However, file versions that are part of file or item revisions are not purged, even if they match all these settings.
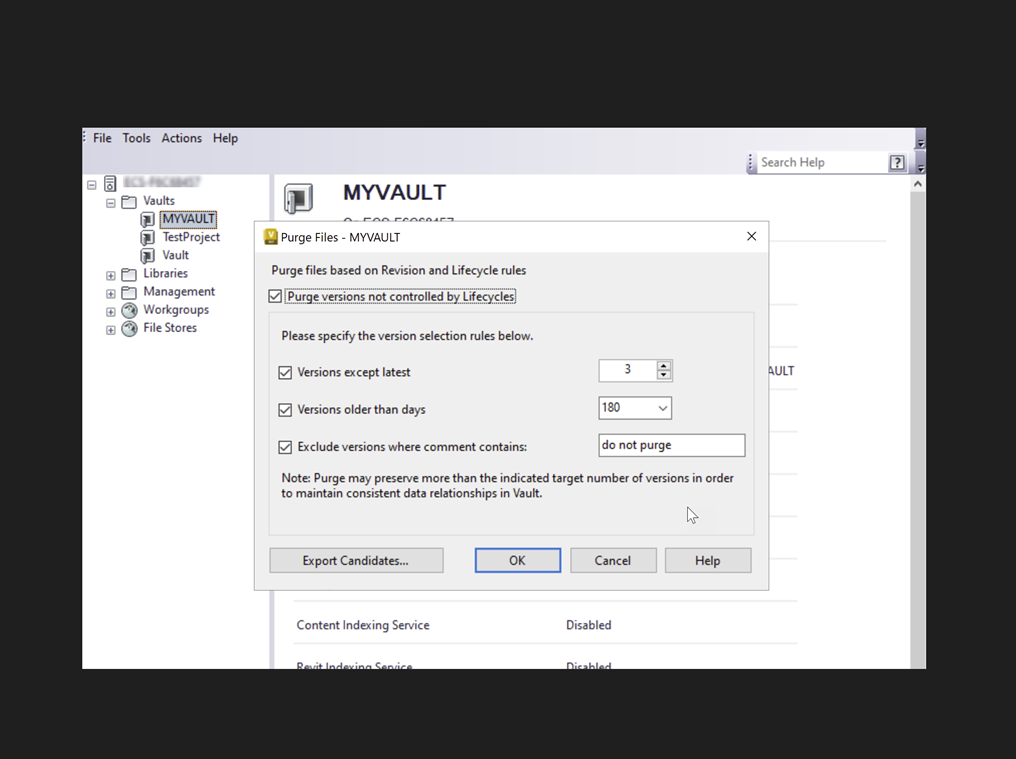
Here, in this example, we have a vault named MYVAULT. We specify to keep all the versions except the latest three, or we could even say the latest five. We can also purge it based on time, so we specify to purge everything half a year old. In addition, we can exclude the version from being purged with a particular comment, for instance, "do not purge."
Purge File Versions from the Command Line
Connectivity.ADMSConsole.exe -Opurge -Nvault name -KEEPVERSnumberX -MINAGEnumberX -EXCLCMTcomment -UNCONTROLLED -VUusername -VPpassword See Purge File Versions from the Command Line for details.
Disable Purge from the Command Line
The purge feature can be disabled from the command prompt:
Connectivity.ADMSConsole.exe -Odisablepurge -Ndatabasename -VUusername -VPpasswordSee Disable Purge from the Command Line for details.
Purge Items
Item versions are purged based on their lifecycle control settings. You can't purge any item version if an item does not have a lifecycle assignment.
To purge items from the server console:
Log into the ADMS console.
Right-click a vault from within the Vaults folder, and select Purge Items, or
Select the vault from the Vaults folder and click Actions > Purge Items.
Click OK to initiate the purge.
Purge Items from the Command Line
Connectivity.ADMSConsole.exe -Opurge -Nvault name -ITEMS -VUusername -VPpasswordSee Purge Items from the Command Line for details.
Purge versions from the Main Client view
Purge file/item versions from a vault from the main client view.
To purge files from the main Vault Client:
Select a file or files, and then select Purge from the Edit menu, or
Right-click a file, and then select Purge.
The Purge Wizard lists the file or files that were selected from the main pane. Click Add Files to include other files from the vault.
To exclude a file from being purged, select it from the list and then click Remove.
The parents and children of a selected file can be included in the purge. Right-click on a file in the list and select Add Parents or Add Children to include the related files.
Click Next.
Click the Purge versions not controlled by Lifecycles check box to purge versions not defined by revision and lifecycle rules. This action enables the Specify the version selection criteria box.
In the Specify the version selection criteria box, turn on the check box next to each of the selection rules to determine the data to be purged:
Versions except latest Specify how many file versions to leave in the vault. Versions older than days Specify how old the files to purge should be. Exclude versions where comment contains Enter a text string contained within the Comments field of the files in the vault. Any files containing this string will be excluded from the purge process. This option is only available if any of the above checkboxes are selected.
Enter an asterisk (*) in the Comments field. Any file version which has a comment will be excluded from the purge.
Note: This asterisk (*) workflow is supported only for 'Versions not controlled by Lifecycles.’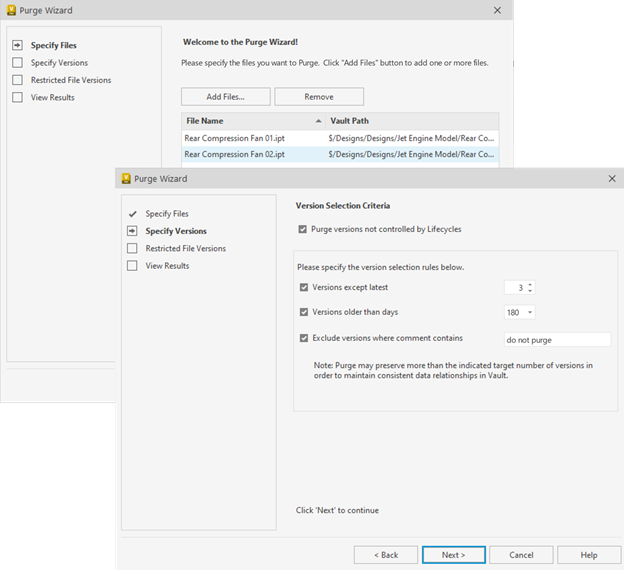
Click Next.
If there are any restrictions on the versions to be purged, the restricted versions and the reason for the restrictions are listed.
Click Finish to purge those versions that are not restricted, or click Cancel to exit the Purge Wizard.
Note: Versions that are restricted because they are linked to items in Vault Professional cannot be purged unconditionally when the version is a dependent of a parent file version. The corresponding item must be deleted from the item master before the version can be purged.The Purge Results screen summarizes the versions that were successfully removed and the versions that were not purged due to vault restrictions.
You can choose to generate a report as an Excel file (.xls) and save it locally or in the vault by performing one of these options:
- To save the report locally, click Save. On the Save As dialog, navigate to the folder structure where you want to store the file locally. Enter a name for the report and click Save.
- To save the report in a vault, click Send to Vault to display a list of vault folders. Select the vault where you want the report saved, enter a name for the report, and click Save.
Click Close.
Purge file versions from the History tab
You can also purge specific versions of a file from the History tab.
Select a file and then click the History tab.
From the History tab, select a file version or versions and then select Edit > Purge, or
Right-click a file, and then select Purge.
The Purge Wizard starts at the Restricted File Versions screen. If there are any restrictions on the versions to be purged, the restricted versions and the reason for the restrictions are listed.
Click Finish to purge those versions that are not restricted, or click Cancel to exit the Purge Wizard.
If you have been assigned the role of Administrator, you can choose to purge even the restricted versions. Turn on Ignore restrictions (Purge unconditionally) and then click Finish to override any purge restrictions. Note that if you are purging versions from history tab, the Ignore restrictions (Purge unconditionally) check box is enabled when a file is labeled or is marked as Controlled by the lifecycle definition.
Note: Versions that are restricted because they are linked to items in Vault Professional cannot be purged unconditionally when the version is a dependent of a parent file version. The corresponding item must be deleted from the item master before the version can be purged.The Purge Results screen summarizes the versions that were successfully removed and the versions that were not purged due to vault restrictions.
You can choose to generate a report as an Excel file (.xls) and save it locally or in the vault by performing one of these options:
- To save the report locally, click Save. On the Save As dialog, navigate to the folder structure where you want to store the file locally. Enter a name for the report and click Save.
- To save the report in a vault, click Send to Vault to display a list of vault folders. Select the vault where you want the report saved, enter a name for the report, and click Save.
Click Close.
Purging in case of lifecycle states
When you set up your lifecycle states, there is a Control tab where you can set what file versions should be kept: all versions in that state, the first and last versions, the last version in that state, or none. Configure your purge preferences for files assigned to a lifecycle definition to help manage Vault file retention. Purging Vault will always purge first based on lifecycle control settings.
To configure the control preferences:
Click Tools > Administration > Vault Settings.
In the Vault Settings dialog, click the Behaviors tab > Lifecycles.
In the Lifecycle Definition dialog, select the name of the lifecycle definition, and then click Edit.
From the Lifecycle States grid, select the state you want to edit and click the Control tab.
Select one of the following options:
- All - No versions in this state are removed when a purge is performed. This option is recommended for states where not many versions are created or where each version is critical.
- First and Last - All versions in this state are removed during a purge, except each series' first and last version. Use this option for states where the changes between the first and last files are helpful.
- Last - All versions in this state are removed during a purge, except the last version in each series. This option is recommended for states where a record that the file was in the state is essential.
- None - No version in this state will be retained after the purge, except the tip version of a revision and the versions consumed by a parent file.
Note: The basic purging rules are also applied to the selected optionImportant: No record of the file in this state will exist after the purge.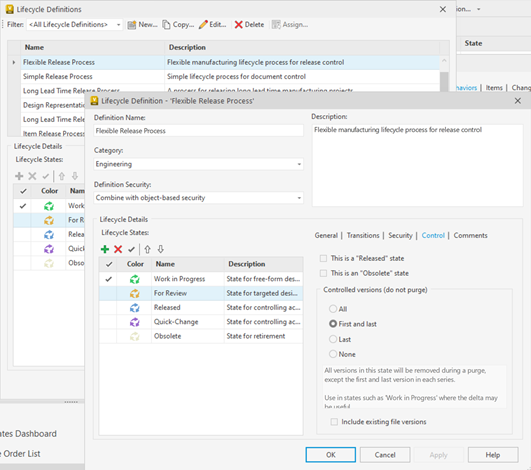
Turn on the Include existing files versions check box to apply purge restrictions for lifecycle states for existing versions of files.
Note: If this box is not checked, the purge version control settings apply only to new file versions.
When you now purge your vault, the list of eligible files and items is built from the lifecycle control setting for that version.
Here is an example that highlights what files will be purged in a lifecycle scheme scenario. Considering there are no dependencies, the following are the purge settings:
- Released: Last
- For Review: First and last
- Work in Progress: None
We have different versions at different revisions and lifecycle states.
| V1 | V2 | V3 | V4 | V5 | V6 | V7 | V8 | V9 | V10 |
| Rev A | Rev A | Rev A | Rev A | Rev B | Rev B | Rev B | Rev C | Rev C | Rev C |
| Work in Progress | Work in Progress | For Review | Released | Work in Progress | Work in Progress | Released | Work in Progress | Work in Progress | Work in Progress |
Now, upon purging, all the versions except V3, V4, V7, and V10 are purged as per the criteria and the following versions remain after purging. It doesn't matter if we have selected to keep the last three or the last five under the selection criteria.
| V3 | V4 | V7 | V10 | ||||||
| Rev A | Rev A | Rev B | Rev C | ||||||
| For Review | Released | Released | Work in Progress |