Use Square to create a surface by blending inward from a combination of four free curves and/or corners.
- Choose Surfaces > Boundary Surfaces > Square

 .
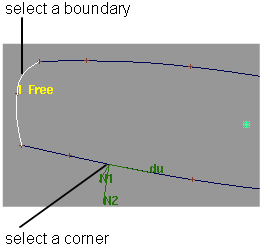
. - Click the boundary curves, or snap corner locators to existing geometry, in clockwise or counter-clockwise order.
What combination of curves and corners can I use?

If you mix curves and corners, you must click the curves first.
After the surface appears, you can move a corner locator by dragging it.
Create a new surface by blending four boundary curves (or curve segments)
- Choose Surfaces > Boundary Surfaces > Square from the tool palette.
The Square Control window appears.
- Click the first boundary curve.
or
Click a point on the curve (to use as a corner) by holding down either the
 (Windows) or
  (Mac) key or the and
  (Windows) or and
  (Mac) keys.
 - You can use free curves, curves on surface, isoparametric curves, and/or trim edges.
- To maintain continuity with another surface, you must pick an isoparametric curve or trim edge on that surface, not a construction curve used to create that surface.
- You can use a segment of a longer curve. The Square tool will use the section of the curve bounded by the other curves you click.
or
Click a grid point (to use as a corner) by holding down the
(Windows) or (Mac) key. - Click the remaining curves and/or points (corners) in clockwise or counter-clockwise order.
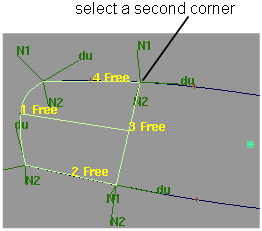
- You can select either four curves, four corners, one corner and two curves, or two corners and one curve.
- If you select both curves and corners, you must select the curves first.
- You can only use a snapping mode to select the first corner.
- If two adjacent boundary curves do not intersect, the Square tool displays an error in the prompt line. Otherwise, the surface is built.
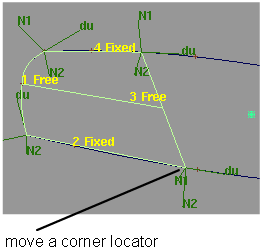
- Move the corner locators (if any) by clicking them and dragging to change the position of the corners.
- Use the options in the Square Control window to set the continuity you want at each edge (see below).
Use the tangent angle manipulator
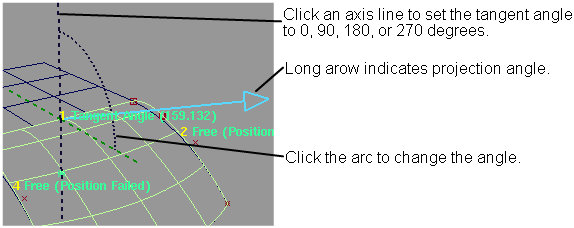
This manipulator appears when you set an edge to Tangent Angle in the Square Control window (see below).
- Click an axis line to set the tangent angle to 0, 90, 180, or 270 degrees.
- Click an arc, then drag the mouse left and right to change the angle value, or type a number to set the value exactly.
- When you are finished, click the Go button.
Edit the construction history of a Square surface
- Pick the surface you want to edit.
- Click the Square icon, or choose Surfaces > Boundary Surfaces > Square from the tool palette.
The Square Control window appears.
- Use the curve modification tools (in the Transform, Curve Edit, and Object Edit palettes) to reshape the curves used to create the surface, and use the Square Control window to change the surface creation options.
Tips and notes
- To make sure the boundary curves intersect, use:
- Curve snapping
- Use the Project Tangent tool to make sure the curves are already continuous before creating the surface. This will ensure the Square tool can achieve continuity and decrease calculation time.
- The first curve you click defines the U direction of the new surface. The second curve defines the V direction.
- You can select several boundary curves at a time by dragging a pick box around them, but you cannot control in what order they will be picked.
- Curve segments can be ambiguous. In the example at left, it is not clear which part of the U-shaped boundary curve should be used as the left edge of the new surface.
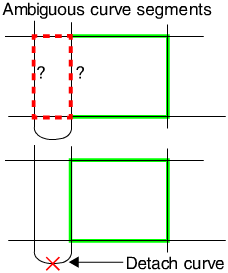
In these cases, the Square tool will guess which segment to use. If it guesses incorrectly, detach the ambiguous curve to create two separate, non-ambiguous curves.
- If you know the boundary curves already have matching parameterization and minimum spans, you should turn the Rebuild checkboxes off. Rebuilding can sometimes inhibit continuity.
- For the continuity options to work for some edges, the adjacent edges (for example, edges 2 and 4 are adjacent to edge 1) must usually be free.
If you have continuity constraints on all edges, the constraints may sometimes conflict and fail.
- If your surface has a bulge or dent, try reducing the Influence slider for the edges whose continuity is Fixed or Free.
The Influence sliders are found in the Square Control window when Blend Type is Cubic.
When you specify the four corners of a Square surface, you must specify the first corner using a snap mode (that is, holding down either the
(Windows) or  (Mac) key, the (Windows) or (Mac) key, or the Ctrl and (Windows) or and (Mac) keys). However, you can specify the remaining corners with or without using a snap mode.
 - There are several techniques to try when Square does not produce the intended results:
- Turn Rebld on for all boundaries with trimmed surfaces or curves on surface, and have the system recalculate the surface.
- Adjust the influence sliders to adjust the shape of the resulting surface.
- Set the Blend Type to Linear instead of Cubic.
- If trying to maintain continuity with trim edges or curves on surface, it may be necessary to decrease the curve fit tolerance in the Preferences > Construction Options
 settings.
 - Verify that the square surface doesn’t have a corner where the U and V edges are colinear.
What if...?
I can’t create a surface from my curves?
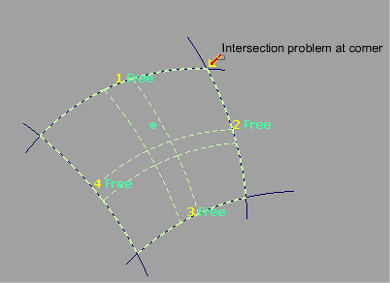
- Make sure your curves intersect. If modifications to the boundary curves cause them to stop intersecting (while construction history is on), a small red and yellow arrow appears at that corner. Right mouse clicking on the arrow displays a bubble with an explanation of the problem.
- The Square tool tests whether curves intersect within the Curve Fit Distance tolerance in Construction Options. To change the Curve Fit Distance option, choose Preferences > Construction Options.
- You can’t create a surface inside boundary curves with sharp corners, CV multiplicity, or multi-knots. To remove multi-knots, turn on the Rebuild option for rail curves.
The resulting surface is too complex?
- Turn on the Rebld options for the curves used to create the surface.

- Turn on the Explicit Control option, then manually choose how many spans the surface may have and what degree it should be in the U and V directions.
I want to change a Square surface after I’ve worked on other objects?
Choose Object Edit > Query Edit![]() and click the surface.
and click the surface.