Autodesk Vault provides an engineering data management solution that ensures the integrity of design relationships and supports revision control, while SharePoint provides a simplified and familiar interface for other users within a design organization . This integration is achieved with Microsoft Business Data Connectivity Services (BDC) by using Autodesk Vault with Microsoft SharePoint.
SharePoint users can search, list, link, and download visualization files from Autodesk Vault using the SharePoint interface.
Deploy and Configure Vault for Sharepoint 2010
Product Requirements
-
Autodesk Vault Professional 2014.
-
Microsoft SharePoint 2010 Standard or higher.
– Business Data Connectivity Service
– Search Service Application
-
Microsoft WSE 3 (Web Service Extensions 3 is downloadable from Microsoft.com).
Follow these steps to deploy the Microsoft Sharepoint Vault Integration and configure it for use.
Deploy Vault for Sharepoint
The deployment package is an executable that you must run from the setup screen. The deployment package uncompresses the files in a location you specify.
- Ensure WSE 3 is installed on the SharePoint server.
- Launch the Installation Wizard for the Autodesk Data Management Server Console.
- Click the Install button in the Installation Wizard.
- Accept the Licenses and Services Agreement if you haven't already and click Next.
- Enter your product information and license information if you haven't already. Click Next.
- On the Configure Installation page in the Installation Wizard, select the Autodesk Office Sharepoint Server 2010 Integration check box.
- Click Install.
The Deployment package installs the files.
Manage the Deployment
Batch files are used to deploy the Sharepoint solution. There are two main duties performed by the batch files.
The first duty is to install the BDS model. The BDS model is required for communication with Autodesk Vault. The second duty is to create two administrative configuration web pages and properly formatted lists.
Administrative Configuration Pages
The first configuration page, Vault Settings, applies to the farm. This page should be configured by a site collection administrator. The default location for the Vault Settings configuration page is:
_layouts/Autodesk.Vault.BCSConnect/VaultSettings.aspx
The second configuration page, the Add List configuration web page, is intended for use by site owners. The Add List page is used to create new SharePoint lists of Vault data. New lists are created on the site from which this page is accessed. The default location for this page is:
selected site: _layouts/Autodesk.Vault.BCSConnect/addVaultlist.aspx
Batch Files
The deployAll.bat file deploys the Vault integration to the default collection. When using the deployAll.bat file, deployFarm.bat and deploySite.bat are not necessary. Each of the deploy batch files has an equivalent retract batch file for removing the solution. The deployAll.bat file can be used when the default site collection is the only collection or when there are multiple site collections.
The deployFarm.bat file deploys the SharePoint solution, the BCS model, and creates the Vault Settings web page at the farm. deploySite.bat supports deployment of the three default lists to a specific site collection. You must modify a path within each batch file to use the deploySite.bat file. Instructions for modifying the path are detailed in the next section.
It is permissible to deploy to multiple site collections.
Example of Deploying Vault for Sharepoint to a Default Site
You can deploy Vault for Sharepoint to a default site, and then access the Add List web page from a sub‐site of another site collection.
-
Default deployment creates the Add List page: http://ServerABC/_layouts/Autodesk.Va...Vaultlist.aspx
- A new Vault list is desired on the site ‘Electrical’ under the site collection
‘Engineering‘: http://ServerABC/sites/Engineering/Electrical/SitePages/Home.aspx
- Copy the path, starting with ‘_layouts’ from the default site. Append to the path of the selected site:
http://ServerABC/sites/Engineering/Electrical/_layouts/Autodesk.Vault.BCSConnect/addVaultlist.aspx
- Using this virtualized path to access the Add List page creates a new vault list that is exclusive to the site from which it was created.
- If SharePoint is installed in a non‐default location edit the SPPATH location in all applicable batch files. Replace ‘localhost’ with your server name.
Set URL=http://ServerABC
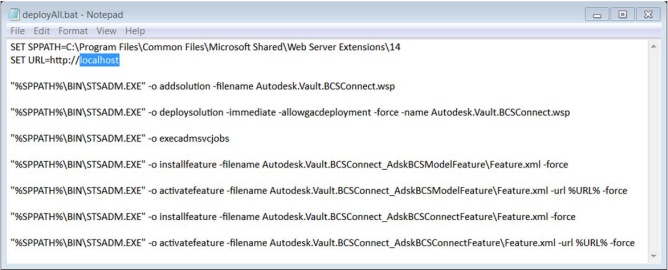
- If deploying the Vault integration to a specific site collection modify the deploySite.bat with the path to that site collection.
Server name = ServerABC
Site Collection = Engineering
Set URL=http://ServerABC/Sites/Engineering
- If updating an existing deployment of Vault connector, run retractAll.bat to prepare the existing deployment for an update.
- SharePoint Administrator Tasks outlined in this paper should be completed prior to the creation of custom lists using Add List.
Set Access Permissions
You must configure access permissions for Vault files. If you are using Vault Professional, you will also need to configure access permissions for Change Orders and Items.
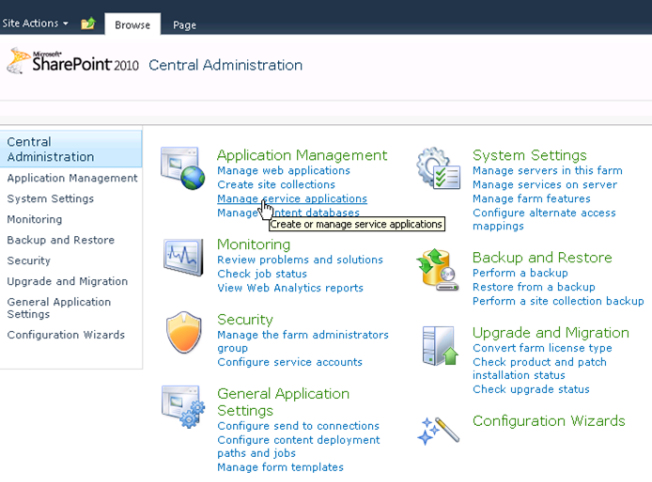
- Start SharePoint 2010 Central Administration.
- Click Manage service applications under Application Management.
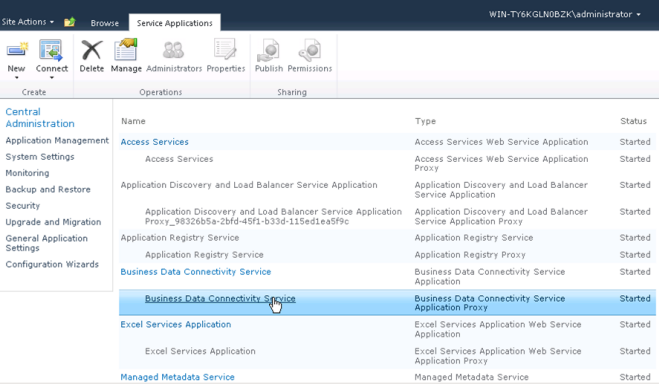
- Click Business Data Connectivity Service.
- In the View section of the toolbar, select the drop-down control andchoose External Content Types.
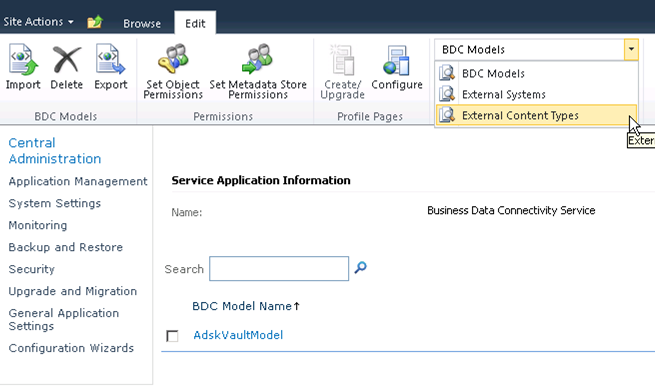
- Select the AdskVaultFile check box.
- Click Set Objects Permissions.
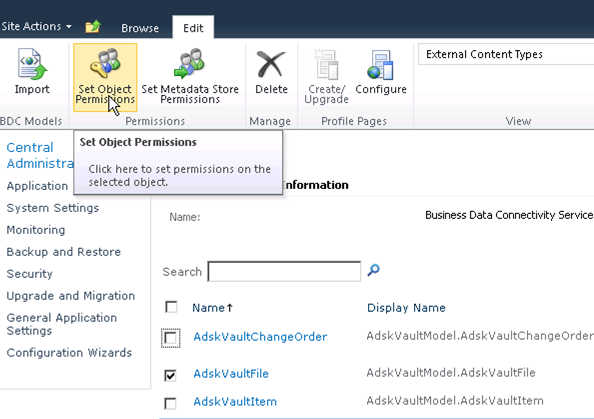
- Add All Authenticated Users and select each permission box.
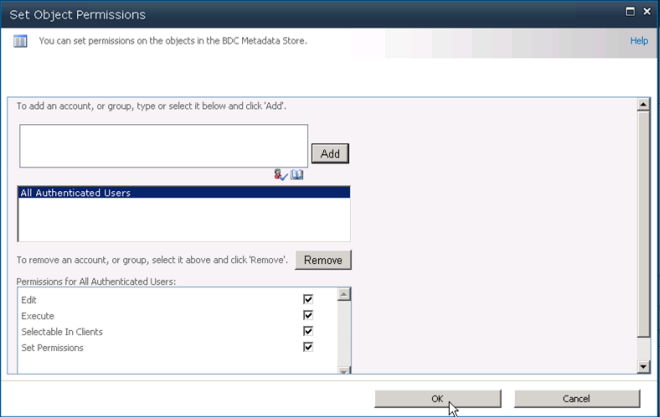
- Click OK.
- If using Vault Professional, repeat steps 2 and 3 for both AdskVaultChangeOrder and AdskVaultItem.
Configure the Profile Page
You must configure the profile page to recognize Vault Files. If you are using Autodesk Vault Professional, you will also need to make change orders and items recognizable.
- Check AdskVaultFile and select Configure. If using Vault Professional also check AdskVaultItem & AdskVaultChangeOrder.
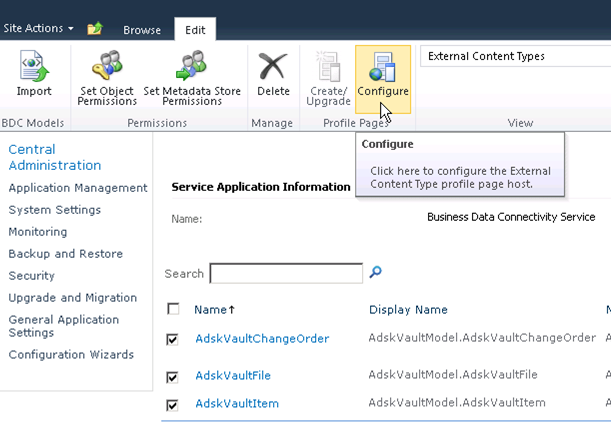
- Type in the URL field. http://<server name>/
- Click OK. Note: When re‐importing a modified BCS model selecting Create/Upgrade in the next step is optional. Choosing this option may require subsequent manual modification of XSL for proper display of thumbnails. This process is detailed in the Additional Topics section of this paper in the sub‐section Thumbnail Display Issues After BCS Model Update.
- Check AdskVaultFile and click Create/Upgrade. If using Vault Professional also check AdskVaultItem & AdskVaultChangeOrder.
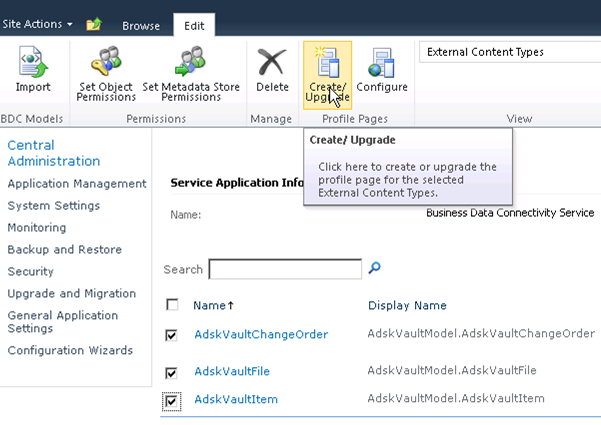
- Click OK.
Configure the Vault Login
After configuring the Profile Page, you must create and configure your Vault Login. One Vault Login will be used by everyone accessing the vault, so a custom Vault user should be created.
This user requires read access to the objects that you want Vault to see in SharePoint.
- Go to URL http://<server name>/_layouts/Autodesk.Vault.BCSConnect/VaultSettings.aspx.
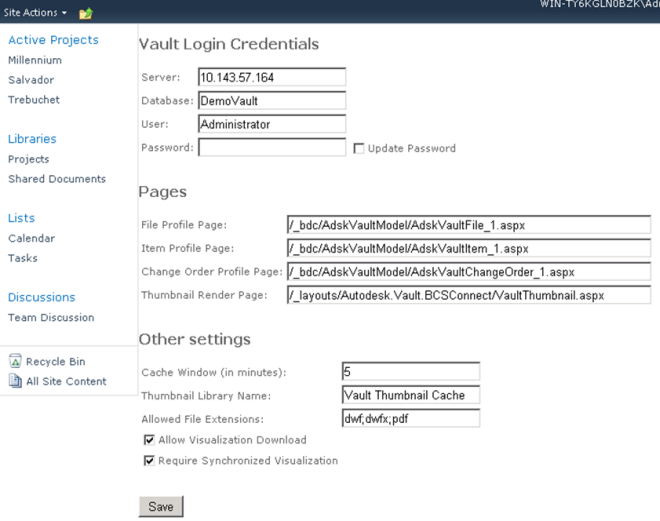
- Fill in Vault connection information.
- The server name may be the machine name or IP address.
- Select the Update Password option only when you wish to change the password.
- The Cache Window is the period that Vault thumbnail images are cached on the SharePoint server.
- Allowed File Extensions defines the file extensions available for both source download and visualization download options on the profile pages.
- Visualization files are defined by a unique relationship within Vault.
- Allow Visualization Download enables download of Vault specified visualization files.
- Require Synchronized Visualization prevents download of outdated visualization files.
- Show Only Released Revisions restricts all lists and searches to the latest released version. If there is no released version the object is not returned. If the tip version is a Work in Progress, or some other state, the last Released version will be returned.
- Click the Save button.
Configure Vault Search
Once you have set up the Profile Page and created the Vault login, you must configure Sharepoint to allow Vault searching.
-
From Central Administration click Manage service applications under Application Management.
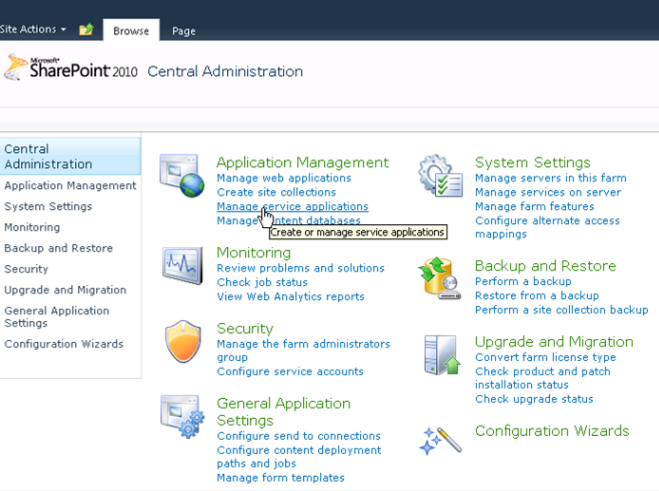
-
Click Search Service Application.
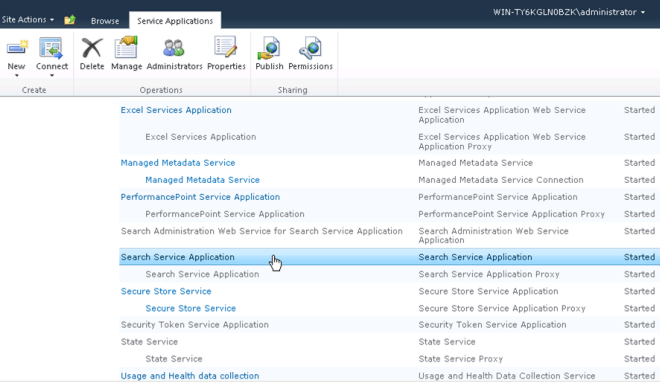
-
Under Queries and Results on the left hand side, click Federated Locations.

-
Click New Location.
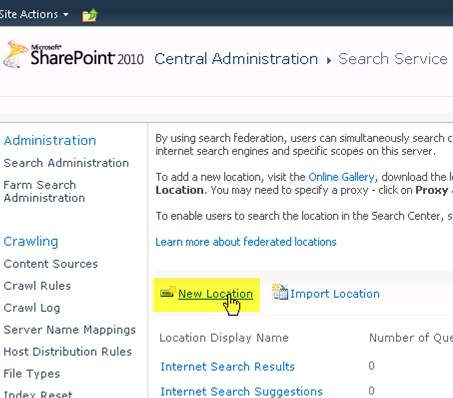
-
Fill in the following information:
-
Set Location Name: VaultSearch
-
Set Display Name: Vault Search
-
Enter a Description: Vault Search
-
Scroll down to the Location Information section. Under Location Type select the OpenSearch 1.0/1.1 radio button.
-
In the Query Template field enter the following string. Tip: copy the server name from the browser path.
http://<server_name>/_layouts/Autodesk.Vault.BCSConnect/VaultSearch.asp
x?s={searchTerms}
-
Under Display Information in the section Federated Search Results Display Metadata uncheck the option Use Default Formatting.
-
Immediately below the Use Default Formatting check box is the section XSL: replace the default contents with the contents of the searchResult.XSL located in the installation folder. (This step provides the proper formatting of the search result.)
-
Scroll down to the Specify Credentials section (at the bottom) and under User select Kerberos ‐ User credentials passed automatically option.
-
- Click OK at the bottom of the screen.
Quick References
The following links to Vault Utility Pages are created during deployment.
Autodesk Vault configuration page:
http:// <ServerName>/_layouts/Autodesk.Vault.BCSConnect/VaultSettings.aspx
Autodesk SharePoint list creation page:
http:// <ServerName>/_layouts/Autodesk.Vault.BCSConnect/addVaultlist.aspx