The Matte/Shadow/Reflection material, part of the Production Shaders library, is used to create “matte objects”; that is, objects that represent real-world objects in a photograph used as the scene background (also known as the plate). The material provides a wealth of options for combining a photographic background with the 3D scene, including support for bump maps, ambient occlusion, and indirect illumination.
Applications include:
- Blocking another 3D object from the camera view, thus allowing the 3D object to appear to be behind the object in the photo.
- Allowing 3D objects to cast shadows and occlusion on and receive shadows from objects in the photo.
- Adding reflections of 3D objects to objects in the photo.
- Allowing the interplay of indirect light between 3D objects and objects in the photo.
In all these cases the material is applied to a matte object that represents an object in the background plate, and the 3D object uses a traditional material.
For additional information, see Help menu  Additional Help
  mr Production Shader Library
  Matte/Shadow Objects and CameraMaps, as well as the Tech Note (following).
Tech Note
The Matte/Shadow/Reflection shader works by doing a form of differential shading. In other words, it determines the amount of light a point would receive if it were not in shadow, compares it to the amount of light the point actually receives, and shades it by the relative difference.
This means that any point that is fully lit, unshadowed by any object, returns the same color it already had, completely disregarding the actual intensity of that light. If half of the incoming light is blocked, the point will be shaded at 50 percent intensity, regardless of the full-intensity amount in an absolute sense.
An important feature of the Matte/Shadow/Reflection material is that it is non-self-shadowing, non-self-occluding, non-self- reflecting, and does not cast indirect light onto itself. Because it is designed to act as a stand-in for objects present in a photographic plate, which already contains self-shadowing, self-reflection, and so on, the material automatically excludes these effects. However, it is still able to cast shadows on other objects, receive shadows from other objects, reflect other objects, and so on, without creating unwanted double shadows or double reflections for such effects already present in the plate.
Procedure
This multi-part procedure provides step-by-step instructions for a simple case of combining a 3D object with a photograph using the Matte/Shadow/Reflection material, the Environment/Background Camera Map shader, and the Environment Probe/Chrome Ball shader.
Prerequisites:
- A photo of a background
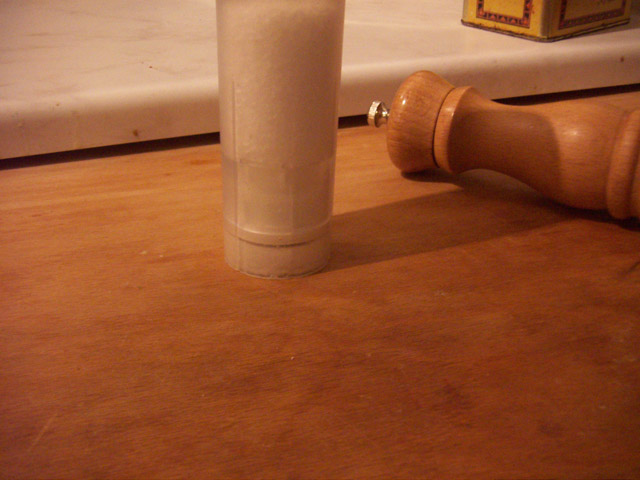
- A photo of a chrome ball, also known as a light probe, shot from the same camera angle and cropped so the edges touch the image.
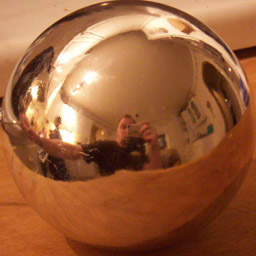
Ideally, these should be HDR photos, but non-HDR images can also work well.
Part 1: Set up the matte object, then test the shadows:
Set up the viewport:
- Make sure mental ray is the active renderer.
- Activate a Perspective viewport.
- Use the Viewport Configuration dialog
 Background panel to set the background image (see the procedure introduction, above).
 - On the Viewport Background dialog, make sure Display Background is on and Aspect Ratio
 Match Rendering Output is chosen.
 - Click OK to continue.
Choose an environment:
- Open the Environment And Effects dialog to the Environment panel (press 8).
- On the Common Parameters rollout, click the Environment Map button (reads “None”).
- From the Material/Map Browser
 Maps
Maps  mental ray group, choose Environment/Background Switcher.
Set up the background and environment reflections:
- Open the Slate Material Editor.
- Drag the Environment Map button from the Environment And Effects dialog to the active view in the Material Editor. Use the Instance option.
- Double-click the Environment/Background Switcher node to display the map’s rollout in the Parameter Editor panel.
- Drag a wire from the Background input socket of the Environment/Background Switcher node, then release the mouse to display the contextual pop-up menu.
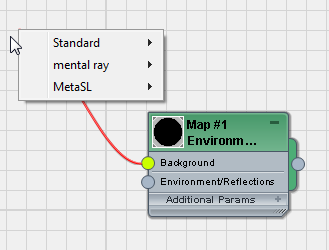
From the pop-up menu, choose mental ray
 Environment/Background Camera Map.
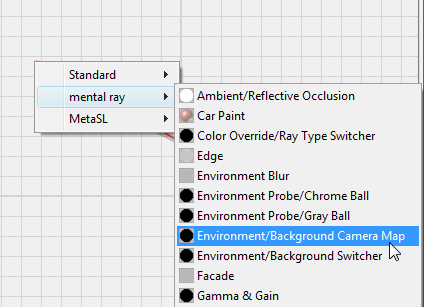
- Double-click the Environment/Background Camera Map node so you can see the map’s parameters. On the Environment/Background Camera Map Parameters rollout, click the Browse button and again open the background image.
- On the Material Editor
 View panel, drag a wire from the Environment/Reflections socket of the Environment/Background Switcher node. Use the pop-up menu to choose mental ray
  Environment Probe/Chrome Ball.
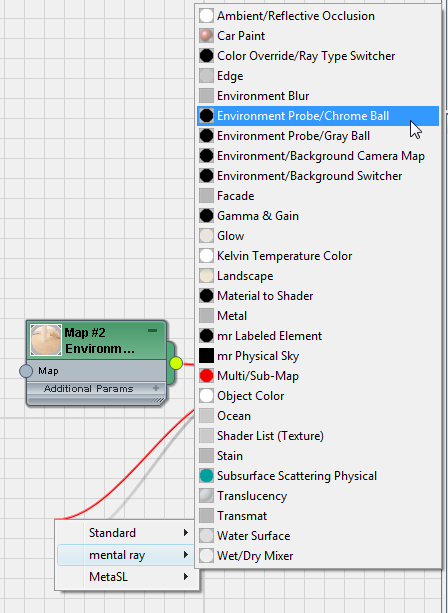
- Double-click the Environment Probe/Chrome Ball node so you can see the map’s parameters. On the Environment Probe/Chrome Ball Parameters rollout, click the Browse button and open the image containing the cropped photo of the chrome ball.
If the two photos have different exposures, use the Multiplier setting for either or both maps to match them.
Next, you’ll make a rudimentary model that represents objects already present in the background. At the very least you need a simple plane for the "ground" to place things on.
Note: It is easier to see your work if you maximize the viewport (
 +W) and use wireframe display mode.
Set up the matte object and a shadow-casting object:
- Align the viewport so it matches the angle of the photograph as closely as possible.
- Create some geometry. For this example, add a plane to represent the ground.
- Add a teapot on top of the plane. You’ll use this temporarily to tune the shadows.
- In the Material Editor, create an Arch & Design material, change the color to white, and apply it to the teapot.
Add a Skylight:
- From the Create menu, choose Lights
 Standard Lights
  Skylight and then click in the Perspective viewport to add a Skylight to the scene.
 - On the Skylight Parameters rollout for the light, set Sky Color to Use Scene Environment.
This retrieves the appropriate ambient color from the chrome ball photo.
Next, you’ll set up the Matte/Shadow/Reflection material.
Set up the Matte/Shadow/Reflection material:
- In the Material Editor, activate the existing Environment/Background Switcher map.
- Right-click the Background map button and choose Copy.
- Add a Matte/Shadow/Reflection material node to the active View. Double-click the node to see the material’s parameters.
- On the Matte/Shadow/Reflection Parameters rollout, right-click the Camera Mapped Background map button and choose Paste (Instance).
This places the same background map that is used in the environment switcher into the background map in the material as an instance.
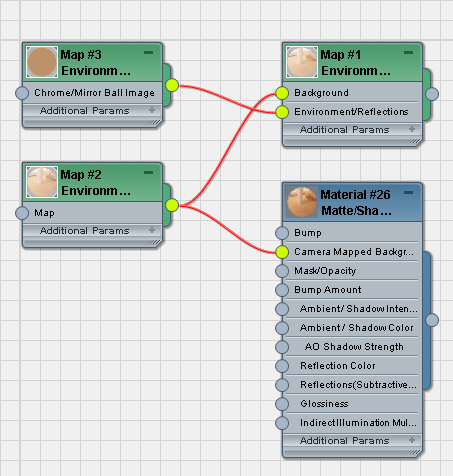
In the Slate Material Editor, you can see the same map wired to both components.
Tip: In the active View of the material editor, press L to arrange the nodes and wiring. - Select the ground plane.
-
 Apply the new Matte/Shadow/Reflection material to the ground plane.
This completes the basic setup. If you render now, you should see the teapot superimposed over the background image. The teapot should have a soft shadow underneath, which comes from ambient occlusion.
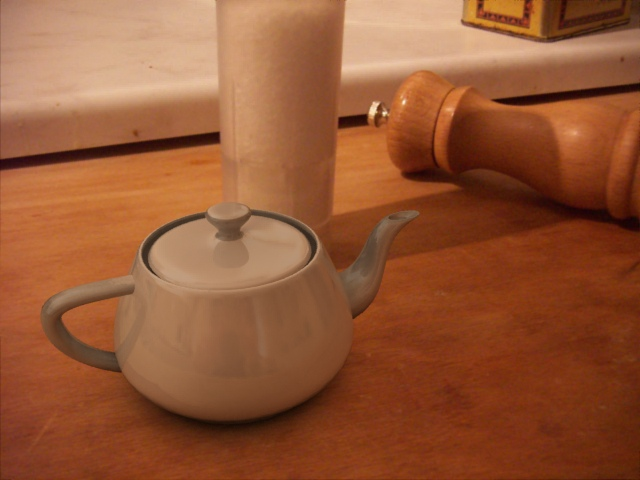
Part 2: Marrying 3D with a photo:
Now you’ll tune the lighting in the scene. Generally you need at least one key light to cast a directional shadow.
- Add a photometric light source; for example, a Target Light with spotlight distribution and a Disc for a shadow-casting area. Place the light with a location and orientation similar to where the main light seems to be coming from in the photo.
- Tune the light so that the lighting direction and intensity on the teapot seem reasonable compared to the objects in the photo, and so the shadow directions seem to match. For now, ignore the shadow intensity; just consider the lighting on the teapot itself.
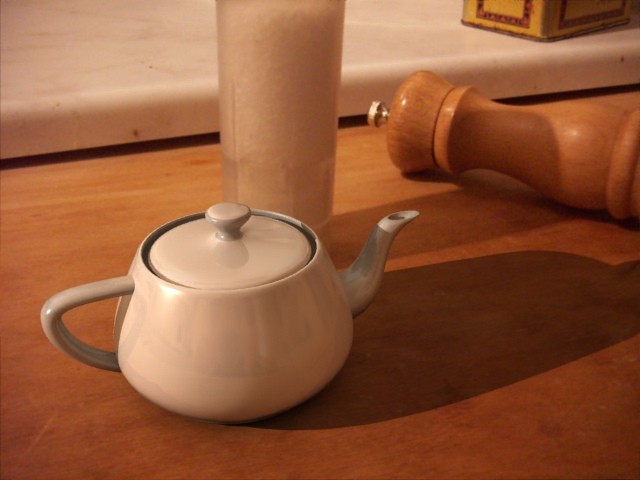
- Now tune the overall intensity of the shadow with the Ambient/Shadow Intensity parameter to match existing shadows in the photo. If the shadow needs tinting, use the Ambient/Shadow Color setting. You might also need to modify the AO Max Distance value to make contact shadows more or less pronounced.
- You can adjust the shadow softness with the photometric light’s Disc
 Radius setting, on the Shape/Area Shadows rollout.
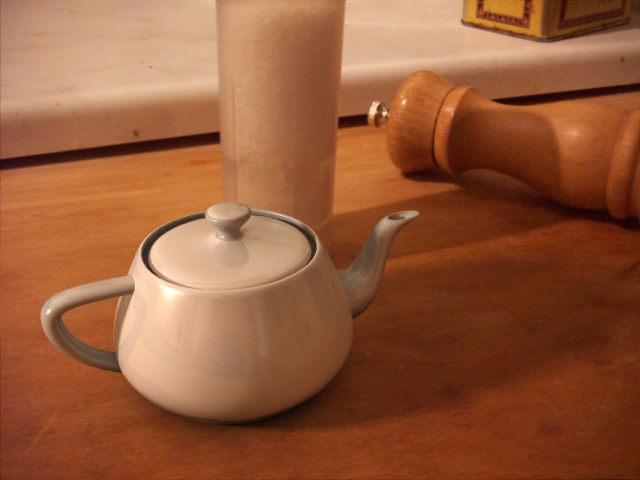
The scene is now set up, although further tuning might be necessary.
- Delete the teapot.
- Add any objects you want to use to the scene.
- Add any additional stand-in matte objects that you can use to occlude objects, receive and cast shadows, and so on, to the scene, and apply the same Matte/Shadow/Reflection material to them.
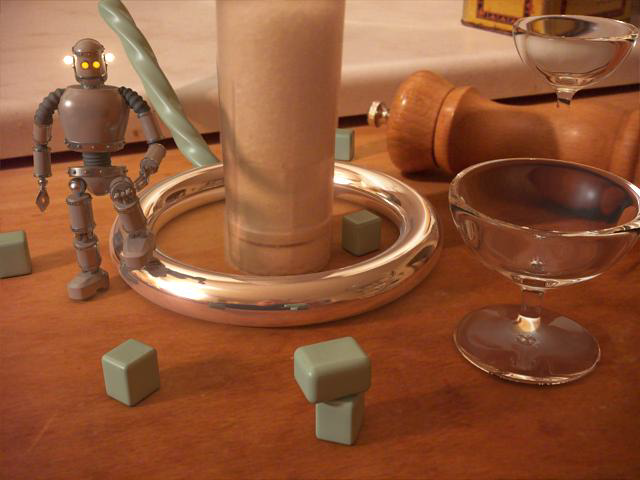
Part 3: Prepare for compositing:
So far the rendered 3D content has been added on top of the background directly in the renderer. Generally, you want to do this in an external compositing program, as follows:
- Open the Material Editor.
- Activate the Environment/Background Switcher shader (the one you instanced from the Environment panel).
- Drag the wire away from the Background input socket to disconnect the Environment/Background Camera Map.
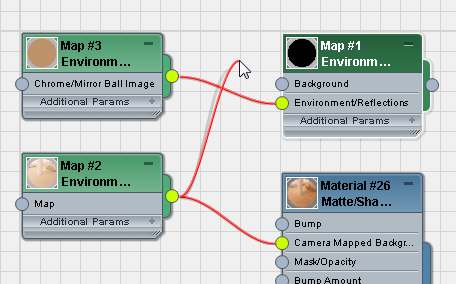
- Click the color swatch next to Background and make sure the color is transparent black; in other words, Red, Green, Blue, and Alpha all equal 0.0. These are the default values, so no changes should be necessary. Close the Color Selector dialog.
- Activate the Matte/Shadow/Reflection material, right-click the Camera Mapped Background map button, and choose Cut.
In this case, you use the button with its Cut option so you can paste the map in a different location.
- To the Matte/Shadow/Reflection material
 Camera Mapped Background map, apply a new Environment/Background Switcher shader.
 - Right click the Environment/Reflection map button (not the Background map button) and choose Paste (Instance) to apply the previously used map.
- Click the Background color swatch and make sure the color is transparent black as well.
The scene now contains two Switcher nodes: One used in the environment (switching between transparent black and the chrome ball) and one in the material (switching between transparent black and the camera map).
If you render now, the resulting image still properly contains all the reflections, light, and so on, from the background, but not the background itself. Shadows exist in the alpha channel, so the image is suitable for compositing directly on top of the background image.
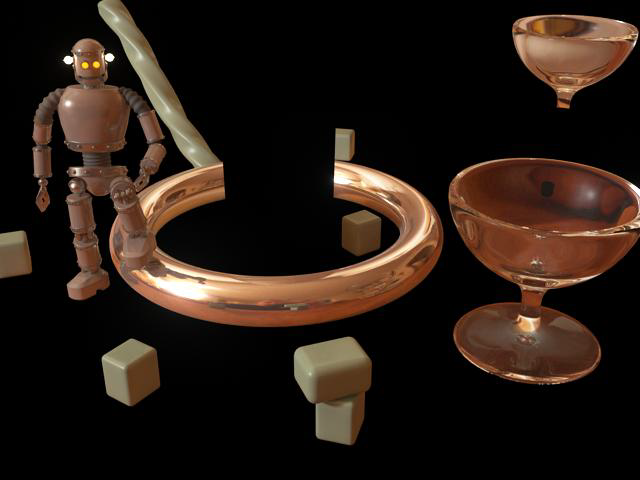
A Note on Gamma
The foregoing procedure does not cover gamma.
If you use a gamma-correct workflow, which yields a superior result, with literal mental ray textures (that is, you use the big Browse button to refer directly to a bitmap file, rather than inserting a Bitmap map), you must set the gamma of this bitmap explicitly in the appropriate Reverse Gamma Correction parameters.
Interface
Matte/Shadow/Reflection Parameters rollout
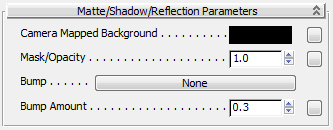
- Camera Mapped Background
-
Sets the color or map for the matte material. To use the scene background, click the map button, browse from the scene, and choose the Environment map. This button is a shortcut: You can also assign a Background map on the Maps rollout.
Note: Unlike the standard Matte/Shadow material, this material does not automatically pick the background (that is, the scene environment) as its color; rather, it’s necessary to provide the background explicitly. There are several ways to do this:- The most common method is to use a screen-projected map. However, using a Bitmap map with Screen environment mapping will not work correctly, because it does not handle reflections correctly. Instead, for this purpose, we recommed using the Environment/Background Camera Map shader. This shader projects the texture back from the current rendering camera.
- Alternatively, you can apply the color in any applicable UV texture space, perhaps if you previously projected the texture into that texture space.
- A third option is to project the background at render time with the Camera Map Per Pixel map.
- Mask/Opacity
-
The opacity of the material. Default=1.0.
Click the map button to assign an Opacity map. This button is a shortcut: You can also assign an Opacity map on the Maps rollout.
Tip: One use case for the Mask/Opacity setting is to refine a rough stand-in object. For example, the plate might contain a person’s arm, and you want to put in a CG object that goes behind the person’s arm and/or has shadows thrown onto it by the person’s arm. You could create simple stand-in geometry (maybe even a cylinder) and then use a screen-projected opacity map that defines the exact edges of the arm. Also, if the arm in the plate is motion-blurred or out of focus, you can feather the opacity mask accordingly. - Bump
-
Click the button to assign a Bump map. This button is a shortcut: You can also assign a Bump map on the Maps rollout.
- Bump Amount
-
The multiplier for the bump map. Default=0.3.
Shadows rollout
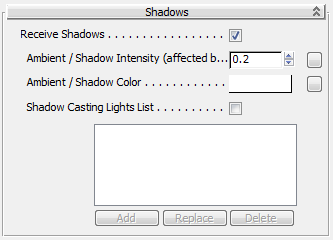
- Receive Shadows
-
When on, the surface can receive shadows. Default=on.
If Shadow Casting Lights List is off, all lights cast shadows on the surface.
- Ambient / Shadow Intensity
-
The amount of environmental light in the scene, which in a practical sense is how dark the shadows are. Default=0.2.
If the mental ray Image Based Lighting (IBL) feature is active, the Matte/Shadow/Reflection material also uses Skylights to generate shadows. In this case, it is not necessary to use the Ambient / Shadow Intensity setting; instead, just set the value to 0.0. However, when not using IBL, the material cannot use light from Skylights, and any such shadowing must come from the ambient occlusion feature.
So when the shader is used together with a Skylight and IBL is off, the Ambient / Shadow Intensity value should be similar to the level of light the Skylight provides.
The units value for this setting depends on the lighting unit. If you use the mr Photographic Exposure Control, and set Physical Scale to Physical Units (cd/m 2 ), this value will be in physical values, and might need to be in the hundreds (or thousands for an outdoor shot lit by mental ray Sun & Sky). However, if you don’t use the exposure control, or set it Physical Scale to Unitless, this parameter is in a "traditional" unit space where 0 is black and 1 is white.
Note: This "ambient" light is affected by ambient occlusion, so it is darkened by the occlusion at contact points and in areas hidden under objects. - Ambient / Shadow Color
-
Setting a color or map here tints the shadows. For accurate shadow tint, use a neutral color.
Click the map button to assign an Ambient Color map. This button is a shortcut: You can also assign an Ambient Color map on the Maps rollout.
- Shadow Casting Lights List
-
When on, you can use the Add/Replace/Delete buttons to edit the list, specifying lights that are to cast shadows on the surface. For the lights list to be in effect, Receive Shadows must also be on.
When off, and Receive Shadows is on, all lights in the scene cast shadows on the surface.
Note: Shadow-casting lights act as representations of any real-world lights in the background plate, such as the sun or any artificial light sources. For further information, see Direct Illumination rollout, following.
Ambient Occlusion rollout
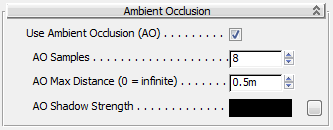
- Use Ambient Occlusion (AO)
-
When on, ambient occlusion affects the surface. Default-on.
- AO Samples
-
The number of ambient-occlusion rays that are shot. Default=8.
- AO Max Distance
-
The reach of ambient-occlusion rays. At 0.0, the ray distance is not limited. Using short rays increases performance but localizes the ambient-occlusion effect. Default=50.0.
- AO Shadow Strength
-
The darkness of shadows the ambient occlusion causes. The default value is black, but you can cause a less-pronounced shading effect by using a lighter color.
Reflections rollout
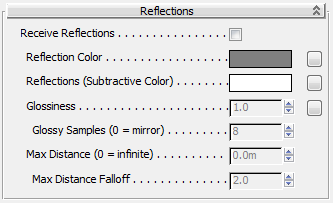
- Receive Reflections
-
When on, the surface reflects its surroundings. Default=off.
- Reflection Color
-
Reflections are tinted this color. For accurate reflections, use a neutral color.
Click the map button to assign a Reflection map. This button is a shortcut: You can also assign a Reflection map on the Maps rollout.
- Reflections (Subtractive Color)
-
The subtractive color for reflections. This amount is removed from the plate before reflections are added. If black, nothing is removed, and reflections are added purely additively on top of the plate. If 50% gray, the plate pixels are attenuated to 50% of their intensity, and the reflections are added on top of that, and so on.
Use this setting if the plate contains an area with many reflections that need to be removed before the new, synthetic reflection is added.
- Glossiness
-
The glossiness of reflections. Default=1.0.
Click the map button to assign a Glossiness map. This button is a shortcut: You can also assign a Glossiness map on the Maps rollout.
- Glossy Samples
-
The number of glossy-reflection samples. Default=8.
- Max Distance
-
At values other than the default of 0.0, limits the distance from which reflections are cast.
- Max Distance Falloff
-
The falloff curve for reflections at Max Distance. Lower values cause more rapid falloff.Default=2.0.
Indirect Illumination rollout

- Receive Indirect Illumination
-
When on, indirect light (final gather and global illumination) is gathered and scaled by the Indirect Illumination Multiplier value (see following). Default=on.
- Indirect Ilumination Multiplier
-
The multiplier for gathered indirect light. Default=1.0.
Direct Illumination rollout
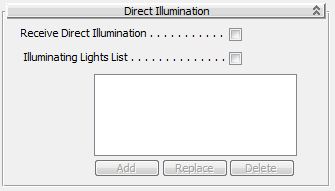
- Receive Direct Illumination
-
When on, the surface renders where struck by direct illumination. Default=off.
If Illuminating Lights List is off, all lights in the scene illuminate the surface.
- Illuminating Lights List
-
When on, you can use the Add/Replace/Delete buttons to edit the list, specifying lights that are to illuminate the surface. For the lights list to be in effect, Receive Direct Illumination must also be on.
Maps rollout
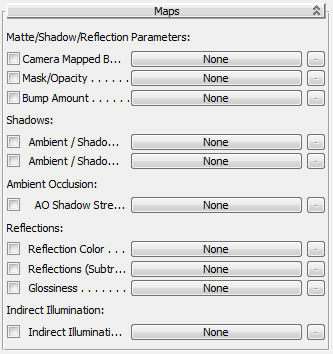
This rollout lets you assign a map or shader to many of the Matte/Shadow/Reflection parameters. You can also assign maps and shaders on the rollout where the parameter first appears: The principal value of this rollout is that it also lets you toggle a parameter's shader, using the checkbox, without removing the map.
![]() The button to the right of each main shader button is for shaders that can return multiple parameters. If a shader that returns multiple parameters is assigned to the component, the button's tooltip shows the parameter name.
The button to the right of each main shader button is for shaders that can return multiple parameters. If a shader that returns multiple parameters is assigned to the component, the button's tooltip shows the parameter name.