Lets you set up Joint Angle, Bulge Angle, and Morph Angle deformations.
Interface

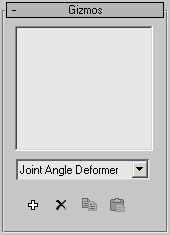
Controls in the Gizmos rollout allow you to deform the mesh according to the angle of the joint, and to add gizmos to selected points on the object. The rollout consists of a list box containing all the gizmos for this modifier, a drop-down list of the current types of gizmos, and four buttons (Add, Remove, Copy, and Paste).
The workflow for adding a gizmo is to select the vertices that you want to affect, select the bones that will drive the deformation, and then click the Add button.
There are three deformers available:
- The Joint Angle deformer has a lattice that can deform vertices on the parent and child bones.
- The Bulge Angle deformer has a lattice that only works on vertices on the parent bone.
- The Morph Angle deformer works on vertices of the parent and child bones.
Keep these distinctions in mind when you select vertices to deform. For example, if you want to use the Joint Angle deformer, then select vertices close to the joint that will drive the deformation. If you want the parent bone vertices to deform like a biceps muscle, then select vertices that are only assigned to the parent bone before adding the Bulge Angle deformer. If all the vertices of the parent and child bone must deform, then select all of the vertices and add the Morph Angle deformer.

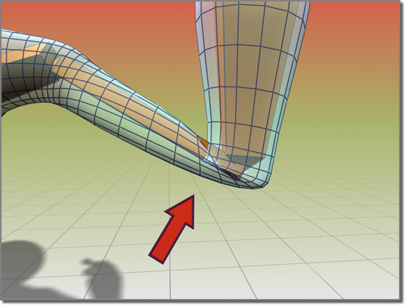
Bending the arm without the Morph Angle deformer causes the sleeve to crumple.

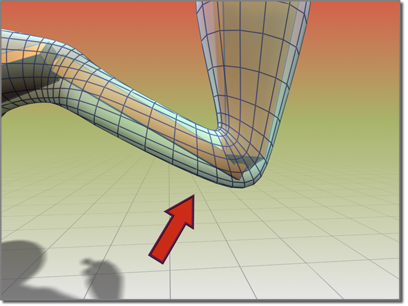
Using the Morph Angle deformer creates a smooth bend in the sleeve.
- Gizmo List Window
- Lists the current Angle Deformers.
The Deformer Parameters rollout changes depending on the type of gizmo selected.
- Deformer drop-down list
- Lists the available deformers.
-
 Add Gizmo
 - Adds the current Gizmo to the selected vertices.
To add a gizmo, first select the child bone for the joint to deform, then select the vertices to deform. You can then add a gizmo.
After you add or highlight a gizmo, a Deformer Parameters or Gizmo Parameters rollout opens with gizmo parameters that you can adjust (see following).
-
 Remove Gizmo
 - Remove the selected gizmo from the list.
-
 Copy Gizmo
 - Copies the highlighted gizmo into a buffer for pasting (see following).
- Paste Gizmo
- Pastes the gizmo from the copy buffer.
The Paste button applies the contents of the copy buffer to the highlighted gizmo. You can paste only to a like gizmo. For instance, you can't paste from a Bulge gizmo to a Joint gizmo.