You can use the Retime tool to easily speed up or slow down the animation within any time periods on any animation tracks. Also available are options to accelerate and decelerate the time-warped motion.
To use the Retime tool, open Track View in Curve Editor mode and highlight the tracks to retime. Then, after activating the tool, you double-click in the Track View Curve Editor window to place retime markers. Each adjacent pair of vertical markers includes the time between them on the highlighted tracks. You then move the markers to change the animation timing. If you make them closer together, the animation within speeds up; farther apart and the animation slows down.
- The Retime tool is based on the Ease curve, so it not only moves keys but warps the time between the keys as well.
- When the Retime tool is active, an animation curve is visible in Track View only when both of these conditions apply:
- The curve's track is highlighted in the hierarchy list.
- The curve's track is assigned to the active retimer.
- Retimers are saved and loaded with the scene.
The Retime tool is somewhat similar to the Region tool in that both scale animation, but they differ in a several ways:
- The Region tool scales both time (horizontally) and value (vertically), while Retime scales time only.
- With the Region tool, expanding or moving the region horizontally mixes the affected keys with other keys outside the region, while with Retime, the region remains intact and keys outside the scaled region simply move aside.
- The Retime tool supports Ease In/Out options for acceleration and deceleration; the Region tool does not.
- The Retime tool supports multiple scaling regions; the Region tool supports only one.
In general, if you're scaling keys in time only, the Retime tool gives you more options and more-predictable results.
Retime Tool Limitations
The technology underlying the Retime tool is the Ease curve, which applies timing changes to a function curve. Thus you can use the Retime tool with any animated parameter that can take an Ease curve. These include keyframe controllers such as Bezier and Position XYZ, the Noise controller, the Expression controller, the Path constraint's Percent parameter, and so on.
With regard to the two character-animation subsystems in 3ds Max, the Retime tool supports CAT in general, but does not support biped. However, for best results, do not use the Retime tool with the Time Warp feature in CAT. Also, Retime does not directly support procedural animation such as that found in particle systems and physics simulation, but it does if you can bake the animation into keyframes.
- Save the scene normally.
- Use Save As Previous, saving to a different file name.
- Open the scene saved in step 1.
Procedures
To use the Retime tool:
- Select an animated object in a viewport, then right-click the object and choose Curve Editor.
Track View opens in Curve Editor mode. Only animated tracks of the selected object are highlighted in the Hierarchy window of Track View - Curve Editor. This is the default behavior.

All keys belonging to highlighted tracks are affected by the Retime tool, within the horizontal confines that you'll define shortly by placing markers.
Tip: To toggle a track's highlighting, +click its name.
 - On the Key Controls toolbar, click
 (Retime Tool). Three things happen:
- The message "Double click to add retime markers" appears in the Key window.
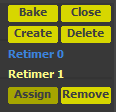
- The Retime tool controls appear in the top-right corner of the Key window. These consist of yellow buttons labeled Bake, Close, and so on. Also here is a single entry in the Retimer list: Retimer 0.
- Each highlighted item in the Hierarchy window changes in two ways:
- A small icon consisting of a circle around a + sign appears to the left of each item. This indicates that an Ease curve has been assigned to the track. Because you haven't done any actual retiming yet, the Ease curve contains no data at this point.
- To the right of each item, the text "(R0)" appears. This indicate that the track has been assigned to Retimer 0, which is the only retimer that exists at this point.

- Position the mouse cursor in the Key window at the frame to start or stop retiming and double-click.
A Retime marker appears in the window where you clicked. It takes the form of a vertical yellow bar and bears the legend "Drag to Retime."

Drag the thick central part of the marker to see what happens, then undo the move.
You can use the Retime tool with a single marker, but it only moves the keys; for scaling, you need at least two markers.
- Move the mouse to a different frame and double-click again.
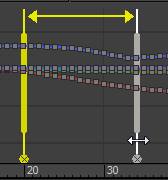
A second marker appears, as does a horizontal double-headed arrow between the tops of the two markers.

Retiming markers at frames 20 and 40
Take a moment to observe the markers. Each has a thin line at the top and bottom, a thicker part in the middle, and a small X in a circle at the bottom.
- Click the circled X at the bottom of either marker.
The marker disappears. That's how you delete a marker.
- Double-click to add a new marker.
Alternatively, press
 +Z to undo the deletion.
 - Drag either marker left or right by the thin upper or lower part.
The marker moves but no retiming occurs. Before you start retiming, you can reposition marker freely.

The second marker was moved from frame 40 to frame 34.
- When the marker positions are correct, drag either marker by the thick central part.
Now retiming takes place. If you move the markers farther apart, the time between them expands and the animation they contain slows down. If you move them closer together, the animation speeds up. Meanwhile, time outside and adjacent to the marker you drag moves in the same direction by the same amount. Thus the animation outside the marker pair remains intact, but takes place at a different time.

After retiming, the animation between frames 20 and 34 extends between frames 20 and 50.
.As a result, the keys are farther apart than the others and their motion is slower.
This applies no matter how many markers belong to the retimer. You can add multiple markers; moving one affects only adjacent animation on either side. If you drag a marker that is between two other markers, time on the side toward which you drag compresses, while time on the other side expands, but animation beyond the adjacent markers is not affected.
Something else happens the first time you retime with a marker: The whole marker becomes as thick as the central portion. This indicates that you can no longer adjust the marker position without retiming. You can reposition a marker without retiming only before you use it for retiming.
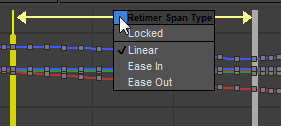
- Right-click the horizontal arrow between the tops of the two markers.
This opens the Retimer Span Type right-click menu, where you can set the span behavior.

- Try the various options on the menu. For details, see Time Span.
To finish this procedure, you'll learn how to move a retimer from one object to another.
- If necessary, create a second object and animate it.
- Select the first object again and click the Remove button in the group of yellow buttons on the right side of the Key window.
This removes the highlighted tracks' animation from the retimer's influence. The retimer remains but is prevented from affecting the object's motion. The object's curves disappear from the Key window to indicate that the animation is no longer subject to editing with this retimer.

After using Remove, the retimer no longer affects the object's animation.
- Select the other object and click the Assign button in the group of yellow buttons on the right side of the Key window.
The second object's curves appear, with retiming already applied. This shows that they're now under the influence of the retimer.

The retimer now affects a different object's animation.
Of course, you can also assign additional tracks to a retimer without first removing the existing ones.
- Drag a marker.
The second object's tracks are now using the same retimer that you removed from the first one.
Note: You can use the same retimer on any number of different objects; just select them and click Assign. Then, even if the objects aren't selected, dragging the markers affects their motion.
To finalize retiming:
- Activate a retimer that has tracks assigned.
- In the cluster of Retime tool buttons near the top-left corner of the Track View window, click Bake.
This saves the retimer's changes to the tracks permanently and removes the tracks from the retimer's control. This is indicated by the deletion of the (R#) suffix from each baked track's name. As a result, the tracks are no longer visible.
- Again in the Retime tool buttons cluster, click Close.
All animated tracks of selected objects are now visible.
All retimers remain, available for assigning animation tracks.
When you're satisfied with the retiming, you can easily bake in the adjustments to make them permanent and remove the overhead imposed by the retimer.
To use multiple retimers:
- In the viewports, animate an object on all three Position and all three Rotation tracks.
- Select the animated object in a viewport, then right-click the object and choose Curve Editor.
Track View opens in Curve Editor mode. Only animated tracks of the selected object are highlighted in the Hierarchy window of Track View - Curve Editor. This is the default behavior.
Tip: To toggle a track's highlighting, +click its name.
 - On the Key Controls toolbar, click
 (Retime Tool).
 As in the preceding procedure, activating the Retime tool creates Retimer 0 and assigns all the highlighted tracks to it.
- In the bank of buttons in the top-right corner of the Track View window, click Create.
This adds a second retimer, Retimer 1, to the list. Retimer 1 is highlighted, as indicated by the blue color of its label. The Retimer 0 label turns yellow to show that it is not highlighted.
- Click Retimer 0 in the list.
The label turns blue and the animated tracks' curves and keys again become visible.
- Activate Retimer 1 again and highlight a few tracks in the Controller window hierarchy list; say, X Position(R0) and Y Rotation(R0).
- Click the Assign button near the top-right corner of the Key window.
Now you can see only keys and curves from the highlighted tracks, whose names change to X Position(R1) and Y Rotation(R1). This indicates that the tracks are under the control of Retimer 1.
- Click Retimer 0 in the list.
Now you can see the remaining tracks that are still under the control of Retimer 0.
In this way you can freely reassign tracks among different retimers. Even if you need a different retimer for each animation track, this is easy to do.
You can add as many retimers as you like, each with its own set of markers and its own consequent retiming results. You can use different retimers to control different objects or even different tracks of the same object.
Interface
The Retime tool interface is interspersed throughout Track View - Curve Editor. Initial access is through a toolbar button, but the remaining controls are available in the Key window as buttons and draggable, vertical markers.

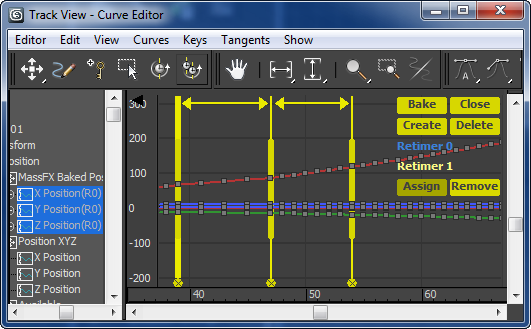
The Retime tool control panel embedded in the Track View Key window
 (Retime Tool)
- To activate the Retime tool, click this button, found on the Key Controls toolbar of the Track View in Curve Editor mode. While the Retime tool is active, you can place markers, adjust their positions, use them for retiming, and use the remaining tools described following.
The Retime tool assigns retimers on a track basis. When you activate the tool, if all highlighted tracks have no retimer assigned, the Retime tool creates a new retimer and assigns the highlighted tracks to it. If any highlighted tracks are already assigned to a retimer, clicking the tool button simply activates the tool.
To exit the Retime tool, click a different button on the Key Controls toolbar or click the Close button (see following).
Note: Markers for the Retime tool and the Retime All tool cannot coexist in the scene. If you click the Retime Tool button with any Retime All markers present, you're prompted to bake the latter. To proceed, click Yes; otherwise, to retain the Retime All markers, click No. - Bake
- Makes the retiming permanent by converting the retimed tracks to standard tracks while retaining the changed timing. Bake also removes the tracks from the retimer's control. Applies to the highlighted retimer in the list and its tracks.
After baking, the retimer remains and can be assigned any tracks.
- Close
- Exits the Retime tool and activates the Move Keys tool. Any existing retimers remain and are reactivated the next time you access the Retime tool.
Choosing another tool on the Key Controls toolbar also exits the Retime tool.
- Create
- Adds a new retimer to the list and activates it. At this point, no curves appear in the Key window. To make curves available for retiming, highlight them in the Hierarchy list, then click Assign (see following).
- Delete
- Removes the active retimer from the list and from the Retime tool. Any unbaked retiming effected by that tool is also deleted.
- [retimer list]
- Lists all retimers, starting with Retimer 0. If more than 10 retimers are present, up and down arrow buttons appear; scroll through the list by clicking these.
To activate a retimer and display its markers, click its name in the list. The active retimer's name appears in blue; the rest are yellow.
Tip: Clicking a retimer in the list doesn't necessarily make its assigned tracks appear in the Key window. To activate a timer and highlight its assigned tracks, double-click the retimer name in the list. - Assign
- Places any highlighted tracks in the Hierarchy list under the control of the active retimer. Any adjustment of the retimer is automatically applied to newly assigned tracks.
- Remove
- Removes highlighted animation tracks from the influence of the active retimer, so they're not assigned to any retimer. Consequently, their curves don't appear in Track View while the Retime tool is active.
Available only when the retimer that controls the highlighted track(s) is active, and applies only to the active retimer. For example, if tracks assigned to both R0 and R1 are highlighted and R0 is active, when you click Remove, it acts only upon the tracks assigned to R0. The tracks assigned to R1 are not removed.
In-screen Controls
In addition to the buttons and list in the top-right corner of Track View, the Retime tool provides control of marker placement, retiming, and other settings directly in the Key window.
- Retiming markers
- When the Retime tool is active, double-click in the Track View Key window at any time to add a vertical yellow marker. Each neighboring pair of markers encompasses a time span, which you warp by moving either marker. Note: The Retime tool warps time with an Ease curve, thus affecting underlying keys. However, keys need not be present within a time span to warp its animation.

Retimer 0 is active with three markers.
Each marker has the following features:
- Before retiming, you can adjust the marker's position by dragging it by the thin upper or lower part. After retiming, this feature is no longer available.
- To perform retiming, drag the marker horizontally by the thick central part. After retiming, the entire marker assumes this thickness, indicating that adjustment without retiming is no longer available. Retiming affects time adjacent to the marker on both sides. Specifically:
- If no marker is adjacent to the moved marker, retiming simply moves the animation.
- If the moved marker has an adjacent marker, moving the marker towards its neighbor compresses the intervening time, and moving it away from its neighbors expands the intervening time. Time beyond neighboring markers on either side is not affected.
- To delete a marker, click the small X button at its bottom end.
Note: If you retime with a marker (so it becomes thick), and then adjust the position of an adjacent marker by dragging it by the thin part, the latter then becomes thick as well, so it can then be used only for retiming. - Time Span
- When two or more markers are present, a horizontal line connects the tops of each adjacent marker pair. By default, this line is a double-headed arrow that simply indicates the time span between the two markers.

Default (linear, unlocked) time span lines between markers
Time span settings are available on the Retimer Span Type menu, which you open by right-clicking the time span line. Each time span can have different settings.

The menu provides the following controls. The Locked option is a toggle, and of the remaining three options, one can be active at a time.
- Locked When on, the time span between the two markers is fixed in length, so that moving either marker moves the other by the same amount. The result is that you move the keys between them without changing the length of the contained animation.
When a time span is locked, a padlock icon appears superimposed on it.

Left: Locked linear time span; Right: Locked Ease Out time span
- Linear No overall adjustment is applied, so keys retain their original relative timing as you retime the span. This is the default time span type.
A linear time span appears as a double-headed arrow, unless locked (see preceding illustrations).
- Ease In The spacing between neighboring keys decreases gradually from left to right, so that the movement accelerates throughout the time span.
The Ease In time span resembles an upward slope (from left to right).
- Ease Out The spacing between neighboring keys increases gradually from left to right, so that the movement decelerates throughout the time span.
The Ease Out time span resembles a downward slope (from left to right).

Left: Ease In; Right: Ease Out
- Locked When on, the time span between the two markers is fixed in length, so that moving either marker moves the other by the same amount. The result is that you move the keys between them without changing the length of the contained animation.