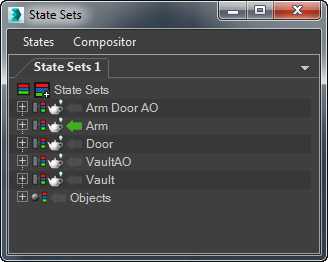
The State Sets dialog contains two main menus—States and Compositor—plus two corresponding views: State Sets and Compositor View. Each view also contains a number of right-click menus whose contents depend on the context.
This topic covers the State Sets main interface. For Compositor View help, see State Sets Compositor View.
Master State
The master state item, State Sets, is a root node that contains all of your scene states. You can use it to perform global operations such as rendering all states at the same time (right-click State Sets  Render All States) or adding new states.
States
Each item at the first level below the master state is called a child state, or simply a state. These are individual objects that you work with when tracking changes in your scene. A special case is the Objects state (described below), which you can use to transfer objects such as lights to the compositing application.
You toggle recording changes into a state using the circular button next to the state name. You toggle a state, activating and deactivating its recorded changes, by clicking its arrow button.
After you record changes, the state's entry in the dialog list contains nested child items that show recorded properties. To see these changes, expand the child state item and adjust them to modify the state.
Nested States and Moving Them
You can nest states, subjecting the child states to the parent's settings. For example, consider a scene where you have hidden an object in one state and changed render resolution in another state. If you nest the first state within the second, the first state will do both: Hide the object and change the render resolution.
To nest states within another:
- Highlight the state or states to be nested. Note: When highlighting a state to nest, be sure to click and release. Dragging over the state names in the list simply highlights the names.
- Drag and drop the highlighted states onto another state to nest them within that state.
To move states:
- First highlight the states to be moved, pause a moment, and then drag the highlighted states either on top of another state, for nesting, or between two other states for reordering.
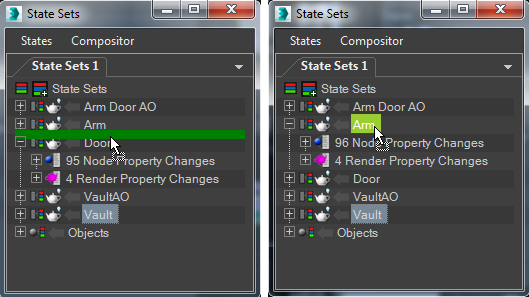
While dragging, a green highlight at the cursor location shows the destination of the moved states.

Left: Reordering states
Right: Nesting states
Interface
This section covers controls in the State Sets dialog hierarchy list. The menu-based controls are covered in the sections following this one.

The main feature of the State Sets dialog is a hierarchical list, or "tree view," of all defined states. To highlight a state, click its name in the list. To highlight multiple states, drag over the list with the mouse, or click with  or
or  held down.
 does not select hidden states, such as a sub-state within a collapsed state. To select sub-states within a range, first expand the parent state.
 In addition to the state name, each entry includes buttons for toggling various state properties. Also, if a state contains sub-states or has properties recorded, its list entry starts with a + or - icon to indicate that it can be expanded or collapsed, respectively.
 Add State
- Adds a new state to the list. To delete a state, click its name and then press
 or choose Delete from the States menu. Alternatively, right-click the name and choose Delete from the context menu.
 - State name
- The name of the state. When you add a state, it uses the default name "State##" with ## being a two-digit number using the lowest available value. For example, if the list contains State01, State02, and State04, and you add a state, the new one's name will be State03.
To rename a state or any other entry, such as a property change, highlight the name, pause for a moment, then click it again and enter a new name from the keyboard. A standard double-click does not enable renaming.
 Activate State toggle
- When on (
 ), any recorded properties for the state take effect. Also when on, you can change existing recorded properties either directly in the list entries or using the standard 3ds Max controls without having to record the changes.
 When off, the scene uses only global properties; that is, properties applied without being recorded in a state.
Activate State acts both as a radio button control and a toggle. Only one state can be active at a time; activating a state with another state active deactivates the latter state. To deactivate all states, returning to the global scene setup, click the active toggle.
Note: The Activate State toggle symbol for a state that has an active sub-state (any number of levels deep) is a solid gray circle: .
.  In Autodesk 3ds Max 2015, by default a state is always recording while it is active.
 Typically, properties that State Sets records include render settings, object properties, lighting changes, viewport and camera settings, and material settings. For a complete list of the properties that State Sets records, see Properties tracked by State Sets.
Tip: You can see a complete list of recorded properties by expanding the state's list entry. To remove a recorded property, highlight it in the list and press . Note: If you want to use the
 (Record) control familiar from releases prior to Autodesk 3ds Max 2015, you can enable it by changing Always Record State Sets to False on the State Sets Configuration dialog (States
  Options
  Configuration
  State Sets Configuration dialog
  General panel).
  Enable State toggle
- Toggles the state definition; that is, any property changes recorded for that state and any states nested within it. When on (the default) and you use Render All States, the state renders with those property changes. When off (
 ), activating or rendering the state has no effect.
 -
 Render Output toggle
 - Toggles render output for the state. When on (the default), the state renders when you use Render All States; when off (
 ), the state does not render, but you can still activate it within State Sets.
 - Sub-State
- See Add Sub-State.
- Recorded property changes
- A hierarchical, expandable list of all properties recorded in the state. After activating the state, you can change these properties without having to use the Record feature.
- Objects
- This is a special state that holds objects (as opposed to rendered output) that are to be transferred to the compositing application. Types of objects that can be transferred include lights, cameras, and geometry. To specify scene objects for transferring, first select the objects to transfer, then click the Record button for the Objects state. The selected objects are added to the state and are ready for transferral.
Another way to specify objects for transferring is to make sure nothing is selected, then click the Record button for the Objects state. This hides all scene objects. Then use any standard method for unhiding the objects to be transferred. For example, right-click in a viewport choose Unhide By Name, use the Unhide Objects dialog to unhide objects to transfer, then turn off Record for the Objects state. After doing so, activating the Objects state shows only objects that will be transferred.
When using Adobe After Effects, light and camera objects are transferred as is. Geometrical objects are transferred as nulls, with one exception: Plane primitives are transferred as After Effects solids.
If you transfer a text object from 3ds Max, you can adjust the font and size in After Effects.