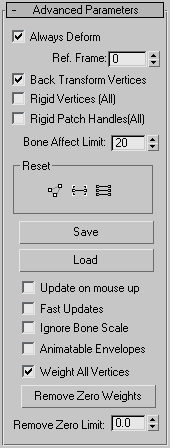
Contains additional global Skin modifier controls.
Interface

- Always Deform
- When on, moving a skeleton component such as a bone also moves the vertices of the skin mesh that are weighted for the component. When off, adjusting the skeleton does not affect the mesh.
This toggle is useful for editing the transformation relationship between bones and the controlled points. This relationship is first set when Skin is applied. To change the relationship, turn off Always Deform, move the object or the bones, and reactivate. The new transformation relationship is now used.
- Ref. Frame
- The frame where the bones and the mesh are in a reference position.
Normally this is frame 0. If frame 0 is the reference frame, start your animation at frame 1 or later. If you need to adjust bones relative to the mesh, move the time slider to frame 0, turn off Always Deform, move the bones into the correct position, and then turn on Always Deform.
- Back Transform Vertices
- Allows you to link the mesh to the bone structure. Ordinarily, when you do this, any movement of the bones causes the mesh to move twice as far as it should, because it moves once with the bones and once with the link. Enabling this option prevents the mesh from moving twice under these circumstances.
- Rigid Vertices (All)
- When on, effectively assigns each vertex to the bone whose envelope has the most influence, as though weighted 100% to that bone. Vertices will not have weight distributed over more than one bone and the deformation of the skinned object is rigid. This is mainly used with game engines that do not support weighted point transformation. Note: This does not change weight values for vertices assigned to multiple bones, so you can return to distributed weight assignments simply by turning off Rigid Vertices (All).
- Rigid Patch Handles (All)
- On a patch model, forces patch handle weights to equal the knots weights.
- Bone Affect Limit
- The maximum number of bones that can affect one vertex.
Reset group

-
 Reset Selected Verts
 - Resets the weight of selected vertices to the envelope defaults. After manually changing vertex weight, use this to reset weights if necessary.
-
 Reset Selected Bone
 - Resets associated vertex weights back to the original weights calculated for the selected bone's envelope.
-
 Reset All Bones
 - Resets all vertex weights back to the original weights calculated for all bones' envelopes.
- Save/Load
- Allows you to save and load the envelope position and shape, as well as the vertex weights. If you load a saved file onto a different system of bones, you can use the Load Envelopes dialog to match the incoming bones to the current bones.
- Update on mouse up
- When on and the mouse button is pressed down, no updates take place. When the mouse button is released, updates occur. This option helps keep workflow moving quickly by avoiding unnecessary updates.
- Fast Updates
- Turns off viewport display of weighted deformation and gizmos and uses rigid deformation when not rendering.
- Ignore Bone Scale
- Turn this option on to leave a skinned mesh unaffected by a scaled bone. Default=off. Note: To scale a bone's length, you first need to turn off its Freeze Length option on the Object Properties rollout of the Bone Tools floater dialog.
- Animatable Envelopes
- Toggles the possibility of creating keys on all animatable envelope parameters while Auto Key is active. Default=off. Note: This does not affect keyable track settings.
- Weight All Vertices
- When on, forces all vertices that are not under the control of an envelope to be weighted to the bone closest to them. Has no effect on vertices that are manually weighted. Default=on. Tip: If you want to revert vertices to their original weight value, click
 (Reset Selected Verts in the Reset group) or open the Weight Table, and change the Modified weight status (M) of your selected vertices.
 - Remove Zero Weights
- Eliminates the influence of bones on vertices whose Weight value is less than the Remove Zero Limit value (see following). Removes any bones with qualifying Weight values from the list of those influencing affected vertices and adjusts the remaining weights accordingly. Also accessible from the Weight Table > Edit menu.
This helps making your skinned model lighter (in games for instance) because less unnecessary data is stored in the geometry.
- Remove Zero Limit
- Sets the weight threshold that determines if a vertex is stripped of its weight when you click Remove Zero Weights. Default=0.0.