The Ragdoll helper is a component of MassFX that lets animated characters participate in simulations as Dynamic and Kinematic rigid bodies. The character can be a Bones system or a Biped plus, optionally, an associated mesh using Skin.
The Ragdoll comprises a set of rigid bodies connected by constraints. These are created automatically by MassFX when you use the Create Ragdoll command. It builds the arrangement based on the bones structure of the character; each bone gets a Rigid Body modifier and each connected pair of bones gets a constraint. You use the Ragdoll helper to set global simulation parameters for the character. To adjust the constituent rigid bodies and constraints, select them separately and use the applicable controls as detailed elsewhere in this section.
Procedure
To use the MassFX Ragdoll helper:
- Create and optionally animate a character, using any of the toolsets listed in the introduction of this topic.
- Select a bone in the character or its associated skin mesh, if available.
- On the MassFX toolbar, click
 (Create Dynamic Ragdoll).
 This creates a Ragdoll helper and its icon in the scene.

Typically you'd use Create Dynamic Ragdoll for a non-animated character, as any motion a Dynamic Ragdoll undergoes is created as part of the simulation. To use an animated character, open the Create Ragdoll flyout on the MassFX toolbar and choose
 (Create Kinematic Ragdoll) instead. Note: The Ragdoll helper icon always faces the viewpoint and is always the same size when visible in the viewport. It does not render. Also, it remains stationary in the scene, but you can move it to wherever you like.
The helper is selected, so its interface appears on the Modify panel. On the Setup rollout, the Bones list shows all bones associated with the Ragdoll. Also, if the character is skinned, the skin mesh(es) show up in the Skin list.
If you add bones to the character, you can incorporate them into the Ragdoll with the Pick and Add buttons above the list. Likewise, if you add a mesh object to the character skin, use Pick or Add in the Skin group to apply them to the Ragdoll.
- Use the other Ragdoll controls, described following, to customize your setup. In the simulation the participating bones affect dynamic rigid bodies in the simulation, but are not affected by them.
Interface
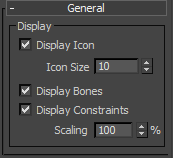
General rollout
The General rollout contains display-related settings for Ragdoll objects.

- Display Icon
- Toggles the display icon for the Ragdoll object. Note: The Ragdoll helper icon always faces the viewpoint and is always the same size when visible in the viewport. It does not render. Also, it remains stationary in the scene, but you can move it to wherever you like.
- Icon Size
- The display size for the Ragdoll helper icon.
- Display Bones
- Toggles the display of the physical shapes for the bones.
- Display Constraints
- Toggles the display of the constraints that connect the rigid bodies.
These constraints determine the joint behavior of Ragdoll characters in the simulation. By default, all constraints in a Ragdoll object are set to Swing Y/Z
 Limited
  Angle Limit=15.0. If you want, say, a knee joint to be able to bend differently, select its constraint and adjust the settings. For details, see MassFX Constraint Helper.
 - Scaling
- The display size of the constraints. Increasing this value can make it easier to select the constraints in the viewport.
Setup rollout

- Ragdoll Type
- Determines how the Ragdoll participates in the simulation:
- Dynamic The motion of the Ragdoll affects and is affected by the motion of other objects in the simulation.
- Kinematic The motion of the Ragdoll affects the motion of other objects in the simulation, but is not affected by it.
Note: For best results, when setting a Ragdoll biped to be Dynamic, the biped should not contain any existing animation. In particular, using a biped animated with the Walk tool as a Dynamic Ragdoll can lead to unexpected results. Similarly, avoid switching individual rigid bodies of Ragdoll objects from Kinematic to Dynamic mid-simulation using the Until Frame option. In general, don't mix animation types with a Ragdoll: Either allow MassFX to control the Ragdoll's motion completely (Dynamic) or use standard animation methods (Kinematic).Also, when using a biped as a Dynamic Ragdoll, be aware that biped constraints take precedence over the MassFX constraints imposed by the Ragdoll. For example, the MassFX simulation might tend to break a constraint to which excessive force is applied, but because biped does not permit separation of its bones, the break does not occur.
Bones group
- Pick
- Associates bones from the character with the Ragdoll. After clicking this button, click a bone in the character not already associated with the Ragdoll. A MassFX Rigid Body modifier is applied to each added bone.
- Add
- Associates bones from the character with the Ragdoll. Clicking this button opens the Select Bones dialog, listing of all the bones in the character not already associated with the Ragdoll. A MassFX Rigid Body modifier is applied to each added bone.
- Remove
- Disassociates highlighted bone(s) in the bone list from the Ragdoll. Removes the MassFX Rigid Body modifiers from each disassociated bone, but does not delete or otherwise modify the bone itself.
If a group is highlighted, instead ungroups the bones, creating a rigid body for each.
- Name
- Lists all bones in the Ragdoll. Highlight bones in this list to remove them, group them, or batch-change the rigid body settings. To highlight multiple bones, use standard
 +click and
  +click methods.
 Bones are automatically sorted in ascending alphabetical order, as indicated by an upward-pointing arrow at the right end of the Name button. To reverse the sorting order, click the Name button.
Note: The list is automatically populated with any bones already associated with the character when you create the Ragdoll. - Search By Name field
- Enter search text to highlight the first matching item in ascending alphabetical order. Tip: Use the wildcard (*) key to stand in for any number of leading characters. For example, you can find Robot R Index Finger by typing * R In.
Select group
- All
- Click to highlight all list entries.
- Invert
- Click to highlight all non-highlighted list entries, and to remove highlighting from highlighted list entries.
- None
- Click to remove highlighting from all list entries.
Skin group
Use these controls to add and remove skin meshes that use the same bones as the Ragdoll.
- Pick
- To add a skin mesh from the viewport, click Pick and then select a mesh with the Skin modifier applied. The modifier must use at least one of the same bones as the Ragdoll.
- Remove
- Removes the highlighted skin mesh from the Ragdoll.
- Add
- Use to add a skin mesh to add a mesh from the scene with the Skin modifier applied. The modifier must use at least one of the same bones as the Ragdoll.
- [skin list]
- Lists skin meshes associated with the Ragdoll character. Note: The list is automatically populated with any skin meshes already associated with the character when you create the Ragdoll.
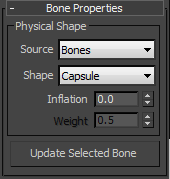
Bone Properties rollout
Use these settings to specify how MassFX applies physical shapes to the Ragdoll components. The settings apply to all bones highlighted in the list. After changing settings, use Update Selected Bone to apply them.

Physical Shape group
- Source
- Determines how the shape (see following) is sized. Choose from the list:
- Max Meshes Finds the vertices in the associated skin mesh that are weighted in the Skin modifier above the Weight threshold (see following), and then fits the physical shape around them. This option is unavailable if the Ragdoll has no associated skin mesh. When available, this option is the default because it is usually desirable for the skin mesh to serve as the colliding object in the simulation.
- Bones Fits the physical shape around the shape of the bone. This option is typically useful only when the character doesn't contain a skin mesh.
- Shape
- Specifies the physical shape type used for highlighted bones. The size depends on the Source and Inflation settings. Choose from the list:
- Capsule Fits a capsule-shaped physical shape around each bone.
- Sphere Fits a spherical physical shape around each bone.
- Convex Hull Fits a convex physical shape around each bone. In most cases, this assumes the exact shape of the bone or the skin mesh, depending on the active Source option (see preceding).
- Inflation
- The amount to expand the physical shape beyond the cloud of vertices or bone. To make the physical shape smaller than the bone or skin mesh, use a negative value.
- Weight
- When finding associated vertices in the skin mesh, this is the weighting cutoff with respect to the weighting value from the Skin modifier in determining which vertices to include for each bone. A lower value can include more vertices per bone, possibly reusing some vertices for multiple overlapping bones.
- Update Selected Bone
- Applies any changed settings to the highlighted bones in the list and regenerates their physical shapes.
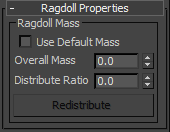
Ragdoll Properties rollout

Ragdoll Mass group
- Use Default Mass
- When on, the mass of each bone in the Ragdoll is the mass defined in the rigid body.
- Overall Mass
- The simulation mass of the entire Ragdoll assembly, calculated as the sum of the masses of all rigid bodies in the Ragdoll.
The default Overall Mass value is 0.0. If you turn on Use Default Mass (see preceding), MassFX calculates the Overall Mass value and displays it as a read-only value.
- Distribute Ratio
- When you use Redistribute (see following), this value determines the maximum ratio of masses between adjacent rigid bodies.
- Redistribute
- Recalulates the masses of the Ragdoll's consitituent rigid bodies, based on the Overall Mass and Distribute Ratio values.
Ragdoll Tools rollout

- Update All Bones
- After changing any Ragdoll settings, apply them to the entire Ragdoll by clicking this button, regardless of which bones are highlighted in the list.
For example, to apply capsule-shaped physical shapes to every bone and size them to fit the skin mesh, on the Bone Properties rollout set Source to Max Meshes and Shape to Capsule, then click Update All Bones.
 Modify panel