For a geometric object to participate in a physics simulation, it must have the MassFX Rigid Body modifier applied. (Alternatively, use the mCloth modifier.) The easiest way to convert an object to a rigid body is by selecting the object and then choosing the appropriate rigid body type from the flyout on the MassFX toolbar.
The modifier interface consists of several rollouts on the Modify panel plus a modifier stack with four sub-object levels. Most of the controls on this rollout are available only for unbaked rigid bodies and become unavailable once you've baked an object's motion. To restore the controls, click the Unbake button on the Rigid Body Properties rollout.
Interface
Modifier Stack: Sub-Object Levels
The modifier stack for rigid bodies provides access to visualization of a number of settings that affect the simulation. When a sub-object level is active, you can change how the simulation begins and proceeds by transforming the respective gizmo.

- Initial Velocity
- This level shows a visualization of the direction of the Initial Velocity for the rigid body. Use the Rotate tool to change the direction.

- Initial Spin
-
This level shows a visualization of the axis and direction of the Initial Spin for the rigid body. Use the Rotate tool to change the axis.
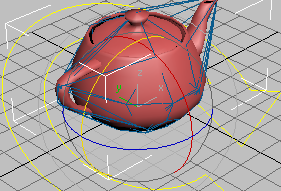
- Center of Mass
-
This level shows a visualization of the location of the Center of Mass for the rigid body. Use the Move tool to change the location.
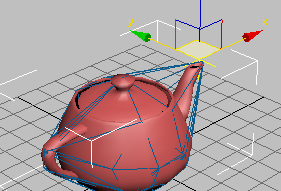
- Mesh Transform
-
This level lets you adjust the position and rotation of a physical shape for the rigid body. Highlight the physical shape to transform in the list on the Physical Shapes rollout; the physical shape will draw in white wireframe in the viewports. Use the Move and Rotate tools to adjust the physical shape's relative placement with respect to the rigid body.
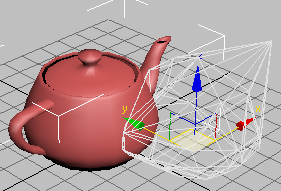
Rigid Body Properties rollout
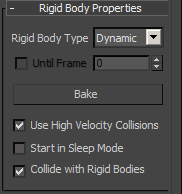
- Rigid Body Type
- The simulation type for all selected rigid bodies. The available choices are Dynamic, Kinematic, and Static. For details, see Rigid Body Types: Dynamic, Kinematic, and Static.
- Until Frame
- When on, MassFX converts the selected Kinematic body to a Dynamic one at the specified frame. Available only when Rigid Body Type is set to Kinematic.
This means you can animate an object using standard methods and set Rigid Body Type to Kinematic so it performs as animated until the designated frame. At that point it becomes a Dynamic object and is then subject to the full MassFX simulation forces.
For example, to re-create a baseball game, you might animate the ball leaving the pitcher's hand and flying toward the bat. Then, using Until Frame, when the bat strikes the ball, MassFX would take over and accurately simulate the action of the batter hitting a home run (or fouling out).
Tip: A rigid body need not be animated to take advantage of this feature. For example, you might want to suspend several stationary bodies and then drop them at different times. To do so, simply set them all to Kinematic and turn on Until Frame, then select each one in turn and specify the frame at which it should start being subject to gravity and/or other forces. - Bake/Unbake
- Converts the simulated motion of the rigid body to standard animation keyframes for rendering. Applies only to Dynamic rigid bodies.
If the selected rigid body is baked, the button label is "Unbake" and clicking it removes the keyframes and restores the body to Dynamic status.
- Use High Velocity Collisions
- When on and the World panel
 Use High Velocity Collisions switch is on, the High Velocity Collisions settings apply to the selected rigid body.
 - Start in Sleep Mode
- When on, the rigid body starts the simulation in sleep mode, using the World sleep settings. This means that it will not move until struck by a non-sleeping rigid body. For example, to simulate a domino rally, start all of the dominos except the first in sleep mode.
- Collide with Rigid Bodies
- When on (the default), the rigid body collides with other rigid bodies in the scene.
Physical Material rollout
The Physical Material properties control the way the rigid body interacts with other elements in the simulation: its mass, friction, bounciness, and so on. You can set the material properties one at a time, or use a preset to simulate real-world substances such as cardboard or rubber.
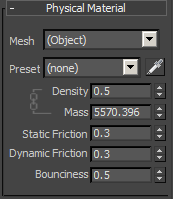
- Mesh
- Use the drop-down list to choose the physical shape of the rigid body for which you are changing the material parameters. By default, all physical shapes use the common material setting labeled "(Object)". Only physical shapes whose Override Physical Material checkbox is on show up in this list.
- Preset
- Choose a preset from the list to specify all Physical Material properties. (The mass of the rigid body is recalculated based on the value of the density and the volume of the object.) When a preset is chosen the settings are not editable, but when Preset is set to (None) you can edit the values freely.
To use the settings from a different rigid body in the scene, click
 and then select a rigid body in the scene.
 At the bottom of the list are commands to load and save a preset as a file and to create a new preset.
- Density
- The density of this rigid body, measured in g/cm3 (grams per cubic centimeter). This is one thousandth of the equivalent measurement in SI units: kg/m3. Changing this value automatically calculates the correct mass for the object, based on its volume.
- Mass
- The weight of this rigid body, measured in kg (kilograms). Changing this value automatically updates the density of the object, based on its volume.
- Static Friction
- The degree of difficulty for two rigid bodies to start sliding against one another. A value of 0.0 indicates no friction (more slippery than Teflon); a value of 1.0 indicates full friction (rubber cement on sandpaper).
The effective static friction between two rigid bodies is the product of their static friction values. If one rigid body has a static friction of 0.0, it doesn't matter how what the value of the other is. (Everything slides on wet ice; even sandpaper.) Once the two objects start sliding, the dynamic friction (see following) applies instead.
- Dynamic Friction
- The degree of difficulty for two rigid bodies to keep sliding against one another. Technically, this parameter is called the "coefficient of kinematic friction." A value of 0.0 indicates no friction (more slippery than Teflon); a value of 1.0 indicates full friction (rubber cement on sandpaper).
In the real world, this value should be less than the coefficient of static friction. (It's harder to start pushing a couch across the floor than it is to keep it moving.) As with static friction, the effective value between two rigid bodies is the product of their respective values.
- Bounciness
- How easily and high an object bounces when it hits another rigid body. Technically, this parameter is called the "coefficient of restitution." A value of 0.0 indicates no bounce (a lump of peanut butter dropped on carpet); a value of 1.0 indicates that the object will bounce off just about as hard as it hit. The effective bounciness between two rigid bodies is the product of their bounciness values. A super-bouncy rubber ball landing on peanut butter will not recover.
Physical Shapes rollout
Use this rollout to edit the physical shapes assigned to an object in the simulation. You can use the controls to add and remove physical shapes, change the shape type, copy physical shapes between objects, and more. When you run the simulation, MassFX uses all assigned physical shapes to represent the object's physical presence. For more information, see Rigid Body Overview.
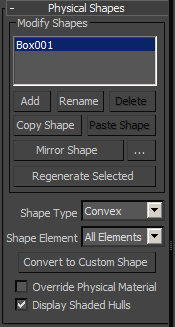
Modify Shapes group
- Shapes List
- Shows all the physical shapes that comprise the rigid body. Highlight a physical shape in the list to rename it, delete it, copy and paste it, change its mesh parameters or affect its transform via the Mesh Transform sub-object level.
- Add
- Applies a new physical shape to the rigid body. By default, the new shape is the Convex type and covers the entire graphical mesh, the same was when you first apply the MassFX Rigid Body modifier to an object. After you add a shape, it's highlighted in the list so you can change the shape type, properties, and so on.
- Rename
-
Change the name for the highlighted physical shape. This name is just for your own use to easily identify multiple physical shapes.
- Delete
- Delete the highlighted physical shape from the rigid body. (The last remaining physical shape for a rigid body cannot be deleted.)
- Copy Shape
- Copy the highlighted physical shape to the clipboard for subsequent pasting (see following). The physical shape's parameters and local transform are copied along with the mesh.
- Paste Shape
- Paste a previously copied physical shape (see preceding) onto the current rigid body. Note: The new physical shape is not an instance; any changes you make to the originally copied physical shape do not affect the new physical shape after pasting.
- Mirror Shape
- Flips the shape geometry around the specified axis (see Mirror Shape Settings, following).
- ... (Mirror Shape Settings)
- Opens a dialog for setting the axis along which the shape is mirrored, and whether to use the local axis or the world axis.
- Regenerate Selected
- Adapts the highlighted shape in the list to the current state of the graphical mesh. Use this to re-fit the physical shape to the graphical mesh after editing either. Examples might involve transforming sub-objects or scaling the object.
- Shape Type
- The physical shape type applied to the highlighted item in the Modify Shapes list. The available types are Sphere, Box, Capsule, Convex, Concave, Original, and Custom. Sphere, Box, and Custom are MassFX primitives and simulate more quickly than other hulls. For best performance, use the simplest type you can get away with.
The contents of this rollout vary, depending on the Shape Type setting. For descriptions of the parameters for each type, see MassFX Physical Shape Types.
Changing the shape type generates a new shape of the chosen type sized to fit around the graphical mesh. The options for the shape, which depend on the chosen shape type, are available on the Physical Mesh Parameters rollout (see following).
- Shape Element
- Molds the highlighted shape in the Shapes list to the element you choose from the Shape Element list.
For example, take the Teapot primitive and apply the Rigid Body modifier with Generate Shape Per Element on. This creates four physical-shape elements by default, of which the first is the body of the teapot: Element 1. If, with Element 1 highlighted in the Shapes list, you choose Element 2 (the handle) from the Shape Element list, MassFX reshapes the teapot body physical shape to the handle. Or if you choose All Elements, Element 1 takes on the shape and size of the entire teapot mesh. If you then change the Shape Type setting, say from Convex to Box, the result is a physical shape of that type that fits around the active Shape Element item.
- Convert to Custom Shape
- Clicking this button creates a new Editable Mesh object in the scene from the highlighted physical shape and sets the shape type to Custom. You can use standard mesh-editing tools to adjust the mesh, then update the physical shape from it. For more information, see Custom.
- Override Physical Material
- By default, every physical shape in a rigid body uses the material settings set on the Physical Material rollout. However, you might be working with a complex rigid body that comprises many physical shapes, where you want to use different settings for certain physical shapes. In this case, turn on Override Physical Material. All properties in this section work as described for the Physical Material rollout, but apply only to the selected physical mesh.
- Display Shaded Hulls
- When on, renders the physical shapes as shaded, solid objects in shaded viewports, rather than as wireframes. Also turns on the See-Through display property for the graphical mesh to make it easier to see the physical shapes.
Physical Mesh Parameters Rollout
The contents of this rollout vary, depending on the Shape Type setting. For descriptions of the parameters for each type, see MassFX Physical Shape Types.
Forces rollout
Use the Forces rollout to control gravity and apply Force space warps to the rigid body.
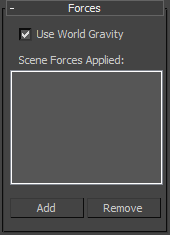
- Use World Gravity
- When off, the rigid body uses only forces applied here and ignores the global gravity setup. When on, the rigid body uses the Global Gravity setup.
- Scene Forces Applied
- Lists Force space warps in the scene that affect this object in the simulation. Use Add to apply a space warp to the object. To prevent a space warp from affecting the object, highlight it in the list and then click Remove.
- Add
- Applies a Force space warp in the scene to the object in the simulation. After adding the space warp to the scene, click Add and then click the space warp in the viewport.
- Remove
- Prevents an applied space warp from affecting the object. First highlight it in the list, then click Remove.
Advanced rollout

Simulation group
- Override Solver Iterations
- When on, MassFX uses the setting specified here for solver iterations for this rigid body instead of the global setting.
Set the numeric value to the desired number of times the solver enforces collisions and constraints. Higher values might be necessary when the simulation uses many constraints, or the tolerance for joint errors is very low. A value higher than 30 is generally unnecessary.
- Enable Backface Collision
- Available only for Static rigid bodies. When you specify the Original shape type for a concave Static rigid body, turn this on to ensure that Dynamic objects in the simulation collide with its back faces.
For example, take a Box primitive, convert it to editable poly format, remove a side, and then make it a Static rigid body with the Original shape type. If you then place a Dynamic object inside the box, turn on Enable Backface Collision for the box to keep the object from falling through the sides.
Contact Shell group
Use these settings to determine the surrounding volume within which MassFX detects collisions between bodies in the simulation.
- Override Globals
- When on, MassFX uses the settings specified here for collision overlap for the selected rigid body instead of the global settings.
- Contact Distance
- The distance that moving rigid bodies are allowed to overlap.
An excessively high value can cause objects to interpenetrate visibly. Setting this value too low can cause jittering because objects alternate between interpenetrating one frame and being forcibly separated the next.
The best value depends upon variety of factors, including the size of objects in the scene, the proximity of the camera to possible interpenetrations, the settings for Gravity Acceleration and Solver Iterations, the inflation amount of the physical shapes, and the frame rate of the simulation.
- Rest Depth
- The distance that resting bodies are allowed to overlap. This setting can come into play when using Capture Transform to set up bodies for their initial positions in the simulation. Note: Changing the Contact Distance value automatically changes the Rest Depth value to the new Contact Distance value plus the difference between the two. For example, say Contact Distance is 10.0 and Rest Depth is 8.0 (difference=–2.0). If you then change Contact Distance to 6.5, Rest Depth automatically changes to 4.5 (6.5+(–2.0)). However, changing the Rest Depth value does not affect Contact Distance.
Initial Motion group
- Absolute/Relative
- This setting applies only to rigid bodies that start out Kinematic (typically these are already animated) and then switch to Dynamic at the frame specified by the Until Frame setting on the Rigid Body Properties rollout. Normally, the initial velocity and initial spin of such bodies are calculated based on the animation for the last frame before they become dynamic. When this option is set to Absolute, the values of Initial Velocity and Initial Spin (see following) are substituted for the animation-based values. When set to Relative, the specified values are added to the values calculated from the animation.
- Initial Velocity
- The starting direction and speed (in units per second) for the rigid body when it becomes dynamic. The XYZ parameters are maintained as a normalized vector, which can be difficult to edit or picture. To visualize the Initial Velocity direction and optionally change it with the Rotate tool, use the Initial Velocity sub-object level.
- Initial Spin
- The starting axis and speed (in degrees per second) for the rigid body's rotation when it becomes dynamic. The XYZ parameters are maintained as a normalized vector, which can be difficult to edit or picture. To visualize the Initial Spin axis and optionally change it with the Rotate tool, use the Initial Spin sub-object level.
- Calculate at Current Time
- Applies to animated, kinematic rigid bodies. Determines the motion values (see preceding) for the animated object at the current frame and then sets the Initial Velocity and Initial Spin fields to those values.
Use this function to apply initial motion values from a point in the animation of the kinematic body other than those at the frame at which it becomes dynamic.
Center of Mass group
The point around which a rigid body rotates unless constrained in some way. To visualize and adjust this point graphically for the rigid body, use the Center of Mass sub-object level.
Choose one of the following:
- Calculate from Meshes Automatically determines an appropriate center of mass for the rigid body based on its geometry.
- Use Pivot Uses the object's pivot as its center of mass.
- Local Offset Lets you set a distance from the object's pivot on the X, Y, and Z axes to use as the center of mass.
- Move Pivot to COM Relocates the object's pivot at the center of mass specified by the Local Offset XYZ values. Available only when Local Offset is active.
Damping group
Damping slows down the rigid bodies. Typical uses include reducing oscillations in a simulation or causing an object to appear to be traveling through a dense medium.
- Linear
- The amount of force applied to reduce the velocity of moving objects.
- Angular
- The amount of force applied to reduce the rotational speed of rotating objects.
Relative Nodes rollout
- Select Ragdoll
- Selects the Ragdoll to which the rigid body belongs. Available only when the rigid body is part of a Ragdoll object.
 Modify panel