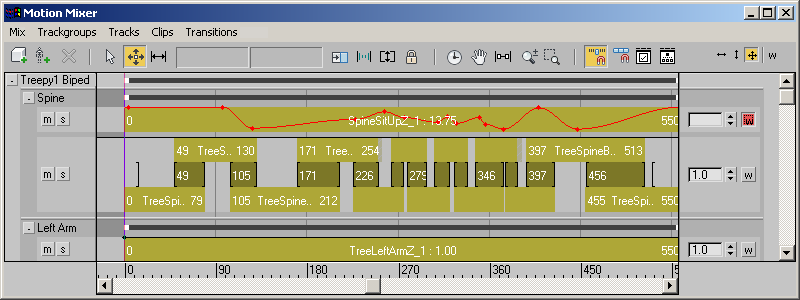
Each track has one or more weight curves that you can use to mix motion from several tracks to varying degrees. The weight curve determines how much a specific track contributes to the motion within the trackgroup.

With weight curves, you can create several full or partial transitions between all the tracks in a trackgroup. Compare with transitions on a transition track, which can only create a full transition between two clips.
Weight curves are useful for:
- Creating transitions between two tracks in a trackgroup.
- Creating random motion.
- Experimenting with transitions quickly and easily.
Each track's weight curve appears as a thin black line across the top of the track.
![]() You access the weight curve by clicking the Weight Mode button at the right end of the track. Clicking Weight Mode on the Motion Mixer toolbar enables weight curve editing for all tracks. When Weight mode is on, you can work only with the weight curve, and not with clips.
You access the weight curve by clicking the Weight Mode button at the right end of the track. Clicking Weight Mode on the Motion Mixer toolbar enables weight curve editing for all tracks. When Weight mode is on, you can work only with the weight curve, and not with clips.
You edit a weight curve using nodes (points) on the curve. Clips on layer tracks automatically have a node at each end of each clip. A transition track has no nodes by default.
Weight Curve Evaluation
By default, each track's weight curve is set to a value of 1.0 across the entire track, which uses 100% of the track's motion in the mix. When you change the curve to dip to a value below 1.0, the motion on the track is mixed with the motion on the track below it. For example, if you set the weight curve for two tracks in a trackgroup to 0.5, the two clips will be mixed equally.
Several tracks can be stacked in a trackgroup with varying weight curves on each one. For each frame in the animation, the Motion Mixer evaluates the curve on the topmost track. If its weight curve is less than 1.0 at that frame, the Mixer evaluates the next track down, and so forth. The Motion Mixer adds up the weight curve values until the sum reaches 1.0, and disregards tracks below that point.
For Transition tracks, one weight curve is used for the entire track. On Layer tracks, weight curves are set individually for each clip.
Procedures
To adjust a weight curve:
- Open the Mixer, add a biped to the Mixer, and create two tracks for a trackgroup. See Filtering Mixer Tracks.
- Place different motion clips on the tracks.
- For the topmost track in the trackgroup, click
 (Weight Mode). This button is to the right of the track display.
The weight curve turns red to indicate it can be edited.
You have to do the next two steps only if the weight curve has no nodes, or would like to create more nodes.
- Move the cursor over the line until a small arrow appears. Click to set a node.
- Move the cursor and click to set more nodes on the weight curve. Tip: On a transition track, you would ordinarily set a node at each end of the track, and at intervals in between. The number of nodes you set depends on the type of curve you want to make. Make as few nodes as possible to get the curve required for your animation.
- Move the cursor over an existing node until a cross cursor appears.
- Click and drag to move the selected node downward.
The Motion Mixer mixes the motions from the topmost track with the track below it on that frame. The motions are mixed to a greater or lesser degree depending on how low you set the weight curve value for the topmost track.