Opens the Object Lister. The Object Lister provides a structured view of the components of the scene.
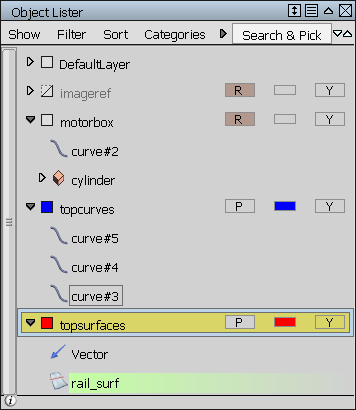
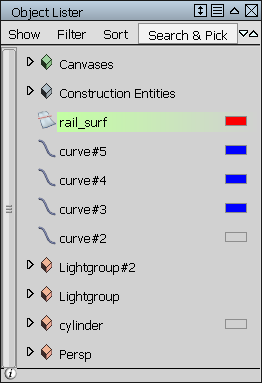
The Object Lister organizes your scene based on either modeling layers (By Layer (Layer Bar) or By Layer (All)), or in the following order: Canvases, Construction Entities, Group Nodes, followed by all other geometry (By Object). Choose which view you want from the Show menu.
When you first open the Object Lister, the hierarchy structure is closed. To open a section, click the  icon. To expand all groups in a layer or object,
 ![]() -click its icon. To expand all layers or groups, click the
-click its icon. To expand all layers or groups, click the  icon in the Object Lister's menu bar. To collapse, click the corresponding
  icon.
icon.
To pick an object, curve, layer, selection of layers or other item in the Object Lister, click it with the ![]() . When ordering By Layer (Layer Bar) or By Layer (All), clicking on a layer also makes it the construction layer.
. When ordering By Layer (Layer Bar) or By Layer (All), clicking on a layer also makes it the construction layer.
Hold ![]() to pick several adjacent objects, or
to pick several adjacent objects, or ![]() (Windows) or
(Windows) or ![]() (Mac) to pick several non-adjacent objects.
(Mac) to pick several non-adjacent objects.
Any objects picked in the scene can be easily located by clicking on the small up and down arrows.
If there are several items picked, each one will be scrolled to in turn in the direction you have picked. When the end of the list is reached, the display scrolls to the start.
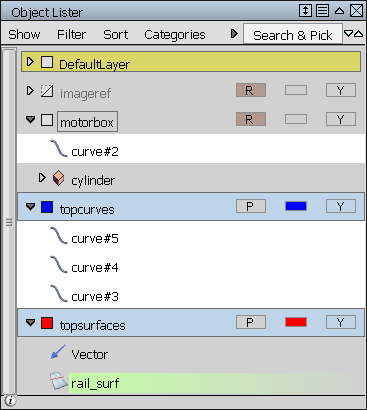
Layer Icons
The space to the right of the layer name can contain up to five icons. These icons provide additional information about the layer, and the ability to toggle between states. You control which ones are displayed through the choices at the bottom of the Filter menu. (Most of these choices are disabled when Show is set to By Object.) Roll over the icons to see a tool tip description.
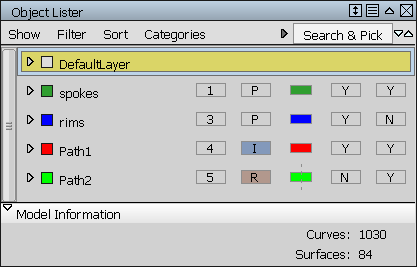
The icons are, from left to right:
- Layer Number Icon
- Box that contains the layer number (for information purpose only).
- Layer Pick State Icon
- Box that contains the letter P (Picked), R (Reference), or I (Inactive). The color of the box also corresponds to that pick state. Clicking the icon cycles between the three states of the layer.
Objects on reference layers can be snapped to, but not picked.
Objects on inactive layers can neither be picked nor snapped to (like templated objects). However, objects on inactive layers can be shaded if you turn on Shade Inactive Layers in the Visualization section of Preferences > General Preferences.
- Layer Symmetry Icon
- Box that shows both the color and symmetry state of the layer. A vertical dashed line means that Symmetry is on. You can turn symmetry on or off by clicking the icon. Note: This icon is the only one that appears when using Show > By Object mode.
- Layer Bar Icon
- Box that displays either Y (Yes) or N (No) depending on whether the layer appears in the Layer Bar. Clicking this icon toggles between the two. Note: If Show > By Layer (Layer Bar) is selected, the layer disappears from the Object Lister when you set this icon to N. Select Show > By Layer (All) to make it reappear.
- Layer Playback Icon
- Box that displays either Y (Yes) or N (No) depending on whether animation on this layer plays when you hit Play on the Animation Time Slider Bar. Clicking this icon toggles between the two.
Changing layer properties
- To change the visibility of a layer, click the layer icon, or click a layer name with the
 to display a pull-down menu of layer operations (such as Visible, Symmetry, Assign, Insert New Layer, and so on), and choose Visible.
- To change a layer color, hold the
 on the layer icon or click with the on a layer color swatch to open the layer color palette.
- To display both the layer names and numbers (or only numbers), open the Preferences > General Preferences option window. Choose Modeling from the list on the left and set Modeling layers mode to Both (or Number for numbers only). Note: Only the layer name is editable (by double-clicking on it).
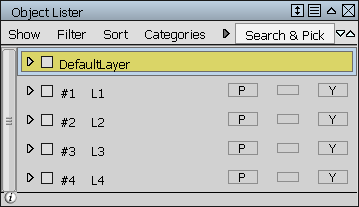
Layers showing both number and name
Grouping and re-arranging objects
Click an object (curve, surface, and so on) with the ![]() to display a pull-down menu containing the following choices:
to display a pull-down menu containing the following choices:
- Visible – Makes picked objects visible or invisible. When visible objects are picked, right-clicking shows the check mark turned on. When turning the check mark off, these objects become invisible in the view window, and are grayed out in the Object Lister. Note:
To avoid errors, you cannot pick invisible objects. To make an invisible object visible, right-click it and select Visible to turn on the check mark. The object becomes visible.
- Group – Creates a new group node and places the picked objects inside.
- Ungroup – Ungroups the objects from a selected node.
- Place Inside – This choice becomes active only when right-clicking on a group node. It places the picked objects into this group node.
- Insert Before, Insert After – Right-clicking on any object and selecting one of these options places the already picked object(s) before or after the specific object. Note:
These two choices are only active when it is possible to insert into the current position. They are grayed out if, for example, you try to insert geometry between group nodes.
- Properties – Brings up the Information Window for the object.
- Copy – Copies the object and all its descendants to the clipboard.
- Paste – Pastes the content of the clipboard onto the layer that contains the object.
- Delete – Deletes the object and all its descendants.
- Delete Null Nodes – Delete null nodes (dag nodes with no geometry under them) under the object.
In Layer mode, you can re-order layers or move objects between layers by using the ![]() to drag and drop.
to drag and drop.
In the same manner, you can also drag and drop a layer from the Object Lister into a category in the Layer Categories editor (Windows > Information > Layer Categories).
Object lister menus
Show
- By Layer (Layer Bar), By Layer (All)
-
Shows all objects, geometry, cameras, planes and so on, grouped inside their geometry layer.
By Layer (Layer Bar) only lists the layers shown in the Layer Bar. A layer can be removed from the Layer Bar by clicking on the Layer Bar icon. (See Layer Icons.)By Layer (All) lists all layers, including those layers not displayed in the Layer Bar.
Note:If you set Modeling Layers mode to Number in your General Preferences, then the Object Lister displays the layer numbers instead of the layer names, for example, #1, #2, and so on
- By Object
-
Lists all items in the order determined by the Sort menu. By default, items are sorted by Hierarchy and appear in the same order as in the SBD window.
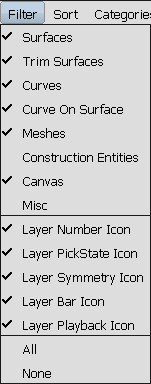
Filter
This menu controls what is displayed in the Object Lister. A check mark indicates that those items are shown.
- Choose a type of object (Surfaces, Curves, and so on) in the top section, to show or hide those objects in the Object Lister.
- Choose which icons you want to display from the bottom section. (See Layer Icons.)
- Choose All to turn on all the filters, or None to turn off all the filters.
Sort
The Sort menu offers several sorting modes for the layers. When showing By Object, only the first three are available.
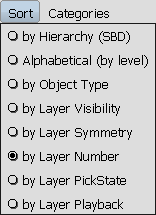
- Sort by Hierarchy (SBD)
- Lists the objects in the same order as they appear in the SBD window (Utilities > SBD > SBD Window).
- Sort Alphabetical (by level)
- Lists the objects in alphabetical order. When showing By Layer (Layer Bar) or By Layer (All), the layers are also listed alphabetically.
- Sort by Object Type
- Lists the objects in the following order: canvasses, construction entities, cameras, DAG nodes (groups of objects), curves, surfaces, meshes, and text objects.
When showing By Layer (Layer Bar) or By Layer (All), five additional sorting modes are available, based on different layer attributes:
- Sort by Layer Visibility
- Lists the visible layers first, followed by the invisible layers.
- Sort by Layer Symmetry
- Lists the layers that have symmetry turned on first, followed by the layers that have symmetry turned off.
- Sort by Layer Number
- Lists the layers in ascending layer number.
- Sort by Layer Pick State
- Lists the Pickable layers, followed by the Reference layers, and then the Inactive layers.
- Sort by Layer Playback
- Lists the layers with Layer Playback turned off first, followed by layers with Layer Playback turned on.
Categories
- Open Editor
- Opens the Layer Categories editor. See Windows > Information > Layer Categories.
- Show All
-
All layers in the scene are shown in the Object Lister.
- Uncategorized Layers
- Shows only layers that do not belong to any category (in both the Object Lister and the scene).
- Reference layers
-
Shows only layers that have been set to Reference (in both he Object Lister and the scene).
- Selected layers
-
Shows only layers that have been picked (in both the Object Lister and scene). To pick layers, click their names. To pick a number of layers,
 -click to pick layers that are contiguous, or -click
 (Windows) or
  -click (Mac) to pick layers that are separated from each other.
This menu also contains the names of all categories created through the Layer Categories editor. Choose a name to show all the layers belonging to that category.
Search and Pick
The Search & Pick field at the top right of the Object Lister window helps you dynamically sort and arrange objects. For example, if you have a large model, and want to group all the curves, type “curve” in this field, then press ![]() (Windows) or
(Windows) or ![]() (Mac). All objects whose names start with “curve” (case insensitive) are picked in the Object Lister, as well as the modeling window. You can scroll up and down in the Object Lister to check the picked objects and can cross-check in the modeling window.
(Mac). All objects whose names start with “curve” (case insensitive) are picked in the Object Lister, as well as the modeling window. You can scroll up and down in the Object Lister to check the picked objects and can cross-check in the modeling window.
Hold the ![]() (Windows) or
(Windows) or ![]() (Mac) key and click to unpick any curve object that is not required for the group. Then create a new group node or put the curve objects in an existing group node.
(Mac) key and click to unpick any curve object that is not required for the group. Then create a new group node or put the curve objects in an existing group node.
If a collapsed group node has a picked "curve" object, the group node expands, to make it easier to find the picked geometry.
You can also use the “*” character as a wildcard. For example, *shell* will find all objects whose names contain the string “shell”, and *30 will find all objects whose names end with “30”.
Object lister icons
| Icon | Meaning |
|---|---|
|
|
Camera |
|
|
Camera eye |
|
|
Camera up |
|
|
Camera view |
|
|
Canvas |
|
|
Info button. Click to bring up information about the number of curves, surfaces, trimmed surfaces, and canvases |
|
|
Cloud |
|
|
Construction plane |
|
|
Curve on surface |
|
|
Curve |
|
|
DAG (directed acyclic graph) node |
|
|
Instance |
|
|
Light |
|
|
Mesh |
|
|
Null node |
|
|
Overlay plane |
|
|
Point |
|
|
Scanned data |
|
|
Shell |
|
|
Surface |
|
|
Target |
|
|
Texture projection |
|
|
Trimmed surface |
|
|
Unknown object |
|
|
Vector |
Highlight colors
Objects and layers are highlighted in different colors to indicate the following:
- White - Selected object
- Light green - Object with construction history
- Light blue - Selected layer
- Yellow - Construction layer
- Brown - Reference layer (objects are not pickable but are snappable)
- Dark blue - Inactive layer (objects are templated)
Option box
- Embedded
- Turn on this option to display the Object Lister as a collapsible window which appears as a narrow vertical tab against the left-hand-side of the main Alias window when not in use.
To open the Embedded Object Lister window, simply roll over its tab. The window stays open as long as the mouse cursor remains within its boundaries.
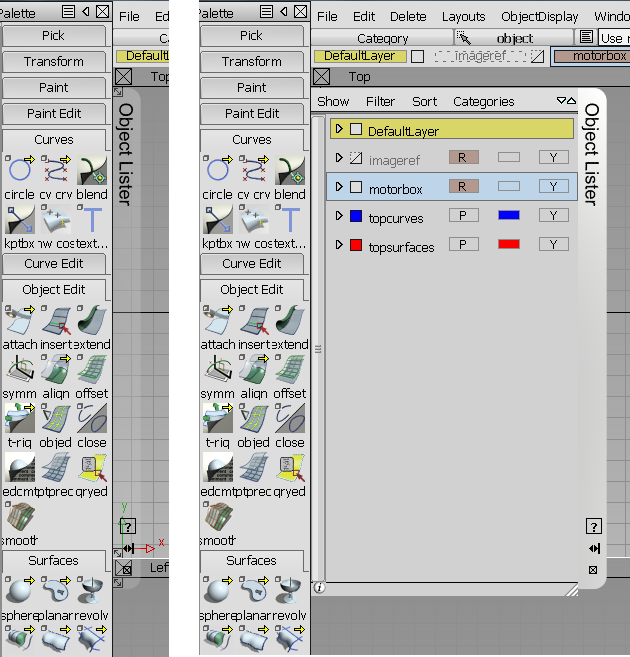
The window has two small icons on its tab. If you click the  icon, the Object Lister window only opens or closes when you click its tab. Click the icon again to return the window to its original state. To close the window, click the close
  icon.
icon.
You can also resize the lister by dragging the striped triangle in its lower right corner.