集成阶段 5:将角色设置为计算和跟随路径
与只运行 A* 计算来查找路径相比,跟随路径是一个更加复杂的问题。路径跟随意味着与运动和转向系统进行交互,这些系统处于动态且有时会受到限制。动态事件可能要求路径进行更改 - 例如,如果角色附近的 NavData 有所更改。您需要使用动态回避系统,以避免与移动的障碍物和其他角色等发生碰撞。
在此集成阶段,我们将使用由 Gameware Navigation 的路径跟随层提供的工具,使角色找到并跟随路径。
人物生命周期
路径跟随层中的关键组件是 Bot 类。通常,您将 Bot 类的实例分配给表示每个游戏角色(需要使用 Gameware Navigation 寻径和路径跟随系统)的类。(其他类型的角色(如玩家角色)通常由 CylinderObstacle 表示;请参见使用动态障碍物和 TagVolume。)人物使用寻径查询来计算到指定目标位置的路径,并通过每一帧计算所需速度来“跟随”该路径。
人物的生命周期意味着至少在三个位置(初始化、每一帧中的更新和销毁)与相应游戏实体进行直接交互。
随着继续集成,您将发现这一原理还用于其他类(如动态障碍物、TagVolume 和关注点)。
初始化
- 创建 BotInitConfig 对象的实例,根据需要设置其类成员并通过调用 Bot::Init() 进行传递。必须至少将 BotInitConfig::m_database 成员设置为指向数据库,该数据库应包含角色在路径规划和路径跟随时使用的 NavData。
- 通过使用 Bot::ComputeNewPathToDestination() 方法创建寻径查询实例,以便人物可以计算路径。如以下示例所示。使用 Bot::ComputeNewPathToDestination() 方法取消之前运行的所有查询,此后调用当前人物的 NavigationProfile 以使用 ProfileID 将 AStarQuery实例化。然后,调用 Bot::InitAStarQueryForBot() 方法来设置 BotConfig 的查询。最后,调用 Bot::ComputeNewPathAsync() 方法来异步计算查询并正确更改人物的路径。
注意:您可以自己初始化 AStarQuery,然后调用 Bot::ComputeNewPathAsync() 方法。但是,在调用 Bot::ComputeNewPathAsync() 方法前,您必须使用 Bot::IsComputingNewPath() 方法检查计算状态。
- 通过调用 Bot::AddToDatabase() 在数据库中激活人物,以便其能够规划路径,同时其他人物能够避免与其发生碰撞。生成游戏角色时通常会完成此操作。
更新
游戏角色在每一帧都需要与人物 进行交互,以便在需要时开始新路径计算,更新人物的当前状态并解释和应用路径跟随系统的结果。
- 当 Bot 在跟随某个路径时,您的角色类应该通过调用 m_navBot->GetBotOutput().m_outputVelocity 拾取每帧下的建议速度。您可以在需要时修改此所需轨迹,以便与动画和转向系统兼容。您应该将最终结果应用于游戏中的角色。
- 任何时候角色的位置或速度有所更改,您还必须相应地更新人物。您可以使用 Bot 类的成员函数来更新人物位置和速度。例如,要访问人物位置,可以调用 Bot::SetPosition()。
- 您还可能需要以各种不同的方式读取并响应路径跟随系统的当前状态。下面的示例包括一个针对是否到达目标位置的简单测试。有关详细信息,请参见监视路径跟随。
销毁
- 调用 Bot::RemoveFromDatabase() 方法使 World 中的其他人物不再考虑它。
- 将已保存到游戏中的人物对象的所有指针设置为 KY_NULL。这会递减引用统计机制,当不剩余任何引用时,将会透明销毁对象。
示例
以下示例显示了游戏角色类 MyGameEntity 对 Bot 类的相对简单使用。生成后,角色会在其初始位置和给定目标位置之间来回规划和跟随路径。
[Tutorial_FirstIntegration.cpp 中的代码]
#include "gwnavruntime/world/bot.h"
...

class MyGameEntity
{
public:

    MyGameEntity()
        : m_startPosition(0.0f, 0.0f, 0.0f)
        , m_destinationPosition(0.0f, 0.0f, 0.0f)
        , m_position(0.0f, 0.0f, 0.0f)
        , m_velocity(0.0f, 0.0f, 0.0f)
        , m_navBot(KY_NULL)
    {}

    void Initialize(Kaim::World* world, const Kaim::Vec3f& startPosition, const Kaim::Vec3f& destination);
    void Destroy();
    void Update(KyFloat32 simulationStepsInSeconds);
    bool HasArrived();

public:
    Kaim::Vec3f m_startPosition;
    Kaim::Vec3f m_destinationPosition;

    Kaim::Vec3f m_position;
    Kaim::Vec3f m_velocity;

    Kaim::Ptr<Kaim::Bot> m_navBot;
};

void MyGameEntity::Initialize(Kaim::World* world, const Kaim::Vec3f& startPosition, const Kaim::Vec3f& destination)
{
    m_position = startPosition;
    m_startPosition = startPosition;
    m_destinationPosition = destination;

    m_navBot = *KY_NEW Kaim::Bot;

    // We initialize the Bot at our desired start position
    Kaim::BotInitConfig botInitConfig;
    botInitConfig.m_database = world->GetDatabase(0);
    botInitConfig.m_startPosition = m_position;
    m_navBot->Init(botInitConfig);

    ...

    // We add the Bot to our Database.
    m_navBot->AddToDatabase();
    ...
}

void MyGameEntity::Destroy()
{
    m_navBot->RemoveFromDatabase();
    m_navBot = KY_NULL;
}

void MyGameEntity::Update(KyFloat32 simulationStepsInSeconds)
{
    if (m_navBot->GetFollowedPath() == KY_NULL && m_navBot->IsComputingNewPath() == false) // We need to compute a Path!
    {
        // Here, we ask the Bot to launch a path computation.
        // We should test the return code of this function, but as this tutorial is pretty simple, we are sure it cannot fail:
        //  - The AStarQuery is set from the default NavigationProfile.
        //  - We do not ask for a path computation while another path computation is in process.
        // Note that Kaim::Bot::ComputeNewPathToDestination() will run the query during the Kaim::World::Update().
        m_navBot->ComputeNewPathToDestination(m_destinationPosition);
    }

    // If we are arrived...
    if (HasArrived())
    {
        m_velocity = Kaim::Vec3f::Zero();

        // Clear the followed path.
        m_navBot->ClearFollowedPath();

        // Swap the positions.
        Kaim::Vec3f swap = m_destinationPosition;
        m_destinationPosition = m_startPosition;
        m_startPosition = swap;

        // Restart a move.
        m_navBot->ComputeNewPathToDestination(m_destinationPosition);
    }

    // Retrieve the velocity suggested by the path following system, if available.
    m_velocity = m_navBot->GetBotOutput().m_outputVelocity;

    // Perform a simple integration.
    m_position += m_velocity*simulationStepsInSeconds;

    // Inform our Bot that the entity has moved.
    // Note that the update will be effective after next World::Update() call
    m_navBot->SetPosition(m_position);
    m_navBot->SetVelocityAndFrontDirection(m_velocity);
}

bool MyGameEntity::HasArrived()
{
    KyFloat32 arrivalPrecisionRadius = m_navBot->GetConfig().m_pathProgressConfig.m_checkPointRadius;
    if (m_navBot->HasReachedPosition(m_destinationPosition, arrivalPrecisionRadius))
    {
        return true;
    }

    return false;
}

class MyGameLevel
{
public:
    ...
    void Update(float deltaTimeInSeconds);
    ...
protected:
    ...
    MyGameEntity m_entity;
};

bool MyGameLevel::Initialize(Kaim::World* world)
{
    ... Do all other initializations

    // Initialize my entity
    m_entity.Initialize(world, Kaim::Vec3f(-11.5963f,1.06987f,10.4563f), Kaim::Vec3f(-16.636f,-26.7078f,8.10107f));
    ...

    return true;
}
...

void MyGameLevel::Update(float deltaTimeInSeconds)
{
    ...
    m_entity.Update(deltaTimeInSeconds);
}

void MyGameLevel::Destroy()
{
    // Destroy my entity.
    m_entity.Destroy();

    ... Do all other destructions and releases.
}
上面的代码大多数使用路径跟随系统的默认行为。但是,路径跟随系统是高度可配置的,您可以根据游戏的需要定制该系统,方法是通过各种方式自定义该系统、响应在角色跟随路径时发生的事件,甚至是在必要时写入您自己的对相关类的实现。 有关详细信息,请参见寻径和路径跟随。
测试
将 Navigation Lab 连接到游戏,您应该会看到一个黄色圆柱体,它表示您的角色,该圆柱体会在为 AstarQuery 设置的起点和终点之间来回移动。例如:
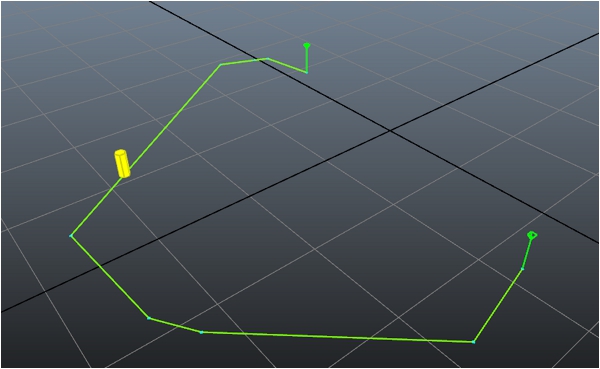
- 如果游戏中不存在任何物理特性,却还要将角色钳制到地面,则角色可能会从地形中跌下去或浮起来。
- 由于通过 NavMesh 的路径的优化方式存在细微差别,因此这两个方向的路径可能不会完全相同。
 除非另有说明,否则此作品受到 Creative Commons 署名-非商业性使用-相同方式共享 3.0 未本地化版本许可证的制约。请参见 Autodesk Creative Commons 常见问题(英文)以获取更多信息。