The effects and tools in the Media list appear from left to right in the order that Action processes them:
Lock and Slip
Use Slip to create a timing offset for your clip and Lock to lock media at a certain frame.
- In the Media list, drag the slip field for your chosen media.
A positive value starts the clip at the specified frame. A negative value creates a freeze frame effect where the first frame of the clip is held by the specified number of frames.
- To lock the media at a certain frame, drag the Lock field to the desired frame number, or click the Lock field to display the calculator to enter a frame number. Ctrl+Alt click the field to return it to Off.
Modular Keyer
When you load media into the Modular Keyer from Action, the front and matte clips for the selected media are loaded with the back clip and appear at the beginning of the processing pipeline. The front clip is used as the Front clip and the matte clip is used as the Key In clip for the processing pipeline. The back clip is used as the Back clip in the processing pipeline and is loaded as a reference only. Any modifications you make to the Back clip in the Modular Keyer are not used when you return to Action.
- In the Media list, double-click the corresponding MK field for your chosen media to enter the Modular Keyer.
- As you work in the Modular Keyer, select Action Context from the View box to preview the result.
- Click Return to return to Action. You do not have to click Render; the modifications are automatically applied to the media in Action.
- To mute a Modular Keyer effect, press Alt and click the MK media. The MK in the field turns black to signify the effect is muted. To unmute the MK effect, press Alt and click the field again.
The MK field is displayed in red if there is an error within the Modular Keyer, such as a broken input connection. Open the Message History viewer to see the error, and return to the Modular Keyer to fix the error.
Blur
You can quickly add Gaussian blur along the X and Y axes in the Media list, or enter the full Blur editor to have access to all blur settings, including other blur types, such as Radial and Defocus.
- In the Media list, drag the X or Y blur values to apply a Gaussian blur, or double-click the corresponding Blur field for your chosen media to enter the full Blur editor. Tip: Alt-drag over a front or matte X or Y Blur field to change both values proportionally; or press Alt+Shift and drag over any front or matte blur field to change all four fields proportionally.
- As you work in the Blur editor, select Action Context from the View box to preview the result.
- Click Exit to return to Action. You do not have to click Render; the modifications are automatically applied to the media in Action.
If you applied a blur type other than Gaussian, notice that the X and Y blur fields are not editable, and display as black. If you switch to a Gaussian blur type in the Blur editor, and return to Action, you are able to use the X and Y blur fields in the Media list (they display as white).
- To mute a Blur effect, press Alt and click the white check mark in the media field. The check mark turns black to signify the effect is muted. To unmute the Blur effect, press Alt and click the check mark again.
Colour Corrector and Colour Warper
You can apply separate Colour Corrector and Colour Warper effects on Action media.
- In the Media list, double-click the corresponding CC or CW field for your chosen media to enter the Colour Corrector or Colour Warper.
- As you work in the Colour Corrector or Colour Warper, select Action Context from the View box to preview the result.
- Click Exit to return to Action. You do not have to click Render; the modifications are automatically applied to the media in Action.
- To mute a CC or CW effect, press Alt and click the white check mark in the media field. The check mark turns black to signify the effect is muted. To unmute the CC or CW effect, press Alt and click the check mark again.
Divide
When compositing with images generated by rendering 3D objects over a black background, unwanted black often appears on translucent or anti-aliased areas of the media. Use the Divide tool to divide the front media by its associated matte media, which eliminates the black edges in the composite.
- In the Media list, select the media containing the unwanted black.
- Double-click the Divide field of the media containing the unwanted black.
The selected media's front is divided by its matte, resulting in correct colour in areas of transparency.
Crop
When you crop media, the front and matte clips are cropped together. You cannot crop the back clip. If you applied the media to more than one surface, all the surfaces are cropped.
You can animate a crop by changing the size and shape of the Crop box at different keyframes. You can also animate the softness of the Crop box.
To crop a clip with the Media list:
- In Action, click Media.
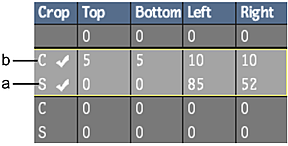
- Set values for cropping and softness in the Top, Bottom, Left, and Right fields. Once you set a value in one of the Crop or Softness fields, white checkmarks indicate that Crop and Softness are enabled.

(a) Softness area of Crop field (b) Crop area of Crop field
Tip: Alt-drag over one of the fields to change all four values proportionally.
To crop gesturally in the image window:
- Double-click the Crop field to enable Crop and Softness.
- In the View box, select Media Front or Media Matte.
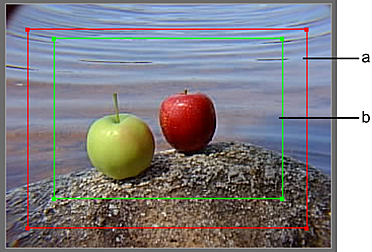
The clip appears in the image window with a red outline, which indicates the Crop box, and a green outline, which indicates the Softness box.

(a) Crop box (b) Softness box
Tip: You can use two viewports to view the crop interactively on both the front and the matte clips. - Set the corners of the Crop box and Softness box by dragging either the corners or edges of the red and green outlines.
The crop and softness values in the Media list are updated as you drag.
- Click Result.
The cropped media appears in the image window, and the front and matte clip share the same crop.
- To mute the Crop and Softness values, double-click the Crop field. To mute only the Softness, double-click the Softness area of the Crop field. When muted, a black checkmark appears in the Crop field.