Maya 2016 has a new look and feel that provides an improved user experience, without sacrificing familiarity with tools and workflows you already know. The user interface (UI) is now scalable and readable on multiple displays at varying resolutions giving you greater flexibility.
You'll notice a new color scheme that simplifies the UI, including refreshed icons, and a new default background color in the scene view (viewport). The appearance of the grid and Heads Up Display (HUD) are also adjusted for better visibility.
Many other important changes have been made, including:
- Streamlined menus and menu sets
- Updated shelves
- Redesigned Hotkey Editor
- High resolution display capabilities
- Multi-platform font support
Menu and menu set changes
The default menus and menu sets have been reorganized, with some menus moved or renamed to align tools and operations to your workflows. Here is a summary of changes:
Animation menu
-
The Skeleton and Skin menus are now found in the Rigging menu set
- The Geometry cache menu has been moved to a new Cache menu, which was the former Pipeline Cache menu that contained the Alembic and GPU Cache menus.
- The ATOM menu is now found under the File menu.
- The Set Keys and related keyframe options are now found in the Animation menu set Key menu.
- The Ghost, Snapshot, Turntable, and Motion Trail menu items are now found in the Animation menu set, Visualize menu.
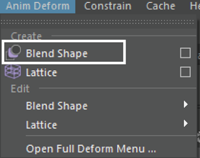
- The Create and Edit Deformers menus in the Animation menu set menu are now grouped under the Anim Deform menu.
Other menu changes
- The Surfaces and Polygons menu sets have been combined into a single Modeling menu set.
- XGen and Paint Effects menu options are now in the Generate menu in the Modeling menu set.
- The nDynamics and Dynamics menu sets have been replaced by an FX menu set.
- The Bifrost menu now appears in the FX menu set.
- The Particles and Soft/Rigid Bodies menus have been removed from Maya. Many of these menu options are available in the Legacy Particles section of the nParticles menu and Legacy Rigid Bodies section of the Field/Solvers menu.
- The Assets menu option now appears in the Create and Modify menus.
To find the new location of your menu or window, select Help > Find a Menu Item. Enter a search term and the window shows the path(s) to the item.
You can revert to the legacy Animate menu set with the Revert Animation to Default option in the Menu Sets Editor. To edit menu sets, see Custom menu sets.
To restore old menu sets, see Reuse a menu set from a previous version.
- Modeling menu set: F2
- Rigging menu set: F3
- Animation menu set: F4
- FX menu set: F5
- Rendering menu set: F6
Menu icons
Small icons now appear next to menu items in the main menus.
These icons reflect the buttons that appear elsewhere in the interface. For example, the blend shape icon next to the Blend Shape deformer in the Anim Deform menu is the same icon that appears for blend shapes in the Rigging shelf.

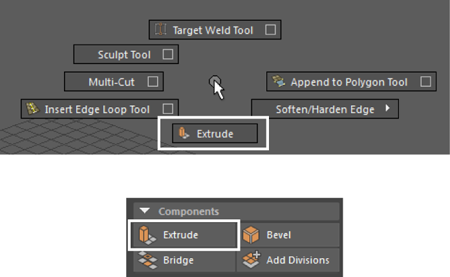
In addition, small icons also appear next to menu items in the marking menu. For example, the Extrude icon in the marking menu is the same icon that appears in the Modeling Toolkit.
If you do not want to see these icons, you can turn off the Show icons in menus preference in the Interface Preferences (Windows > Settings/Preferences > Preferences).
Updated Shelves

- The Curves shelf is now combined with the Surfaces shelf to create the Curves/Surfaces shelf.
- The Rigging shelf is new, and includes animation and deformation tools typically used for rigging characters.
- The Sculpting shelf is new.
- The new FX shelf includes often used tools previously found in the Dynamics, nCloth, nHair and Fluids shelves.
- The FX Caching shelf is new, and includes tools from the nCache menu.
- The PaintEffects, Toon, Muscle, Hair, and Fur shelf are hidden by default. To show them, use the Shelf Editor
To open the
Shelf Editor, use the new gear icon
 on the left to access the shelf menu. For more information on editing shelf layouts, see
Customize shelves. See
Load a shelf for information on how to restore shelf sets that were available in previous versions.
on the left to access the shelf menu. For more information on editing shelf layouts, see
Customize shelves. See
Load a shelf for information on how to restore shelf sets that were available in previous versions.
Redesigned Hotkey Editor
A redesigned Hotkey Editor makes it quicker and easier to create, edit, and assign hotkeys.
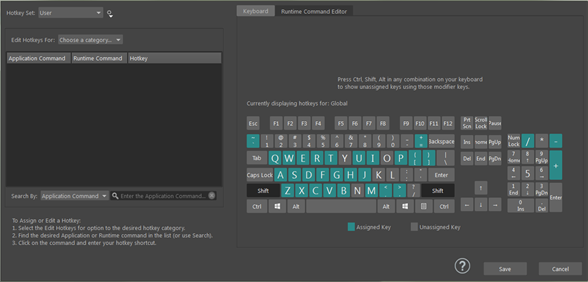
The new Hotkey Editor has:
- Simplified design
- Hotkey Sets and Contexts that let you associate specific hotkeys with a workflow and that you can save and share with other users
- Instant update when a hotkey is created, no need to restart
- Improvements to the Hotkey Lister so application command names (as they appear in the interface), runtime commands, and assigned hotkeys are listed together
- Improved hotkey search
High resolution display capabilities
The following enhancements improve how Maya works on high resolution displays.
Custom display resolution settings
New Interface Scaling preferences let you set the user interface resolution to scale according to your specifications. These settings provide better control of the readability of icons and text on a variety of different displays and devices. You can specify if you want Maya to use your system setting (default), use a custom setting, or to not scale at all.
For more information, see Interface preferences.
High resolution image support
The updated interface supports high resolution images for icons, cursors, and other images when running on a high resolution display device, like Ultra HD or 4K monitors. Three resolution settings are available: 100%, 150%, and 200%.
The default is to use 100%, but if you're running on a display with a higher resolution, Maya automatically uses a higher resolution image (150% or 200%). You can also take advantage of this feature for your own custom images.
For more information, see Use a high resolution custom icon for a shelf item.
Multi-platform font support
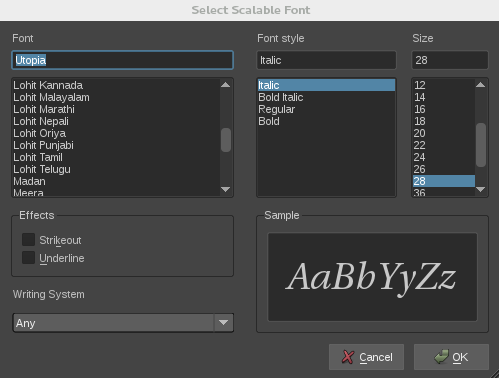
You can choose your font from the Select Scalable Font dialog box that is now the same on all operating systems. Maya remembers the font last used the next time it’s launched. Windows and Mac OS X operating systems use Times New Roman as the default. Linux operating systems use Utopia as the default.
- Existing scenes containing text geometry may behave differently. Check for warnings and error messages when you open scenes for the first time in Maya 2016.
- Existing scripts or plug-ins with makeTextCurves nodes must use new font names and other syntax to work in Maya 2016. See the makeTextCurves node in the Technical Documentation for more information.