The elemental component shaders

Here are the various surface component shaders currently implemented in the layering package:

Diffuse Reflection Component

The diffuse reflection component is very similar to the mia_material diffuse shading, as well as the diffuse elemental component defined in MDL. It has an Oren-Nayer roughness parameter for spreading the light more evenly. These are the parameters:

mila_diffuse_reflection
   "mila_diffuse_reflection" (
        color    "tint"        default 1 1 1,
        scalar   "roughness"   default 0,
        scalar   "quality"     default 1.0,          #: min 0 softmax 2.0

        scalar   "direct"      default 1.0,
        scalar   "indirect"    default 1.0
    )


tint
is the diffuse color.
roughness
sets the (Oren-Nayar) roughness in the range 0 to 1, where 0 is standard Lambertian shading. Higher roughness values yield a more "powdery" look to the surface.
direct
is a multiplier for the direct light (normally 1.0)
indirect
is a multiplier for the indirect light (normally 1.0)
"mila diffuse detail" on/off (string option, default off)
enables indirect detail, currently with path traced FG which mixes with regular FG. In 3.13, Prefer to use new GI technique rather than this feature.
quality/"mila diffuse quality"
Used to determine the number of samples (FG rays) shot for indirect detail. Prefer to use the string option instead of the shader local quality.
"mila diffuse detail distance" (string option, default 10.0)
How far the FG rays are shot. Shorter is faster, but yields a more localized indirect detail effect.

Glossy Reflection Component

The glossy reflection component is similar to the mia_material reflection shading, as well as the glossy elemental BSDF found in NVIDIA Material Description Language (MDL). In fact, this glossy reflection component adopts the use of roughness, which MDL uses, rather than glossiness used by the mia_material. In particular, we also provide a simple specular reflection component separately below for perfectly smooth surface components requiring mirror-like reflections. These are the parameters:

mila_glossy_reflection
   "mila_glossy_reflection" (
        color   "tint"                default 1 1 1,
        scalar  "roughness"           default 0.0, #: min 0.0 max 1.0
        scalar  "quality"             default 1.0, #: min 0.0 softmax 2.0
        
        scalar  "anisotropy"          default 1.0,
        scalar  "aniso_angle"         default 0,
        integer "aniso_channel"       default -1,

        boolean "use_max_dist"        default off,
        scalar  "max_dist"            default 0.0,
        boolean "use_max_dist_color"  default off,
        color   "max_dist_color"      default 0 0 0,

        scalar  "direct"              default 1.0,
        scalar  "indirect"            default 1.0
    )

tint
is the reflection color.
roughness
is the roughness of the material causing reflections. It ranges from 0.0 (flat like a mirror) to 1.0 (like diffuse). It can be considered to control the inverse of what was glossiness in the mia_material. This shader typically is used when roughness is above 0. It writes to the direct glossy reflection pass, but will write to the specular reflection pass, if roughness is set to 0.
quality/"mila glossy quality"
controls the number of rays used for a glossy reflection. The ray count adjusts based on roughness and the importance of the component relative to all the components, combined with ray importance. This local shader value is also multiplied by the global "mila glossy quality" string option, so all glossy shaders in a scene can be affected with a single control. Prefer to use the global string option rather than this local input.
anisotropy
is 1.0 for isotropic reflections. The actual value is the ratio of U reflectivity to V reflectivity, meaning, both values above and below 1.0 are valid, i.e. it is the "U vector scale factor" of reflections.
aniso_angle
defines the rotation of the anisotropy in the UV space, and aniso_channel defines from which texture mapping channel the U and V directions are derived. If set to -1, a default canonical direction based on object space is computed (does NOT relate to any of the texture coordinate spaces).
use_max_dist
enables limiting of ray lengths. By turning this on and setting a nonzero max_dist, the actual distance reflection rays are shot can be limited (for performance or effect). These rays fade either to the environment color (when use_max_dist_color is off) or the supplied max_dist_color (if it is on).
"mila use max dist inside" on/off (string option)
Use the above option only when reflecting internally inside of transmissive objects like glass. This is useful for correct color in colored glass. Typically, matching this to the same setting for the color in the transmissive component.
"mila single env sample" on/off (string option)
a string option which informs glossy reflection to use a single environment map sample (taken in the specular reflection direction) to be used instead of trying to multi-sample the environment. This is intended to be used in combination with shaders that pre-filter such environment lookup, such as mia_envblur. See the architectural shader library documentation about mia_envblur.
"mila use visible area highlight" on/off (string option)
enables a poor mans multiple importance sampling implementation. Balances reflection tracing and light sampling.
"mila visible area highlight" 0.0-1.0 (string option)
defines the fractional split behavior of visible area lights reflections and light sampled specularity.
-1
(the default, and recommended) an automatic heuristic is used to determine the value depending on glossiness.
0.0
visible area lights generate no specular highlights but are instead 100% visible in reflections. This is good for high-glossiness or specular surfaces, and for large area lights (any time the area light covers a larger subtended angle than the glossy cone).
1.0
visible area lights generate traditional glossy/specular highlights, and are not visible to reflection rays. This is good for surfaces with a low glossiness and where area lights are small.
0.0 > x > 1.0
any value greater than 0.0 but less than 1.0 is a blend between the two kinds of reflections. They are still kept in balance so the total energy is accurate.
More details about this parameter can be found on the technical information page.
"mila roughness exponent" default 3.0 (string option)
defines the curve for how roughness is mapped visually. The default of 3 provides roughly visually linear change of roughness, but since this can be quite subjective, and depend on further color processing, it is exposed here

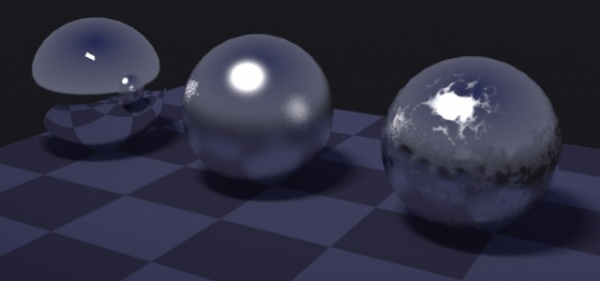
Left: Specular (glossiness=1.0). Center: Glossy  Right: texture-mapped glossiness
Left: Specular (glossiness=1.0).
Center: Glossy
Right: texture-mapped glossiness

Specular Reflection Component

The specular reflection component provides mirror-like reflection. It is similar to the mia_material reflection shading when that glossiness is set to 1. It also relates to the specular elemental BSDF used in MDL. These are the parameters:

mila_specular_reflection
    "mila_specular_reflection" (
        color   "tint"               default 1 1 1,

        boolean "use_max_dist"       default off,
        scalar  "max_dist"           default 0.0,
        boolean "use_max_dist_color" default off,
        color   "max_dist_color"     default 0 0 0,

        scalar  "direct"             default 1.0,
        scalar  "indirect"           default 1.0
    )


tint
is the reflection color.
use_max_dist
enables limiting of ray lengths. By turning this on and setting a nonzero max_dist, the actual distance reflection rays are shot can be limited (for performance or effect). These rays fade either to the environment color (when use_max_dist_color is off) or the supplied max_dist_color (if it is on).
"mila use max dist inside" on/off (string option)
Use the above option only when reflecting internally inside of transmissive objects like glass. This is useful for correct color in colored glass. Typically, matching this to the same setting for the color in the transmissive component.

Glossy Transmission Component

Implemented as basically the same as the mia_material refractive part - as before, the Architectural library documentation will fill in any gaps.

mila_glossy_transmission
    "mila_glossy_transmission" (
        color   "tint"                default 1 1 1,
        scalar  "roughness"           default 0.0, #: min 0.0 max 1.0
        scalar  "quality"             default 1.0, #: min 0.0 softmax 2.0
        scalar  "ior"                 default 1.2,
        
        scalar  "anisotropy"          default 1.0,
        scalar  "aniso_angle"         default 0,
        integer "aniso_channel"       default -1,

        boolean "use_max_dist"       default off,
        scalar  "max_dist"           default 0.0,
        boolean "use_max_dist_color" default off,
        color   "max_dist_color"     default 0 0 0,
        
        scalar  "direct"        default 1.0,
        scalar  "indirect"      default 1.0
    )


tint
is the color applied to the transmission/refraction at the surface (which is a simplistic way to model coloration of transparent objects - more on this below).
roughness
is the roughness of the material causing the transmission, ranging from 0.0 (flat mirror-like transmission) to 1.0 (diffuse).
quality
controls the number of rays used for a glossy transmission. The ray count adjusts based on roughness and the importance of the component relative to all the components, combined with ray importance. This local shader value is also multiplied by the global "mila glossy quality" string option, so all glossy shaders in a scene can be affected with a single control.
ior
is the index of refraction of the surface. If rays are travelling from the inside to the outside of the object (as defined by the normal vector), and the thin_walled parameter of the containing mila_material is notset, the inverse of this value is used.
anisotropy
is 1.0 for isotropic refractions. The actual value is the ratio of U spread to V spread of the refraction lobe, meaning, both values above and below 1.0 are valid, i.e. it is the "U vector scale factor" of refractions.
aniso_angle
defines the rotation of the anisotropy in the UV space, and aniso_channel defines from which texture mapping channel the U and V directions are derived. If set to -1, a default canonical direction based on object space is computed (does NOT relate to any of the texture coordinate spaces).
use_max_dist
enables limiting of ray lengths. By turning this on and setting a nonzero max_dist, the actual distance refraction rays are shot can be limited (for performance or effect), or proper volume attenuation effects can be modelled. When use_max_dist_color is off, the refraction rays fade to black (and then stop completely, improving performance). If use_max_dist_color is on, rays fade to the max_dist_color over the max_dist, being properly exponentially attenuated, such that at two times max_dist they are twice as attenuated and so on, like travelling through an absorbing medium. This is a much more realistic way to model colored refraction than changing the color at the surface. This is discussed in detail in the mia_material documentation.
"mila propagate alpha" on/off default on for mila_transparency (string option)
when on passes the alpha of the background through the transparency. This can be useful in some cases, however, in most use cases for composition, what one really wants to do is to replace the mila_glossy_transmission with a mila_transparency instead, which implicitly always passes alpha (as well as all other framebuffers) through.

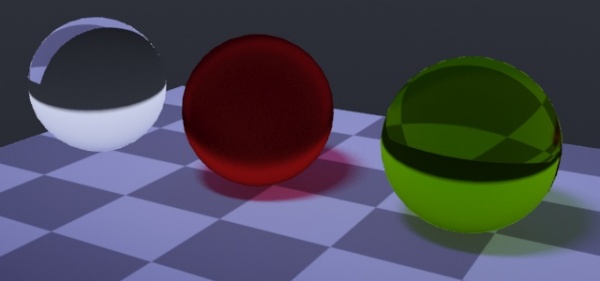
Left: Specular (glossiness=1.0). Center: Glossy  Right: With volume attenuation
Left: Specular (glossiness=1.0).
Center: Glossy and Surface Coloration
Right: With volume attenuation

Specular Transmission Component

Implemented as basically the same as the mia_material refractive part - as before, the Architectural library documentation will fill in any gaps.

mila_specular_transmission
    "mila_specular_transmission" (
        color   "tint"               default 1 1 1,
        scalar  "ior"                default 1.2,
        
        boolean "use_max_dist"       default off,
        scalar  "max_dist"           default 0.0,
        boolean "use_max_dist_color" default off,
        color   "max_dist_color"     default 0 0 0,
        
        scalar  "direct"             default 1.0,
        scalar  "indirect"           default 1.0
    )


tint
is the color applied to the transmission/refraction at the surface (which is a simplistic way to model coloration of transparent objects - more on this below).
ior
is the index of refraction of the surface. If rays are travelling from the inside to the outside of the object (as defined by the normal vector), and the thin_walled parameter of the containing mila_material is notset, the inverse of this value is used.
use_max_dist
enables limiting of ray lengths. By turning this on and setting a nonzero max_dist, the actual distance refraction rays are shot can be limited (for performance or effect), or proper volume attenuation effects can be modelled. When use_max_dist_color is off, the refraction rays fade to black (and then stop completely, improving performance). If use_max_dist_color is on, rays fade to the max_dist_color over the max_dist, being properly exponentially attenuated, such that at two times max_dist they are twice as attenuated and so on, like travelling through an absorbing medium. This is a much more realistic way to model colored refraction than changing the color at the surface. This is discussed in detail in the mia_material documentation.


Transparency Component

Transparency (not refraction, but "straight through" transparency)

mila_transparency
   "mila_transparency" (
       color  "transparency" default 1 1 1
   )
transparency
the transparency of the surface, typically used with thin-walled when the reflective layer on top of it uses a fresnel directionally-dependent weight. That models a thin glass type of surface. It does not make physical sense to have transparency, ie straight through rays, for non-thin-walled objects, when mixed with a fresnel outer layer, because that would be an inconsistent material index of refraction. On the other hand, with thin-walled, the inside of the material would be considered to have an ior = 1.0, and therefore transparency would be an effective replacement for specular transmission.

Transparency vs. Tranmission/Refraction

It is important to understand the conceptual difference of transparency and refraction in the layering shaders.

There is also a very important technical difference in that while transmission is implemented by the actual mila_glossy_transmission shader, transparency is implemented by the mila_material (root) node (as discussed on the framebuffers page), and is really propagated around the shade tree as meta-information.

This, however, matters little to the end user. From an end-user perspective, the important difference is that transparency is used for any time you want rays to go straight through, which can be used for:

For example, creating a solid glass sphere means applying a fresnel-weighted specular reflection component layered on top of a refracting specular transmission component. To create an "empty" glass sphere (think helicopter canopy or soap-bubble), apply a similar fresnel-weighed reflection component on top of a transparent component. The distinction between these two are similar to using the thin_walled parameter in mia_material
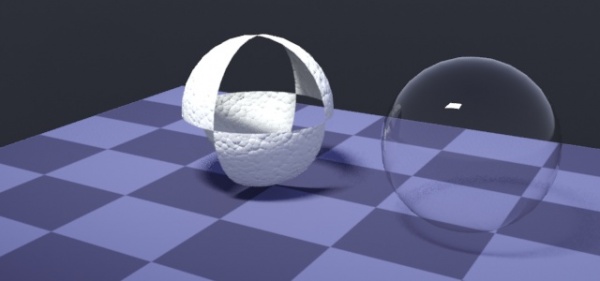
Left: Completely transparent (and you can't see it). Center: Texture-mapped transparency  Right: Using transparency for thin-walled effects
Left: Completely transparent (and you can't see it).
Center: Texture-mapped transparency used as a cutout
Right: Using transparency for thin-walled effects


Diffuse Transmission (Translucency) Component

Implemented as basically the same as the mia_material translucency

mila_diffuse_transmission
   "mila_diffuse_transmission" (
        color   "tint"         default 1 1 1,
        scalar  "roughness"    default 0,
        scalar  "quality"      default 1.0,          #: min 0 softmax 2.0

        scalar  "direct"       default 1.0,
        scalar  "indirect"     default 1.0
    )

This is a very simple shader which only does diffuse transmission on a face, and is hence only really useful on "thin" geometry, allowing light from the backside to shine through.

tint
is the amount of diffuse light coming from the back side to the front side of the surface
indirect
is the percent of that which is indirect light (normally 1.0)
Translucency (quad object only): Simple diffuse transmission

Emission Component

Allows an additional color to be added to the shading, as if the surface was emissive

mila_emission
   "mila_emission" (
       color    "tint"         default 1 1 1,
       scalar   "intensity"    default 10
   )

This is a very simple shader which only adds a constant value - but in a combinable fashion. Beyond that is does nothing complex, and any "emitted" light will only be picked up if FG is on.
color
is the color of the emitted (added) light.
intensity
is the intensity.
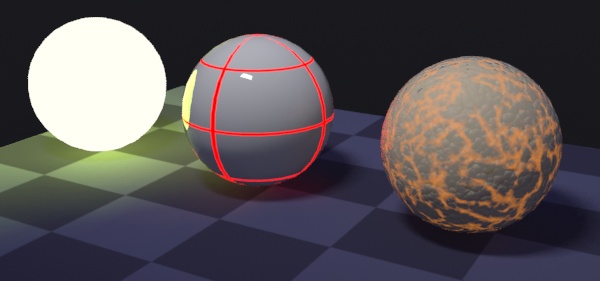
Emission - simple additional color
Emission example.
Left: Emission only
Center: Emission on top, emitting in a grid
Right: Emission on the lowest level, seeping through cracks. Like an exploding planet, perhaps.

Subsurface Scattering Component

This is a new implementation of sub-surface scattering, similar in the rendered appearance to the misss_fast_shader2 but without the use of lightmapping.

The use of lightmapping in the old SSS shaders has become an issue for several reasons:

This subsurface scattering (SSS) shader uses a "lazy evaluation" technique, where light is stored (cached) temporarily in a refillable buffer accessible to all cores at rendering time. So even in cases where the same light needs to be computed twice (due to buffer size overruns), it can be done in parallel on multiple cores. So while the old SSS shaders with the precomputed lightmap may potentially be faster after the lightmap had been computed, these new SSS shaders (which compute the same information on-the-fly) often win overall, since all the cores can be used properly.

Due to this, all parameters live on a single shaders, rather than being split up into the lightmapping and shading phase, as was done with the old misss_fast* shaders.

In most cases, this shader is the preferred way to do SSS now, and one should generally migrate away from the old misss_fast* shader set if one wants to do efficient layering, and especially for skin rendering. More on this in the tutorial page.

mila_scatter
    "mila_scatter" (
        color   "front_tint"       default 1.0 1.0 1.0,
        scalar  "front_weight"     default 1.0,
        vector  "front_radius"     default 20 10 5,
        color   "front_radius_mod" default 1 1 1,
        
        color   "back_tint"        default 1.0 1.0 1.0,
        scalar  "back_weight"      default 1.0,
        vector  "back_radius"      default 20 10 5,
        color   "back_radius_mod"  default 1 1 1,
        scalar  "back_depth",      # unassigned (zero) means "same as radius"
        
        scalar  "sampling_radius_mult"  default 2.0,
        
        scalar  "light_storage_gamma"   default 0.75,
        scalar  "scale_conversion"      default 1.0,
        
        integer "resolution"            default 2,
        scalar  "quality"               default 1.0,

        scalar  "direct"                default 1.0,
        scalar  "indirect"              default 1.0
    )

The new shader still uses the same division into "front" and "back" as the old misss_fast* shaders (see the manual for the "subsurface" library for more information about "front" vs. "back"). However, in most day-to-day cases, one would set these to the same values, since the colorization of the scattering is now done with the per-color scatter radii, so that red automatically scatters further, for example. This means that rather than making the "back" scattering red manually, this happens by itself.<&p>

This also means that the shader still inherently work in a screen based coordinate space. And while the new parameters are much closer to how "physical" scattering works, the shader is still a bit of a "trick" and does not claim to be absolutely physically accurate - rather to be extremely visually convincing.

These are the parameters:

front_tint
front_weight
are the color and weight (amount) of "front" scattering. The value for weight is generally left at 1.0 since you would usually control amounts in the containing mila_layer instead
front_radius
is a vector with three different radii, for the red, green and blue light respectively. Generally, red scatters the most, green less, and blue very little. Note, that the falloff is exponential and has no hard stop (unlike the old misss_fast_shader shader), so the value set here is the distance at which the light has diminished to 10 precent of its original intensity, NOT where the intensity is zero.
front_radius_mod
is a color parameter allowing the modification of the scatter radii. This exists to ease applying a texture map for changing the scatter radii across the surface; the texture can vary within a normal black-to-white range, which is multiplied by the values set in the front_radius parameters.
back_tint
back_weight
back_radius
back_radius_mod
back_depth
work identically to their front_* counterparts. The only difference is that there is a back_depth parameter that defines how "deep" the scattering goes. By default it is 0.0 and means the scattering is uniform (reaches the same distance both in depth and side-to-side)
sampling_radius_mult
is a multiplier for the largest radii set in either of the front_radius and back_radius for within which any samples are actually taken. So if the largest of any these radii is e.g. 10 units, setting this parameter to 2.0 will cause samples to actually be taken within 20 units distance, completely ignoring any light outside that radius. Setting this value too small, can yield a visible hard cutoff to the scattering. Setting it too large, and too many samples are wasted in far away samples with extremely small contribution; since the falloff is exponential, and the scattering radii parameters are defined as "distance until 10 percent contribution" the furthest samples would have a weight of 10 percent raised to the power of this parameter (2 = 1 percent, 3 = 0.1 percent, 4 = 0.01 percent etc)
light_storage_gamma
is applied to the diffuse angular distribution (normally a Lambertian cosine) before the light is stored by the shader. Generally this is a value slightly lower than one, which is a power to which the cosine function is raised. A cosine raised to a power less than one will "flatten" it out and make the bulge "wider", spreading out the light more, and helps the apparent simulation of the scattering. The default value is 0.75. When using the old misss_fast... shaders, this is equivalent to the gamma value used in the misss_lambert_gamma shader.
scale_conversion
is a divider applied on the given radii measurements, to map the values given to actual scene units. So setting e.g. the front_radius to 10,5,2 and scale_conversion to 10 makes the effective radii used 1, 0.5, 0.2
indirect
is a multiplier applied to any indirect light reaching the shader
resolution
defines the actual resolution of the light storage. The storage is done roughly in screen space, and 1 means "same resolution as render", 2 means "half resolution", 3 means "third resolution" etc, with 0 the special case meaning "double resolution". The default is 2 (half resolution) and is often plenty. New in 3.13, the special value of -1, means brute force calculation each intersection without interpolation from previously stored values. It is useful for extreme close-ups.
quality/"mila scatter quality" (string option)
controls the number of samples taken in the map of stored light values. Prefer to use the global string option over the local quality. May also be affected by trace depth and other considerations, for better optimization. Also note, that the impact of the sampling_radius_mult parameter is huge, and should probably not be turned up in many cases ... the default value of 2 will take samples out at twice the maximum radius distance, front or back, as to where the filter weight is 1%.

Left: SSS layer only. Center: SSS + diffuse (to see bumps)  Right: SSS + Diffuse + Reflection
Left: SSS only.
Center: SSS + diffuse (to see bumps)
Right: SSS + Diffuse + Reflection