Motion Blur Shaders
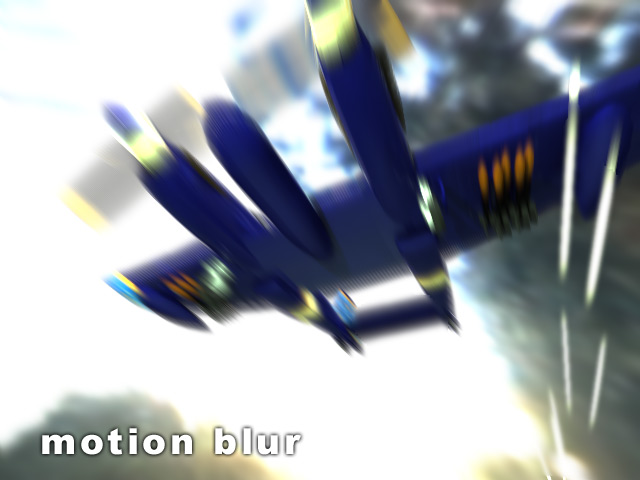
Motion Blur
Introduction
Real world objects photographed with a real world camera exhibit
motion blur. When rendering in mental ray, one has several
choices for how to achieve these trade-offs. There are three
principally different methods:
- Raytraced 3d motion blur
- Fast rasterizer (aka. "rapid scanline") 3d motion blur
- Post processing 2d motion blur
Each method has it's advantages and disadvantages:
Raytraced 3d Motion Blur
This is the most advanced and "full featured" type of motion blur.
For every spatial sample within a pixel, a number of temporal rays
are sent. The number of rays are defined by the "time contrast" set
in the options block, the actual number being 1 / "time contrast"
(unless the special mode "fast motion blur" is enabled, which sends
a single temporal sample per spatial sample1).
Since every ray is shot at a different time, everything is
motion blurred in a physically correct manner. A flat moving mirror
moving in it's mirror plane will only show blur on it's edges -
the mirror reflection itself will be stationary. Shadows, reflections,
volumetric effects... everything is correctly motion blurred. Motion
can be multi-segmented, meaning rotating object can have motion
blur "streaks" that go in an arc rather than a line.
But the trade-off is rendering time, since full ray tracing is
performed multiple times at temporal sampling locations, and
every ray traced evaluates the full shading model of the sample.
With this type of motion blur, the render time for a motion blurred
object increases roughly linearly with the number of temporal
samples (i.e. 1 / "time contrast").
Fast Rasterizer (aka "Rapid Scanline") Motion Blur
The rasterizer is the new "scanline" renderer introduced in mental
ray 3.4, and it performs a very advanced subpixel tessellation which
decouples shading and surface sampling.
The rasterizer takes a set of shading samples and allows a low
number of shading samples to be re-used as spatial samples. The
practical advantage is that fast motion blur (as well as extremely
high quality anti aliasing, which is why one should generally use the
rasterizer when dealing with hair rendering) is possible.
The trade-off is that the shading samples are re-used. This means
that the flat mirror in our earlier example will actually smear
the reflection in the mirror together with the mirror itself. In
most practical cases, this difference is not really visually
significant.
The motion blur is still fully 3d, and the major advantage is that
the rendering time does not increase linearly with the
number of samples per pixel, i.e. using 64 samples per pixel is
not four times slower than 16 samples. The render time
is more driven by the number of shading samples per pixel.
Post Processing 2d Motion Blur
Finally we have motion blur as a post process. It works by using
pixel motion vectors stored by the rendering phase and "smearing"
these into a visual simulation of motion blur.
Like using the rasterizer, this means that features such as
mirror images or even objects seen through foreground transparent
object will "streak" together with the foreground object.
Furthermore, since the motion frame buffer only stores one segment,
the "streaks" are always straight, never curved.
The major advantage of this method is rendering speed. Scene or
shader complexity has no impact. The blur is applied as a mental
ray "output shader", which is executed after the main rendering
pass is done. The execution time of the output shader depends on
how many pixels need to be blurred, and how far each pixel needs
to be "smeared".
Considerations when Using 2d Motion Blur
Rendering Motion Vectors
The scene must be rendered with the motion vectors
frame buffer enabled and filled with proper motion vectors.
This is accomplished by rendering with motion blur turned
on, but with a shutter length of zero.
    shutter 0 0
    motion on
Note the order: "motion on" must come after "shutter 0 0".
In older versions of mental ray the following construct was
necessary:
    motion on
    shutter 0 0.00001
    time contrast 1 1 1 1
Which means:
- Setting a very very short but non-zero shutter length
- Using a time contrast of 1 1 1 1
If there is a problem and no motion blur is visible, try the
above alternate settings.
Visual Differences - Opacity and Backgrounds
The 3d blur is a true rendering of the object as it moves
along the time axis. The 2d blur is a simulation of this
effect by taking a still image and streaking it along the
2d on-screen motion vector.
It is important to understand that this yields slightly different
results, visually.
For example, an object that moves a distance equal to
it's own width during the shutter interval will
effectively occupy each
point along it's trajectory 50 percent of the time. This means
the motion blurred "streak" of the object will effectively be rendered
50 percent transparent, and any background behind it will show through
accordingly.
In contrast, an object rendered with the 2d motion blur will be
rendered in a stationary position, and then these pixels are later
smeared into the motion blur streaks. This means that over the
area the object originally occupied (before being smeared) it will
still be completely opaque with no background showing through, and
the "streaks" will fade out in both directions from this location,
allowing the background to show through on each side.
The end result is that moving objects appear slightly more "opaque"
when using 2d blur vs true 3d blur. In most cases and for moderate
motion, this is not a problem and is never perceived as a problem.
Only for extreme cases of motion blur will this cause any significant
issues.
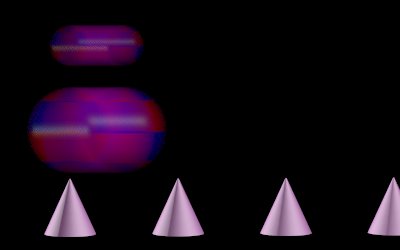
3D blur
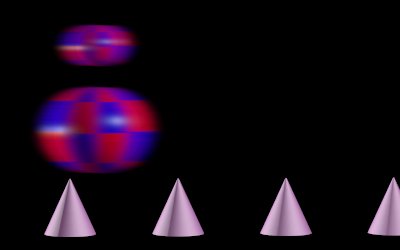
2D blur
Shutters and Shutter Offsets
To illustrate this behavior of the mental ray shutter interval
we use these images of a set of still cones and two moving
checkered balls that move such that on frame 0 they are over
the first cone, on frame 1 they are over the second cone, etc:
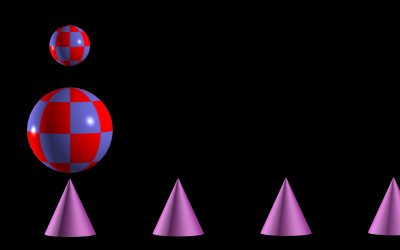
Object at t=0

Object at t=1
When using 3d motion blur, the mental ray virtual cameras
shutter open at the time set by "shutter offset" and closes
at the time set by "shutter".
Here is the result with a shutter offset of 0 and a shutter of 0.5 -
the objects blur "begins" at t=0 and continues over to t=0.5:

3d blur, shutter open at t=0 and close at t=0.5
Now when using the 2d motion blur it is important to
understand how it works. The frame is rendered at the "shutter
offset" time, and then those pixels are streaked
both forwards and backwards to create the blur effect,
hence, with the same settings, this will be the resulting blur:
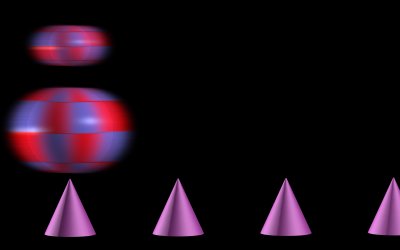
2d blur, shutter offset=0, mip_motionblur shutter=0.5
Note this behavior is different than the 3d blur case! If
one need to mix renderings done with both methods, it is
important to use such settings to make the timing of the blur identical.
This is achieved by changing the "shutter offset" time to the
desired center time of the blur (in our case t=0.25), like
this:
    shutter 0.25 0.25
    motion on

2d blur, shutter offset=0.25, mip_motionblur shutter=0.5
Note how this matches the 3d blurs setting when shutter offset is 0.
If, however, the 3d blur is given the shutter offset of 0.25 and shutter
length 0.5 (i.e. a "shutter 0.25 0.75" statement), the result is this:
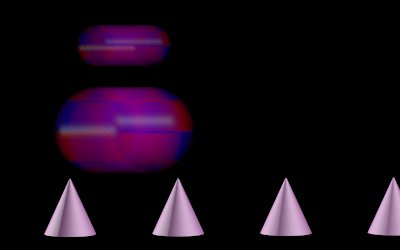
3d blur, shutter open at t=0.25 and close at t=0.75
Hence it is clear that when compositing renders done with different
methods it is very important to keep this difference in timing
in mind!
The mip_motionblur Shader
The mip_motionblur shader is a mental ray output shader for
performing 2.5d2 motion blur as a
post process.
    declare shader "mip_motionblur" (
            scalar  "shutter",
            scalar  "shutter_falloff",
            boolean "blur_environment",
            scalar  "calculation_gamma",
            scalar  "pixel_threshold",
            scalar  "background_depth",
            boolean "depth_weighting",
            string  "blur_fb",
            string  "depth_fb",
            string  "motion_fb",
            boolean "use_coverage"
        )
        version 1
        apply output
    end declare
shutter is the amount of time the shutter is "open". In practice
this means that after the image has been rendered the pixels are smeared
into streaks in both the forward and backward direction, each a distance equal
to half the distance the object moves during the shutter time.
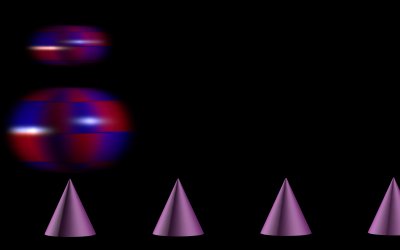
shutter_falloff sets the drop-off speed of the smear, i.e. how
quickly it fades out to transparent. This tweaks the "softness" of the
blur:
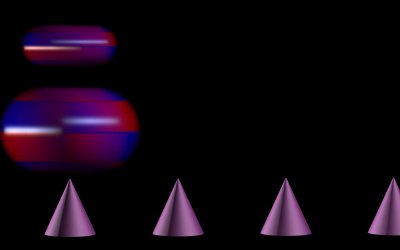
falloff = 1.0
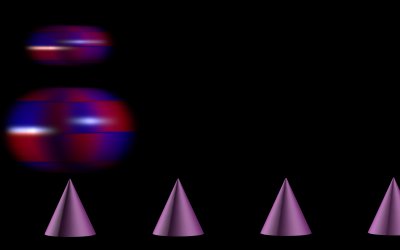
falloff = 2.0
falloff = 4.0
Notice how the highlight is streaked into an almost uniform line in
the first image, but tapers off much more gently in the last image.
It is notable that the perceived length of the motion blur
diminishes with increased falloff, so one may need to compensate
for it by increasing the shutter slightly.
Therefore, falloff is especially useful when wanting the effect
of over-bright highlights "streaking" convincingly: By using an inflated
shutter length (above the cinematic default of 0.5) and a higher falloff,
over-brights have the potential to smear in a pleasing fashion.
blur_environment defines if the camera environment (i.e.
the background) should be blurred by the cameras movement or not.
When on, pixels from the environment will be blurred, and
when off it will not. Please note that camera driven
environment blur only works if "scanline" is off in the
options block.
If the background is created by geometry in the scene, this
setting does not apply, and the backgrounds blur will be that of
the motion of said geometry.
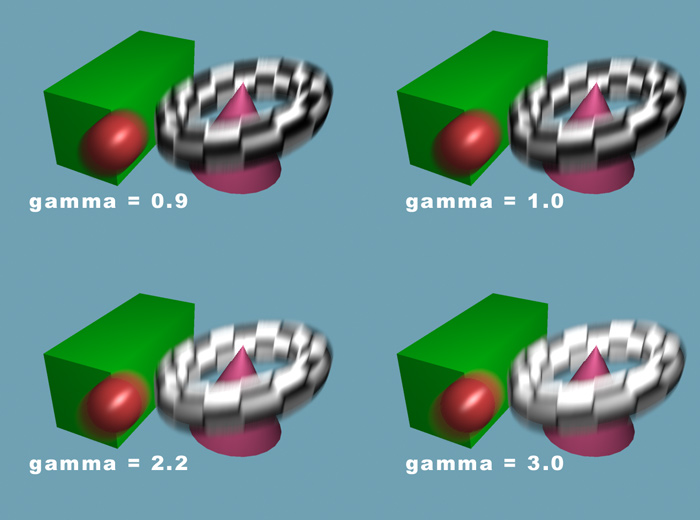
calculation_gamma defines in what gamma color space blur
calculations take place. Since mental ray output shaders are performed
on written frame buffers, and these buffers (unless floating point)
already have any gamma correction applied, it is important that post
effects are applied with the appropriate gamma.
If you render in linear floating point and plan to do the proper gamma
correction at a later stage, set calculation_gamma to 1.0,
otherwise set it to the appropriate value. The setting can also be
used to artistically control the "look" of the motion blur, in which
a higher gamma value favors lightness over darkness in the streaks.
Various gammas
Notice how the low gamma examples seem much "darker", and how the
blur between the green box and red sphere looks questionable. The
higher gamma values cause a smoother blend and more realistic motion
blur. However, it cannot be stressed enough, that if gamma correction
is applied later in the pipeline the calculation_gamma
parameter should be kept at 1.0, unless one really desires the favoring
of brightness in the blur as an artistic effect.
The pixel_threshold is a minimum motion vector length (measured
in pixels) an object must move before blur is added.
If set to 0.0 it has no effect, and every object even with
sub-pixel movement will have a slight amount of blur. While this is
technically accurate, it may cause the image to be perceived as
overly blurry.
For example, a cockpit view from a low flying jet plane rushing away
towards a tropical island on the horizon may still add a some motion blur
to the island on the horizon itself even though its movement is very
slight. Likewise, blur is added even for an extremely slow pan across an
object. This can cause things to be perceived slightly "out of focus",
which is undesirable.
This can be solved by setting pixel_threshold to e.g. 1.0, which
in effect subtracts one pixel from the length of all motion vectors and
hence causing all objects moving only one pixel (or less) between
frames not to have any motion blur at all. Naturally, this value should
be kept very low (in the order of a pixel or less) to be anywhere near
realistic, but it can be set to higher value for artistic effects.
The background_depth sets a distance to the background, which
helps the algorithm figure out the depth layout of the scene. The value
should be about as large as the scene depth, i.e. anything beyond this
distance from the camera would be considered "far away" by the algorithm.
If depth_weighting is off, a heuristic algorithm is used to
depth sort the blur of objects. Sometimes the default algorithm can
cause blur of distant objects imposing on blurs of nearby objects.
Therefore an alternate algorithm is available by turning
depth_weighting on.
This causes objects closer to the camera than background_depth
to get an increasingly "opaque" blur than further objects, the closer
objects blurs much more likely to "over-paint" further objects blurs.
Since this may cause near-camera objects blurs to be unrealistically
opaque, the option defaults to being off. This mode is most useful when
there is clear separation between a moving foreground object against
a (comparatively) static background.
blur_fb sets the ID3 of the frame buffer to be blurred.
An empty string ("") signifies the main color frame buffer.
The frame buffer referenced must be a RGBA color buffer and must be
written by an appropriate shader.
depth_fb sets the ID of the frame buffer from which to obtain
depth information. An empty string ("") signifies the main
mental ray z depth frame buffer. The frame buffer referenced must be a depth
buffer and must be written by an appropriate shader.
motion_fb works identically to depth_fb but for the motion
vector information, and the empty string here means the default mental ray motion
vector frame buffer. The frame buffer referenced must be a motion buffer and must
be written by an appropriate shader.
use_coverage, when on, utilizes information in the "coverage" channel
rather than the alpha channel when deciding how to utilize edge pixels that
contain an anti-aliased mix between two moving objects.
Using mip_motionblur
As mentioned before, the shader mip_motionblur requires the scene to be
rendered with motion vectors:
    shutter 0 0
    motion on
The shader itself must also be added to the camera as an output shader:
   shader "motion_blur" "mip_motionblur" (
      "shutter"          0.5,
      "shutter_falloff"  2.0,
      "blur_environment" on
   )
   camera "...."
      output "+rgba_fp,+z,+m" = "motion_blur"
      ...
   end camera
The shader requires the depth ("z") and motion ("m") frame buffers and
they should either both be interpolated ("+") or neither ("-").
The shader is optimized for using interpolated buffers but non-interpolated
work as well.
If one wants to utilize the feature that the shader properly preserves
and streaks over-brights (colors whiter than white) the color frame buffer
must be floating point ("rgba_fp"), otherwise it can be plain "rgba".
Multiple Frame Buffers and Motion Blur
If one is working with shaders that writes to multiple frame buffers
one can chain multiple copies of the mip_motionblur shader after
one another, each referencing a different blur_fb, allowing one
to blur several frame buffers in one rendering operation. Please note
that only color frame buffers can be blurred!
Also please note that for compositing operations it is not
recommended to use a calculation_gamma other than 1.0
because otherwise the compositing math may not work correctly.
Instead, make sure to use proper gamma management in the compositing
phase.
Good Defaults
Here are some suggested defaults:
For a fairly standard looking blur use shutter of 0.5 and a
shutter_falloff of 2.0.
For a more "soft" looking blur turn the shutter up to
shutter 1.0 but also increase the shutter_falloff
to 4.0.
To match the blur of other mental ray renders, remember to set the
mental ray shutter offset (in the options block) to half of that of
the shutter length set in mip_motionblur. To match the
motion blur to match-moved footage (where the key frames tend to
lie in the center of the blur) use a shutter offset of 0.
The mip_motion_vector Shader
Sometimes one wishes to do compositing work before applying motion blur,
or one wants to use some specific third-party motion blur shader. For
this reason the mip_motion_vector shader exists, the purpose of
which is to export motion in pixel space (mental ray's standard motion
vector format is in world space) encoded as a color.
There are several different methods of encoding motion as a color and
this shader supports the most common.
Most third party tools expect the motion vector encoded as colors
where red is the X axis and green is the Y axis.
To fit into the confines of a color (especially when
not using floating point and a color only reaches from black to white)
the motion is scaled by a factor (here called max_displace) and
the resulting -1 to 1 range is mapped to the color channels 0 to 1
range.
The shader also support a couple of different floating point output
modes.
The shader looks as follows:
    declare shader "mip_motion_vector" (
            scalar  "max_displace"    default 50.0,
            boolean "blue_is_magnitude",
            integer "floating_point_format",
            boolean "blur_environment",
            scalar  "pixel_threshold",
            string  "result_fb",
            string  "depth_fb",
            string  "motion_fb",
            boolean "use_coverage"
        )
        version 2
        apply output
    end declare
The parameter max_displace sets the maximum encoded motion
vector length, and motion vectors of this number of pixels (or above)
will be encoded as the maximum value that is possible to express within
the limit of the color (i.e. white or black).
To maximally utilize the resolution of the chosen image format, it
is generally advised to use a max_displace of 50 for 8 bit
images (which are not really recommended for this purpose) and a
value of 2000 for 16 bit images. The shader outputs an informational
statement of the maximum motion vector encountered in a frame to aid
in tuning this parameter. Consult the documentation for your
third party motion blur shader for more detail.
If the max_displace is zero, motion vectors are encoded
relative to the image resolution, i.e. for an image 600 pixels wide
and 400 pixels high, a movement of 600 pixels in positive X is encoded
as 1.0 in the red channel, a movement 600 pixels in negative X is encoded
as 0.0. A movement in positive Y of 400 pixels is encoded as 1.0 in the
blue channel etc4.
blue_is_magnitude, when on, makes the blue color channel
represent the magnitude of the blur, and the red and green only encodes
the 2d direction only. When it is off, the blue channel is unused and
the red and green channels encode both direction and magnitude. Again,
consult your third party motion blur shader
documentation5.
If floating_point_format is nonzero the shader will write real,
floating point motion vectors into the red and green channels. They are not
normalized to the max_displace length, not clipped and will contain
both positive and negative values. When this option is turned on
neither max_displace nor blue_is_magnitude has any effect.
Two different floating point output formats are currently supported:
- 1: The actual pixel count is written as-is in floating point.
- 2: The pixel aspect ratio is taken into
account6
such that the measurement of the distance the pixel moved
is expressed in pixels in the Y direction, the X component will
be scaled by the pixel aspect ratio.
More floating point formats may be added in the future.
When blur_environment is on, motion vectors are generated for the
empty background area controlled by the camera movement. This option does
not work if the scanline renderer is used.
The pixel_threshold is a minimum motion vector length (measured
in pixels) an object must move before a nonzero vector is generated.
In practice, this length is simply subtracted from the motion vectors
before they are exported.
result_fb defines the frame buffer to which the result is written.
If it is unspecified (the empty string) the result is written to the standard
color buffer. However, it is more useful to define a separate frame buffer
for the motion vectors and put its ID here. That way both the beauty render
and the motion vector render are done in one pass. It should be a color buffer,
and should not contain anything since it's contents will be overwritten by
this shader anyway.
depth_fb sets the ID of the frame buffer from which to obtain
depth information. An empty string ("") signifies the main
mental ray z depth frame buffer. The frame buffer referenced must be a depth
buffer and must be written by an appropriate shader.
motion_fb works identically to depth_fb but for the motion
vector information, and the empty string here means the default mental ray motion
vector frame buffer. The frame buffer referenced must be a motion buffer and must
be written by an appropriate shader.
Using mip_motion_vector
The same considerations as when using mip_motionblur (page usingpostblur)
about generating motion vectors, as well as the discussion on page timing
above about the timing difference between post processing motion blur vs.
full 3d blur both apply.
Furthermore, one generally wants to create a separate frame buffer for the
motion vectors, and save them to a file. Here is a piece of pseudo .mi syntax:
   options ...
      ...
      # export motion vectors
      shutter 0 0
      motion on
      ...
      # Create a 16 bit frame buffer for the motion vectors
      frame buffer 0 "rgba_16"
   end options
   ...
   shader "motion_export" "mip_motion_vectors" (
      "max_displace"     2000,
      "blur_environment" on,
      # our frame buffer
      "result_fb"        "0"
   )
   ...
   camera "...."
      # The shader needs z, m
      output "+z,+m" = "motion_export"
      # Write buffers
      output "+rgba" "tif" "color_buffer.tif"
      output "fb0"   "tif" "motion_buffer.tif"
      ...
   end camera
Footnotes
- 1
-
"Fast motion blur" mode is enabled by setting "time contrast" to
zero and having the upper and lower image sampling rates the same,
i.e. something like "samples 2 2". Read more about "Fast motion
blur" mode at http://www.lamrug.org/resources/motiontips.html
- 2
- Called "2.5d" since it also takes
the Z-depth relationship between objects into account
- 3
-
This parameter is of type string to support the named frame buffers
introduced in mental ray 3.6. If named frame buffers are not used, the
string will need to contain a number, i.e. "3" for frame buffer
number 3.
- 4
- This mode will not work with 8 bit images
since they do not have sufficient resolution.
- 5
- ReVisionFX "Smoothkit" expects vectors using
blue_is_magnitude turned on, whereas their
"ReelSmart Motion Blur" do not.
- 6
- Compatible with Autodesk Toxik.


